How to Install Sod: Top 5 Tips for Success 2024
How to install sod offers a quick path to a vibrant green lawn. For those wanting to beautify their outdoor space without the long wait of growing grass from seed, instant lawn is the solution. Here’s a summary to get you started:
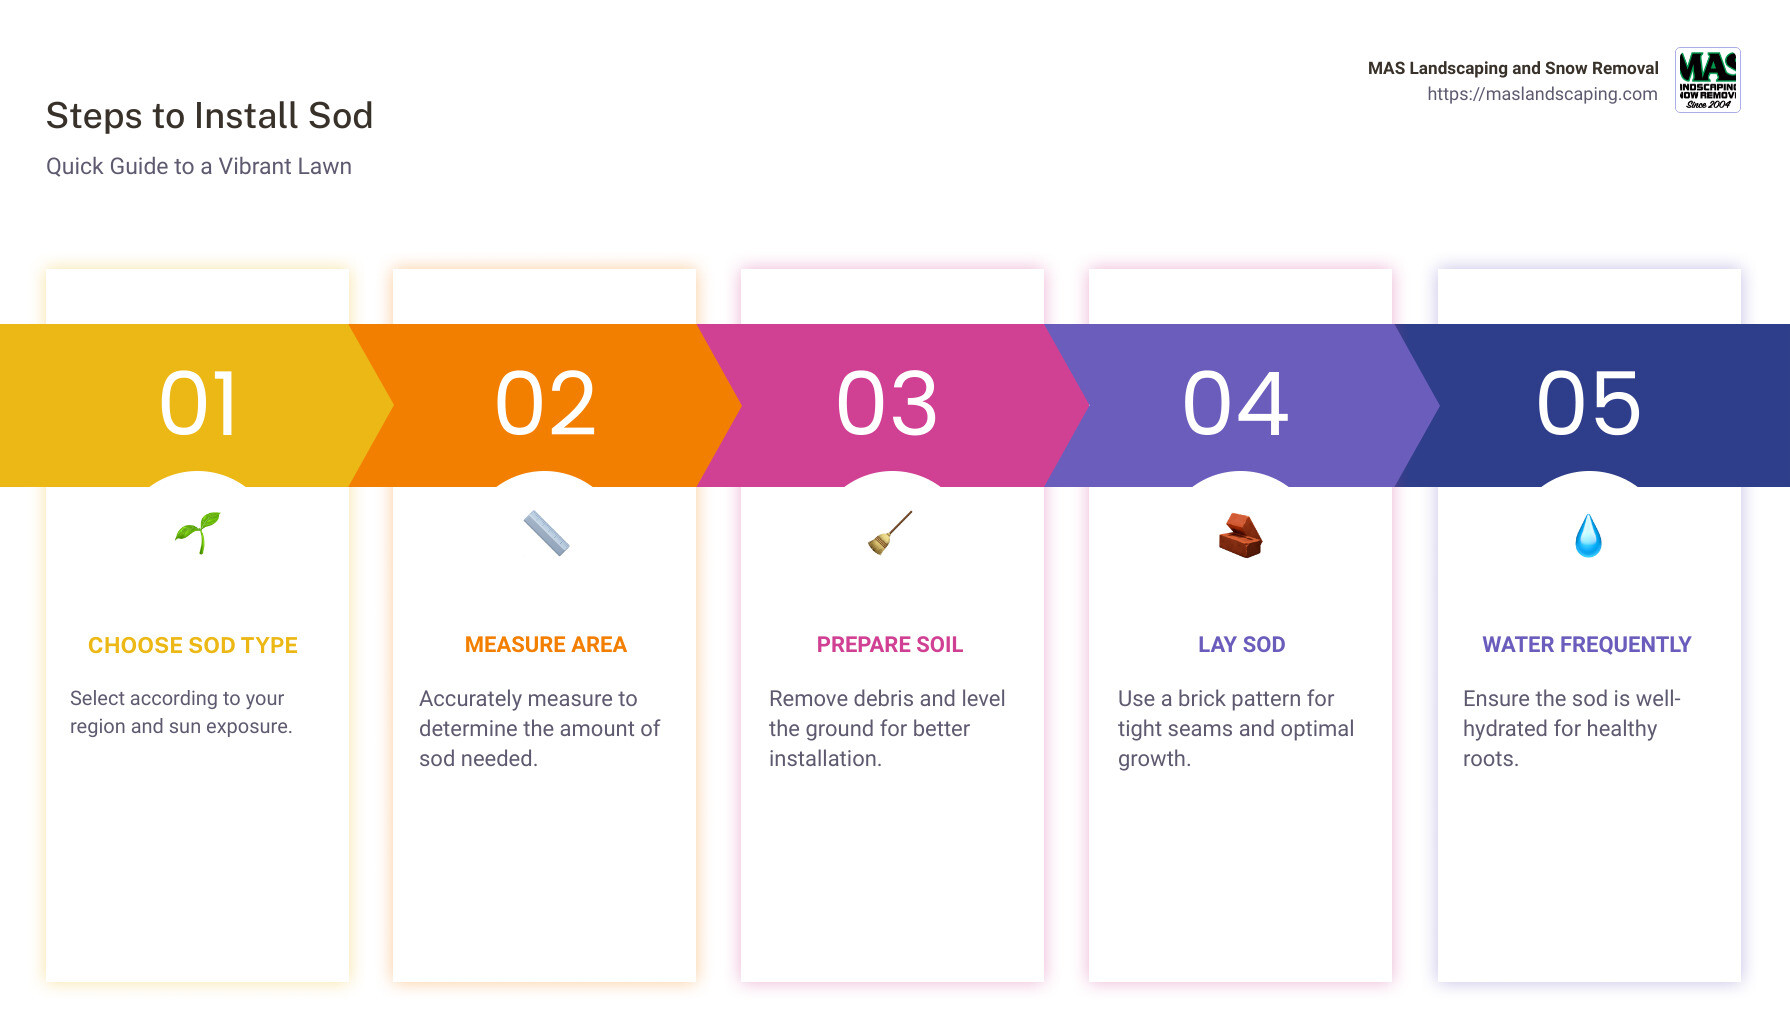
- Choose the right sod type based on your region and sunlight.
- Measure your area accurately for ordering.
- Prepare your soil by removing debris and leveling.
- Lay the sod in a brick pattern for tight seams.
- Water frequently to ensure healthy roots.
Changing your yard with sod brings immediate gratification. While traditional seeding can take months to fully flourish, sod provides an instant carpet of green, turning barren patches into lush retreats overnight. This green space change not only improves beauty but also adds value and usability to your property.
Imagine walking out to a plush, vibrant lawn just days after deciding to revamp your yard. The ease and speed of installing sod make it an attractive option for anyone in the Greater Boston area seeking a stunning lawn without delay. Dive deeper into the following guide to learn how you can achieve this change with minimal hassle.
Common how to install sod vocab:
– how to prepare ground for sod
– how to plant sod
– installing a new lawn
Preparing Your Yard for Sod Installation
Why Soil Preparation is Crucial
Before rolling out that lush green carpet of sod, prepare the ground beneath it. Think of soil preparation as laying the foundation for a house. Without it, your new lawn might not thrive as expected.
Soil Testing
Start with a soil test. This step helps you understand your soil’s pH and nutrient levels. Knowing this ensures that your grass can absorb nutrients effectively. A well-balanced soil pH is crucial; if it’s off, your grass might not get the nutrients it needs, even if you’re using the best fertilizer available.
Clearing Space
Next, clear the area where you plan to lay sod. Remove any existing grass, weeds, and debris. This step is vital because new sod needs direct contact with the soil to establish roots. Use tools like a sod cutter or shovel for this task.
Leveling
Leveling your yard is another key step. Uneven ground can lead to water pooling in low spots, which might drown your new grass. Conversely, high spots might dry out too quickly. Use a rake to smooth out the soil and fill in any depressions.
Pro Tip: Spray water over the area to spot depressions. Water will pool in low spots, making them easy to identify and fill.
Topsoil Assessment
Assess your topsoil to ensure it’s deep and rich enough for sod. Use a soil probe or trowel to check how much loamy topsoil you have. If it’s too thin, consider adding a mix of topsoil and compost. This not only improves nutrient availability but also aids in water drainage, preventing root rot.
Nutrient Availability and Root Growth
Healthy soil promotes strong root growth and nutrient uptake. When roots have access to nutrients, the grass grows thicker and greener. This is why testing and amending your soil before laying sod is so important.
Water Drainage
Proper drainage is vital to prevent water from sitting on the surface and causing root diseases. Tilling the soil can help with this by breaking up compacted layers, allowing water, air, and nutrients to penetrate deeply.
By focusing on these aspects of soil preparation, you’re setting the stage for a successful sod installation. A well-prepared yard ensures that your sod will not only look great immediately but will also remain healthy and vibrant for years to come.
Now that your yard is ready, let’s move on to the exciting part—how to install sod.
How to Install Sod: Step-by-Step Guide
Choosing the Right Sod
Selecting the right type of sod is crucial for a lush, healthy lawn. Your choice depends on several factors, including climate, sunlight, and maintenance needs.
Cool-Season vs. Warm-Season Grasses
- Cool-season grasses like Kentucky bluegrass and perennial ryegrass are perfect for cooler climates. They thrive in temperatures between 60-75°F.
- Warm-season grasses such as Bermudagrass and Zoysia love the heat, flourishing in temperatures above 80°F.
Consider your local climate to determine which type of grass will grow best in your area.
Sunlight Conditions
Evaluate how much sunlight your yard receives:
- Full sun: Choose grasses like Bermudagrass that require plenty of sunlight.
- Partial shade: Opt for grasses like St. Augustine, which can tolerate some shade.
Maintenance Requirements
Think about how much time you’re willing to spend on lawn care:
- Low maintenance: Consider Zoysia, which requires less frequent mowing.
- High maintenance: Kentucky bluegrass needs regular care to stay lush.
Laying Techniques for Optimal Growth
Once you’ve chosen the right sod, it’s time to lay it down with precision. Proper technique ensures your sod establishes quickly and evenly.
Measuring and Ordering
First, measure your lawn’s area to know how much sod you’ll need. Use a tape measure to get the dimensions and calculate the square footage. Order 5-10% extra to account for cutting and fitting.
Laying Technique
Begin by laying sod along a straight edge like a driveway or fence. Unroll the sod carefully, ensuring it lies flat against the soil.
Staggering Rows
Lay the sod in a brick pattern. This means staggering the seams by cutting the first piece of the second row in half. This technique prevents the seams from aligning, reducing the risk of gaps and enhancing root interlocking.
Avoiding Gaps
Press each piece of sod tightly against its neighbor. Gaps can lead to weed growth and drying out. If gaps do appear, fill them with soil to ensure even growth.
Cutting Techniques
When you encounter curves or edges, use a sharp knife to cut the sod to fit. For intricate areas, a utility knife or box-cutter works well. Avoid cutting sod into small pieces, as they dry out faster.
By following these steps, you’ll ensure your sod is laid correctly, leading to a beautiful and resilient lawn. Next up, let’s dive into watering and maintenance post-installation to keep your new grass thriving.
Watering and Maintenance Post-Installation
Once you’ve laid your sod, the next crucial step is ensuring it gets the right care to establish strong roots and grow lush and healthy.
When and How to Water New Sod
Initial Watering
Immediately after laying your sod, give it a thorough soaking. This helps settle the soil and ensures good contact between the sod and the ground beneath. Aim to keep the soil moist to a depth of 3-4 inches.
Watering Frequency
For the first week, water your sod daily in the early morning. This timing minimizes evaporation and maximizes absorption. By the second week, you can reduce watering to every other day. As the sod starts to root into the soil, decrease watering frequency gradually. By the fourth week, watering twice a week should suffice, aiming for about an inch of water weekly.
Signs of Proper Hydration
You’ll know your sod is getting the right amount of water if the grass blades spring back after being walked on. If footprints linger, it’s a sign your grass needs more water. Also, look for a consistent green color; any browning might indicate under-watering.
Mowing and Fertilizing New Sod
First Mow
Wait until your grass reaches about 3 inches in height before mowing for the first time. Use a sharp blade and set your mower to remove no more than one-third of the grass height. This minimizes stress on the new sod and encourages root growth.
Fertilizer Types and Application Timing
About three to four weeks after installation, it’s time to fertilize. Use a starter fertilizer rich in phosphorus, which supports root development. Apply the fertilizer according to the package instructions, ensuring even distribution to avoid burning the grass.
By following these watering and maintenance steps, you’ll support your sod in becoming a lush, thriving lawn. Next, let’s explore common mistakes to avoid when installing sod.
Common Mistakes to Avoid When Installing Sod
Installing sod might seem straightforward, but there are a few common pitfalls that can hinder your lawn’s success. Let’s explore these mistakes and how to fix them.
Overlapping
The Problem: Overlapping sod can create raised areas that dry out quickly. This unevenness also makes mowing tricky and can lead to patches of dead grass.
The Fix: Lay each sod piece snugly against the next, without overlapping. If you notice overlaps, lift and reposition the sod right away. This ensures a smooth, level surface.
Leaving Gaps
The Problem: Gaps between sod pieces don’t magically fill in. Instead, they widen over time, leaving your lawn looking patchy and inviting weeds.
The Fix: Press sod pieces tightly together. If gaps do appear, fill them with soil and overseed to promote growth. Use a sod knife for precise cutting around obstacles to avoid unnecessary gaps.
Incorrect Watering
The Problem: Both overwatering and underwatering can harm your new sod. Too much water drowns roots, while too little causes them to dry out.
The Fix: Follow a watering schedule that starts with daily watering and gradually decreases. Adjust based on weather conditions and check for signs of proper hydration, like springy grass blades.
Poor Soil Preparation
The Problem: Skipping soil preparation can lead to poor root establishment and uneven growth. Sod laid on compacted or nutrient-poor soil struggles to thrive.
The Fix: Before laying sod, test your soil and amend it as needed. Add compost and till the soil to a depth of at least 6 inches for aeration and nutrient distribution.
Adjusting Overlaps
If you find overlaps after laying sod, gently lift the overlapping piece and reposition it. Use a lawn roller to press the sod down evenly, ensuring good contact with the soil.
Filling Gaps
For any gaps, sprinkle soil into the spaces and lightly water. Overseed these areas to encourage growth and integration with the surrounding sod.
Modifying Watering Practices
Monitor your sod’s response to watering and adjust as needed. If the grass appears too wet or too dry, tweak your schedule. The goal is moist—not soggy or parched—soil.
By avoiding these common mistakes and knowing how to correct them, you’ll be well on your way to a beautiful, healthy lawn. Next, let’s address some frequently asked questions about installing sod.
FAQs About Installing Sod
When it comes to how to install sod, questions often arise that can make or break the success of your new lawn. Let’s tackle some of the most common ones.
Can I Lay Sod Over Old Grass?
The short answer is no. Laying sod over existing grass can lead to poor root establishment and an uneven lawn. The old grass creates a barrier that prevents the new sod from making proper contact with the soil. This can cause the sod to dry out and die.
What to Do Instead: Remove the old grass first. Use a sod cutter or rototiller to clear out the existing vegetation. This ensures your new sod has a clean, nutrient-rich base to grow on.
How Long Until I Can Walk on New Sod?
Patience is key here. Typically, you should avoid walking on new sod for about one week. This waiting period allows the roots to establish firmly in the soil without disturbance.
Quick Tip: If you must walk on the sod for maintenance, use a plank to distribute your weight evenly and minimize damage.
What is the Best Season to Lay Sod?
The ideal time to lay sod depends on your region and grass type. For many areas, late summer to early fall or late spring are optimal.
- Late Summer to Early Fall: Cooler temperatures and increased rainfall help sod establish roots without heat stress.
- Late Spring: Warmer soil temperatures encourage root growth, and spring rains support sod establishment.
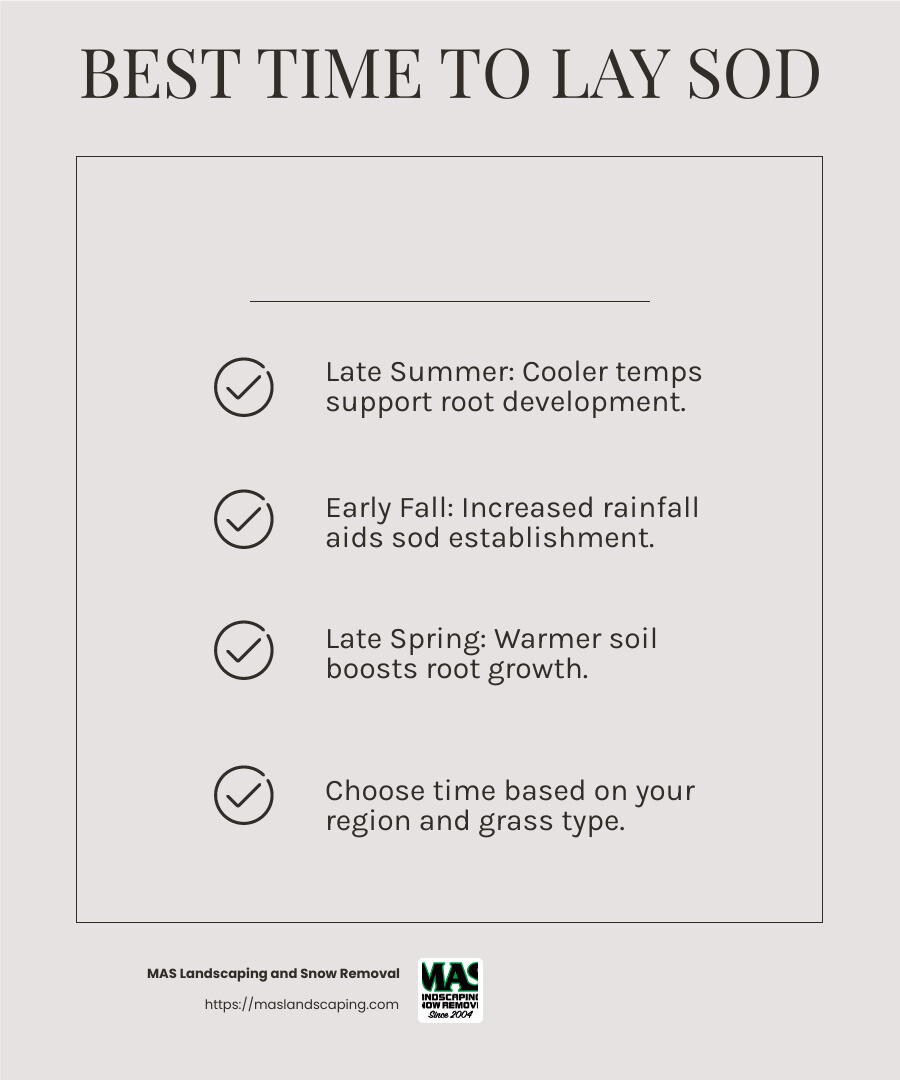
By choosing the right time to install your sod, you set the stage for a lush, thriving lawn. Stay tuned for more tips on maintaining your new sod in the next section.
Conclusion
Congratulations! You’ve taken the first steps toward a beautiful, lush lawn. By following the right practices for how to install sod, you’re setting the foundation for long-term lawn health and a green space you can enjoy year-round.
Long-Term Lawn Health
Maintaining the health of your new sod involves more than just the initial installation. Regular watering, mowing, and fertilizing are crucial. The first few weeks are vital for root establishment. Deep watering encourages roots to grow down into the soil, making your lawn more resilient to drought.
Consistent mowing helps maintain the grass at an optimal height, which supports root health and prevents disease. As your sod matures, a balanced fertilizer can provide the nutrients needed for sustained growth. Always be mindful of local regulations regarding fertilizer use to protect the environment.
Enjoying Your New Lawn
With proper care, your sod will transform into a lush, vibrant lawn that improves your outdoor space. Imagine hosting family gatherings, playing with your pets, or simply relaxing on a soft, green carpet of grass. The effort you put into installing and maintaining your sod will pay off in the form of a beautiful and functional yard.
MAS Landscaping and Snow Removal
At MAS Landscaping and Snow Removal, we pride ourselves on helping you achieve the lawn of your dreams. Our expertise in landscaping and local knowledge ensures that your outdoor space not only looks stunning but also thrives in the unique climate of the Saugus, MA area. Whether you need assistance with sod installation or ongoing lawn care, our team is here to provide personalized and professional service.
Ready to transform your yard into a lush, inviting space? Explore our landscape design services and let us help you make the most of your outdoor environment. Together, we can create a landscape that not only meets your needs but exceeds your expectations.
