Landscape Lighting Install: 7 Powerful Tips for Stunning Yards 2025
Transform Your Property with Professional Landscape Lighting Install
Landscape lighting install projects can dramatically improve your home’s curb appeal while improving safety and security. Whether you’re looking to illuminate pathways, highlight architectural features, or create stunning outdoor ambiance, the right lighting system extends your outdoor living hours and adds significant value to your property.
Here’s what you need to know about landscape lighting installation:
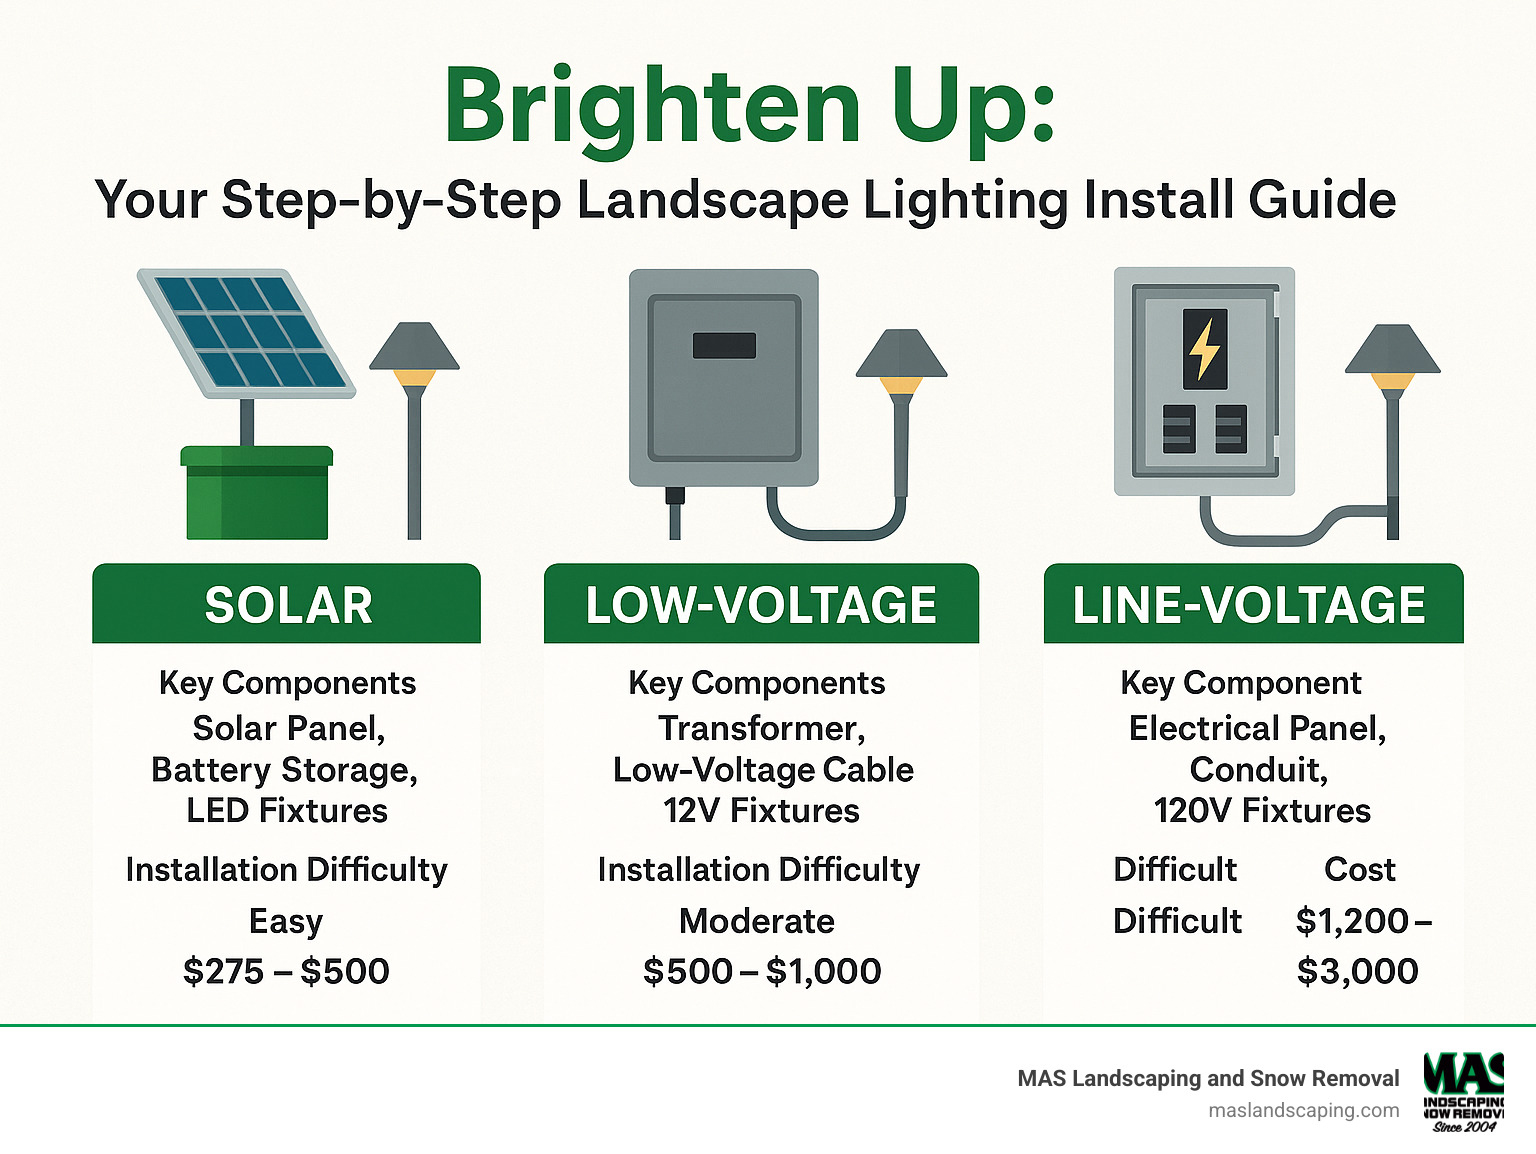
- Three main system types: Solar (no wiring), low-voltage (12V, DIY-friendly), and line-voltage (120V, requires professional installation)
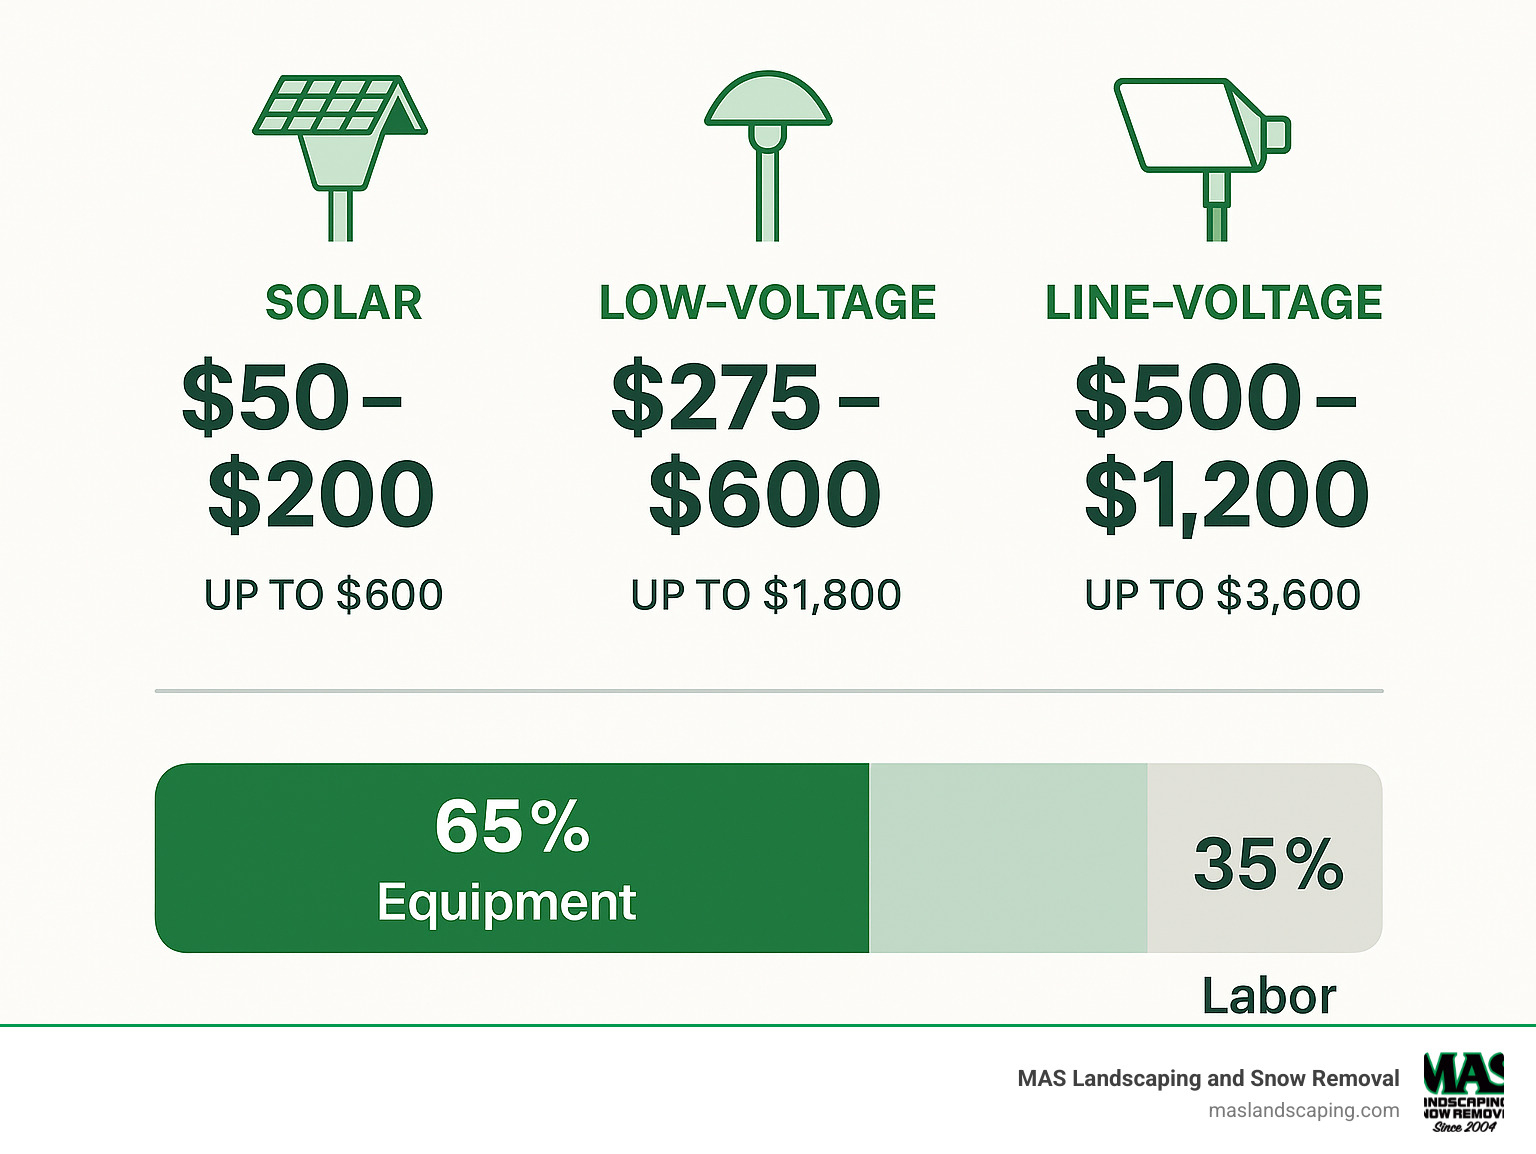
- Average project costs: $275 for basic DIY setups to $600+ for comprehensive systems
- Essential components: Transformer, fixtures, low-voltage cable, connectors, and timer controls
- Safety first: Low-voltage systems are safest for DIY installation, while line-voltage requires licensed electricians
- Planning is key: Calculate total wattage, choose proper wire gauge, and map fixture locations before digging
Most homeowners can successfully complete a low-voltage landscape lighting install as a weekend project. These 12-volt systems offer the perfect balance of safety, affordability, and professional results without requiring electrical permits or specialized training.
Modern LED fixtures have solved many traditional lighting challenges, offering warm color temperatures, exceptional energy efficiency, and 10-year lifespans. The installation process involves mounting a transformer near a GFCI outlet, running low-voltage cable to fixture locations, making waterproof connections, and burying cables about 6 inches deep.
Know your landscape lighting install terms:
– design landscape
– mulch delivery and installation
– patio construction near me
What You’ll Learn
In this comprehensive guide, we’ll walk you through everything you need to know about landscape lighting installation. You’ll find the three main types of lighting systems, learn which tools and materials you’ll need, and understand how to plan your layout for maximum impact.
We’ll cover the landscape lighting install process from start to finish, including average costs based on internet data, safety considerations, and local code requirements.
Landscape Lighting 101: Systems & Benefits
Before diving into your landscape lighting install project, let’s explore the three main system types that can transform your outdoor space. Each option offers unique advantages, and understanding these differences will help you choose the perfect fit for your property, budget, and comfort level.
Solar systems harness the sun’s energy through photovoltaic cells, charging built-in batteries during the day to power LED fixtures at night. Low-voltage systems use a transformer to step down your home’s 120V power to a safer 12V. Line-voltage systems operate at full household voltage and pack the most punch, but they require professional installation due to safety and code requirements.
The benefits of landscape lighting extend far beyond making your yard look amazing. A well-planned landscape lighting install provides improved security by deterring unwanted visitors, improves safety by illuminating pathways and steps, and can boost your property value significantly. Modern LED technology delivers 60-70% energy savings compared to traditional halogen bulbs while lasting up to 10 years.
Most residential transformers handle between 100-300 watts of load, giving you plenty of flexibility to power multiple fixtures on a single system.
| System Type | Voltage | Installation | Permits | Best For |
|---|---|---|---|---|
| Solar | Battery-powered | DIY | None | Simple pathway lighting |
| Low-voltage | 12V | DIY | None | Most residential projects |
| Line-voltage | 120V | Professional | Required | High-brightness applications |
Main Types Explained
Solar landscape lighting wins the prize for simplest installation, but it does need 6-8 hours of direct sunlight daily to perform at its best. These systems excel at basic pathway illumination and accent lighting where you don’t need rock-solid consistency. The photovoltaic cells work their magic during daylight hours, charging internal batteries that automatically kick on your LED fixtures when dusk arrives.
While solar lights have come a long way in recent years, they still struggle in shaded areas or during cloudy weather. The upfront cost is friendly to your wallet, but replacement batteries and fixtures might need swapping out more often than other systems.
Low-Voltage Advantages
Low-voltage systems running at 12 volts hit the sweet spot between safety, performance, and DIY-friendliness. The transformer steps down that dangerous 120V household current to a much safer 12V, practically eliminating shock risk while delivering consistent, reliable light.
These systems really shine when it comes to flexibility and expandability. Want to add more fixtures next season? No problem. Need to relocate a light that’s not quite right? Easy peasy. The low voltage also means you can bury cables at any depth without permits, making installation straightforward for most homeowners.
Most low-voltage transformers come with built-in timers or photocell sensors for automatic operation. That 12V power gives you creative freedom for fixture placement without the safety worries that come with line-voltage systems.
When Line Voltage Makes Sense
Line-voltage systems operating at 120V deliver maximum brightness and work best for large properties or situations requiring serious light output. However, these systems must follow the National Electrical Code® and require professional installation to keep everything safe and legal.
The higher voltage allows for longer cable runs without voltage drop, making line-voltage perfect for extensive lighting schemes. Professional installation ensures proper grounding, GFCI protection, and code compliance, though it does bump up your project costs significantly.
We recommend line-voltage systems only when low-voltage options can’t deliver the brightness or coverage you need, or when you’re integrating with existing 120V outdoor electrical systems.
Plan & Design Like a Pro
The secret to a successful landscape lighting install lies in thoughtful planning before you buy a single fixture. Think of it as choreographing a nighttime dance between light and shadow across your property.
Start by taking evening walks around your yard with a flashlight in hand. This simple exercise reveals which pathways feel unsafe in the dark, which architectural features deserve highlighting, and where unwanted shadows create security concerns. Point your flashlight at different angles to see how various beam patterns will affect your space.

Create a rough sketch of your property, marking focal points like specimen trees, architectural details, or water features. Note pathway locations and any safety hazards that need illumination. This layout map becomes your roadmap for fixture placement and helps you avoid costly mistakes later.
Color temperature dramatically affects your outdoor atmosphere. Warm white LEDs around 2700K-3000K create that cozy, inviting feel perfect for entertaining areas and pathways. Cooler temperatures above 4000K work better for security applications but can feel harsh in residential settings.
Before breaking ground, make that crucial call to 811. This free utility locating service prevents dangerous encounters with buried gas lines, electrical cables, or water mains.
Calculating Transformer & Wire Gauge
Getting your electrical calculations right prevents flickering lights and premature failures down the road. Add up the wattage of all your planned fixtures, then multiply by 1.25 to account for voltage drop and future expansion. This extra 25% headroom keeps your system running smoothly.
Most residential systems work beautifully with transformers in the 100-300 watt range. A typical setup might include eight pathway lights at 7 watts each plus three accent spots at 20 watts each – that’s 116 watts total, requiring a 145-watt minimum transformer capacity.
Wire gauge matters more than many DIYers realize. Use 12-gauge wire for runs over 100 feet or systems above 200 watts. 14-gauge wire handles shorter runs and lighter loads just fine. When in doubt, go heavier – the small extra cost prevents voltage drop headaches later.
Always leave 18 inches of slack at each fixture location. This might seem excessive, but you’ll appreciate the extra wire when adjusting light angles or replacing fixtures years down the road.
Choosing Fixtures & Bulbs
Modern LED fixtures have transformed landscape lighting from a luxury into an accessible home improvement. Spotlights create dramatic focal points on trees or architectural features, while path lights ensure safe navigation along walkways. Flood lights illuminate larger areas for security or entertaining spaces.
Pay attention to beam angles when selecting fixtures. Narrow 12-degree beams create precise highlighting effects, while wider 60-degree floods provide general area illumination. Most residential applications benefit from beams in the 25-45 degree range for balanced coverage.
Lumens measure actual light output, while IP ratings indicate weather resistance. Look for IP65 or higher ratings to handle New England’s challenging weather conditions. Quality fixtures might cost more upfront, but they’ll still be working beautifully years from now.
Kelvin ratings determine color warmth – stick with 2700K-3000K for most residential applications. This warm white range complements home exteriors and creates inviting outdoor spaces your family will actually want to use.
For complex projects or if you’re feeling overwhelmed by the options, our Landscape Lighting Design Service can help ensure optimal fixture placement and system integration.
Smart Controls & Automation
Photocells automatically activate your system at dusk and turn it off at dawn, adjusting naturally to seasonal changes. No more coming home to dark pathways or wasting energy on forgotten lights.
Programmable timers offer even more control, allowing multiple on/off cycles throughout the night. Set lights to turn off at midnight for energy savings, then back on at 5 AM for early morning security.
Wi-Fi enabled systems bring landscape lighting into the smartphone age. Adjust brightness, change schedules, or turn lights on remotely through dedicated apps. While these smart features increase initial costs, they provide unprecedented convenience and can even integrate with existing home automation systems.
Landscape Lighting Install Step-by-Step Guide
Ready to transform your outdoor space? A well-planned landscape lighting install can dramatically change how your property looks and feels after dark. While the process might seem daunting at first, breaking it down into manageable steps makes it surprisingly achievable for most homeowners.
Before you start digging, gather your essential tools. You’ll need a flat-blade shovel for creating clean trenches, wire strippers for making proper connections, and a basic screwdriver set for fixture assembly. Don’t forget a voltage tester – it’s your safety lifeline when working with electrical components.
The key components for your system include the transformer (your system’s heart), fixtures, low-voltage cable, waterproof connectors, and electrical tape. Quality matters here – outdoor conditions are tough on equipment, so invest in components designed to handle weather extremes.
Safety always comes first. Confirm your outdoor outlet has GFCI protection and use a weatherproof cover rated for “while-in-use” conditions. Never work on electrical connections in wet conditions, and always test circuits before handling any wires.
The installation sequence makes all the difference between a smooth project and a frustrating weekend. Mount your transformer first, then lay out fixtures and cable, make your connections, test everything thoroughly, and finally bury the cables.
Low-Voltage Landscape Lighting Install
Starting your low-voltage landscape lighting install begins with properly positioning the transformer. Mount it at least 12 inches above ground level near a GFCI-protected outlet, ensuring adequate clearance around all sides for heat dissipation. Most transformers include sturdy mounting brackets designed for walls or fence posts.
Now comes the cable run – this is where patience pays off. Run your main 12-gauge or 14-gauge cable from the transformer to your planned lighting zones, but keep everything on the surface initially. This temporary layout lets you test connections and fine-tune fixture positions without the headache of digging everything up later.
Leave generous slack at each fixture location – we’re talking 18 inches or more. It might seem excessive now, but you’ll appreciate this extra cable when adjusting light angles or replacing fixtures down the road.
Connection methods vary, but you have two main options. Pierce-through connectors offer speed and convenience, while wire nuts with heat-shrink tubing provide superior waterproof protection. For the wire nut method, strip about 3/4 inch of insulation from your main cable to ensure solid connections.
Connect your transformer temporarily and verify each fixture works properly. This simple step identifies defective bulbs or poor connections when they’re still easy to fix.
Finally, create narrow trenches about 6 inches deep for your cables. This depth protects against accidental damage while keeping cables accessible for future maintenance. Replace soil carefully and consider sketching cable locations for your records.
For homeowners in Saugus, Melrose, and Medford who prefer professional installation, our Landscape Lighting Installation Services handle everything from design to final testing.
Solar Landscape Lighting Install
Solar systems offer the simplest landscape lighting install process since no wiring is involved. However, success depends entirely on smart site selection and proper fixture positioning for optimal sun exposure.
The golden rule for solar lighting is 6-8 hours of direct sunlight daily. Even partial shade can cut performance dramatically, so avoid areas under trees, overhangs, or north-facing slopes that receive limited sun throughout the day.
Before installation, pre-charge new solar fixtures for 12-14 hours in full sun. This initial charging cycle helps identify any defective units while ensuring your lights perform well on their first night of operation.
When staking fixtures, soften the soil first and position solar panels to face south for maximum sun exposure. If your fixtures allow seasonal adjustment, consider steeper panel angles during winter months when the sun sits lower in the sky.
Line-Voltage Landscape Lighting Install (Hire a Pro)
Line-voltage systems operating at 120V require professional installation – no exceptions. These systems must comply with the National Electrical Code® and involve safety risks that make DIY installation inadvisable.
Professional installation involves running UF (Underground Feeder) cable 18 inches deep or installing PVC conduit systems for additional protection. Junction boxes must be properly rated and positioned according to local electrical codes, while proper grounding and GFCI protection are non-negotiable requirements.
Licensed electricians handle the complex details – proper breaker sizing, GFCI protection, permit applications, and coordinating required inspections. While professional installation costs more upfront, it provides safety assurance and peace of mind that’s invaluable for high-voltage systems.
Safe Cable Burial & Protection
Proper cable burial protects your investment and prevents future accidents. Create narrow trenches about 6 inches deep for low-voltage cables, keeping trenches as narrow as possible to minimize damage to your lawn and landscaping.
Gentle curves work better than sharp bends that could damage cables over time. Maintain slack loops at fixture locations and keep continuous cable runs without underground splices whenever possible – these connection points are common failure spots.
In high-traffic areas or locations where mechanical damage seems likely, consider running cables through PVC conduit for extra protection. Stub the conduit up to fixture locations for easy access and a more professional appearance.
Mark your cable locations on a simple property sketch for future reference. This seemingly minor step prevents accidental damage during future landscaping projects or home improvements.
Connect, Test & Aim
Final connections require careful attention to detail for long-term reliability. Strip wires to the exact length specified by your connector manufacturers – too little prevents good electrical contact, while too much creates loose connections that fail over time.
Always use waterproof connectors specifically designed for outdoor applications. Wrap completed connections with electrical tape for additional moisture protection, especially in areas prone to standing water or heavy rainfall.
Night testing reveals everything. Test your complete system after dark to verify proper operation and adjust fixture angles for optimal illumination. This nighttime evaluation shows glare issues and lighting gaps that aren’t visible during daylight hours.
Finally, check your total system wattage with a voltage meter to confirm you’re operating within your transformer’s capacity. Overloaded transformers fail prematurely and can create dangerous fire hazards that put your property at risk.
Maintain, Troubleshoot & Upgrade

Your landscape lighting install doesn’t end when you flip the switch for the first time. Like any investment in your property, regular care keeps your system shining bright and performing reliably for years to come.
Monthly lens cleaning makes a bigger difference than you might expect. Dirt, pollen, and water spots can reduce light output by 30% or more. A simple wipe with a damp cloth brings back that crisp illumination you installed the system for in the first place.
LED bulbs are wonderfully long-lasting, but when one finally gives up after years of faithful service, replace it promptly. A burned-out bulb can cause voltage overload on the remaining fixtures, potentially shortening their lifespan too.
Timer systems occasionally get confused, especially after power outages. Most modern transformers include backup batteries to remember your settings, but older units might need a gentle reminder of what time you actually want the lights to come on.
Voltage drop issues often sneak up gradually as connections age and weather takes its toll. An annual voltage check at your fixture locations helps catch problems before they turn into midnight troubleshooting sessions. Clean any corroded connections with electrical contact cleaner, then protect them with a thin coating of dielectric grease.
Seasonal adjustments keep your lighting looking intentional rather than accidental. That small shrub you planted three years ago might now be blocking half your pathway lights. Trim vegetation that’s grown into light beams, and don’t be afraid to adjust fixture angles as your landscape matures and changes.
Common Mistakes to Avoid
Overloading transformers tops the list of installation regrets we see. It’s tempting to squeeze just one more fixture onto your system, but transformers that run beyond their capacity get hot, fail early, and can create safety hazards. Always size your transformer with 25% extra capacity.
Wrong wire gauge causes more headaches than almost any other single mistake. Undersized wire creates voltage drop that leaves your beautiful fixtures looking dim and disappointing. When manufacturer recommendations seem like overkill, electricity doesn’t negotiate – it follows the laws of physics whether we like it or not.
Glare problems turn your welcoming outdoor space into something that makes visitors squint and neighbors grumpy. Position fixtures to light up your targets, not blind anyone trying to enjoy them. Adjustable fixtures and beam shields are your friends here.
Fixture crowding seems logical until you see the results. More lights doesn’t automatically mean better lighting. Hot spots and overlapping beams create an unnatural, harsh appearance that defeats the purpose of landscape lighting. Sometimes the most neat solution involves fewer fixtures placed more thoughtfully.
The good news? Most of these issues are easily fixed once you know what to look for. A little attention throughout the year keeps your landscape lighting install performing beautifully and safely for many seasons ahead.
Frequently Asked Questions about Landscape Lighting Install
Let’s tackle the most common questions we hear from homeowners planning their landscape lighting install projects. These answers will help you avoid costly mistakes and ensure your lighting system works beautifully for years to come.
What tools and materials do I need?
Getting the right tools upfront makes your landscape lighting install much smoother. You’ll need a flat-blade shovel for digging those neat trenches, wire strippers for clean connections, and basic screwdrivers for assembling fixtures. Don’t forget a voltage tester – it’s your safety lifeline when working with electrical components.
For materials, your shopping list includes the transformer (your system’s heart), fixtures that match your design vision, and low-voltage cable in either 12 or 14-gauge depending on your system size. Waterproof connectors are absolutely essential – cheap connectors will haunt you later with flickering lights and service calls.
A stake installer tool becomes your best friend when dealing with New England’s rocky soil. Trust us, your back will thank you after installing a dozen path lights. Electrical tape provides extra protection for connections, especially important in our wet climate.
How do I size the transformer correctly?
Getting transformer sizing wrong is like buying shoes that don’t fit – uncomfortable and expensive to fix later. Start by calculating your total fixture wattage, then multiply by 1.25 to account for voltage drop and future expansion.
Here’s a real example: if you’re planning ten 7-watt path lights, that’s 70 watts total. Multiply by 1.25 and you need 87.5 watts minimum. Always choose the next larger standard size, which would be a 100-watt transformer in this case.
This extra capacity isn’t wasted – it prevents overloading that causes premature transformer failure and gives you room to add that accent light you’ll definitely want next year. Most residential systems work well with transformers in the 100-300 watt range.
Can I mix solar and low-voltage fixtures?
While nothing stops you from mixing solar and low-voltage fixtures on the same property, it’s rarely a good idea for cohesive landscape lighting design. Think of it like mixing warm white and cool white bulbs – technically possible but visually jarring.
Solar and low-voltage fixtures often have different brightness levels and color temperatures that don’t play well together. Solar lights tend to be dimmer and may have slightly different color characteristics, creating an inconsistent look across your landscape.
Stick with one system type per lighting zone for the most professional appearance and easier maintenance. You can certainly use solar for simple pathway lighting in one area and low-voltage for accent lighting elsewhere, just avoid mixing them where they’ll be viewed together.
The maintenance aspect matters too – having one system type means fewer spare parts, consistent replacement schedules, and simpler troubleshooting when issues arise.
Conclusion
A well-executed landscape lighting install transforms your property’s nighttime appearance while improving safety and security. Whether you choose solar, low-voltage, or line-voltage systems, proper planning and installation techniques ensure years of reliable performance.
The journey from dark pathways to beautifully illuminated landscapes doesn’t have to be overwhelming. With the right approach, most homeowners can successfully complete a landscape lighting install that rivals professional results. The key is understanding your options, planning thoroughly, and taking your time with each step.
At MAS Landscaping and Snow Removal, we understand that landscape lighting is both an art and a science. Our team brings local expertise from years of serving homeowners in Everett, Lynnfield, Malden, and surrounding communities. We know how New England weather affects outdoor lighting systems and design installations that withstand our challenging climate conditions.
From harsh winter storms to humid summer nights, your lighting system needs to perform reliably year-round. That’s why we focus on quality components, proper installation techniques, and ongoing maintenance support to protect your investment.
Whether you’re ready to tackle a DIY project or prefer professional installation, the most important step is getting started. Even a simple pathway lighting system can dramatically improve your property’s safety and curb appeal. More comprehensive systems create stunning outdoor environments that extend your living space well into the evening hours.
From initial design consultation through professional installation and ongoing maintenance, we provide comprehensive landscape lighting solutions custom to your property’s unique needs. Our commitment to professionalism and personalized service ensures your lighting system improves your outdoor living experience for years to come.
Ready to illuminate your landscape? Contact us to schedule a consultation and find how professional landscape lighting can transform your property. Visit our Landscape Lighting Installers Near Me page to learn more about our services and see examples of our work throughout the greater Boston area.
