Paver Retaining Wall: 10 Powerful Tips for Stunning Success 2025
Building a Solid Foundation: Understanding Paver Retaining Walls
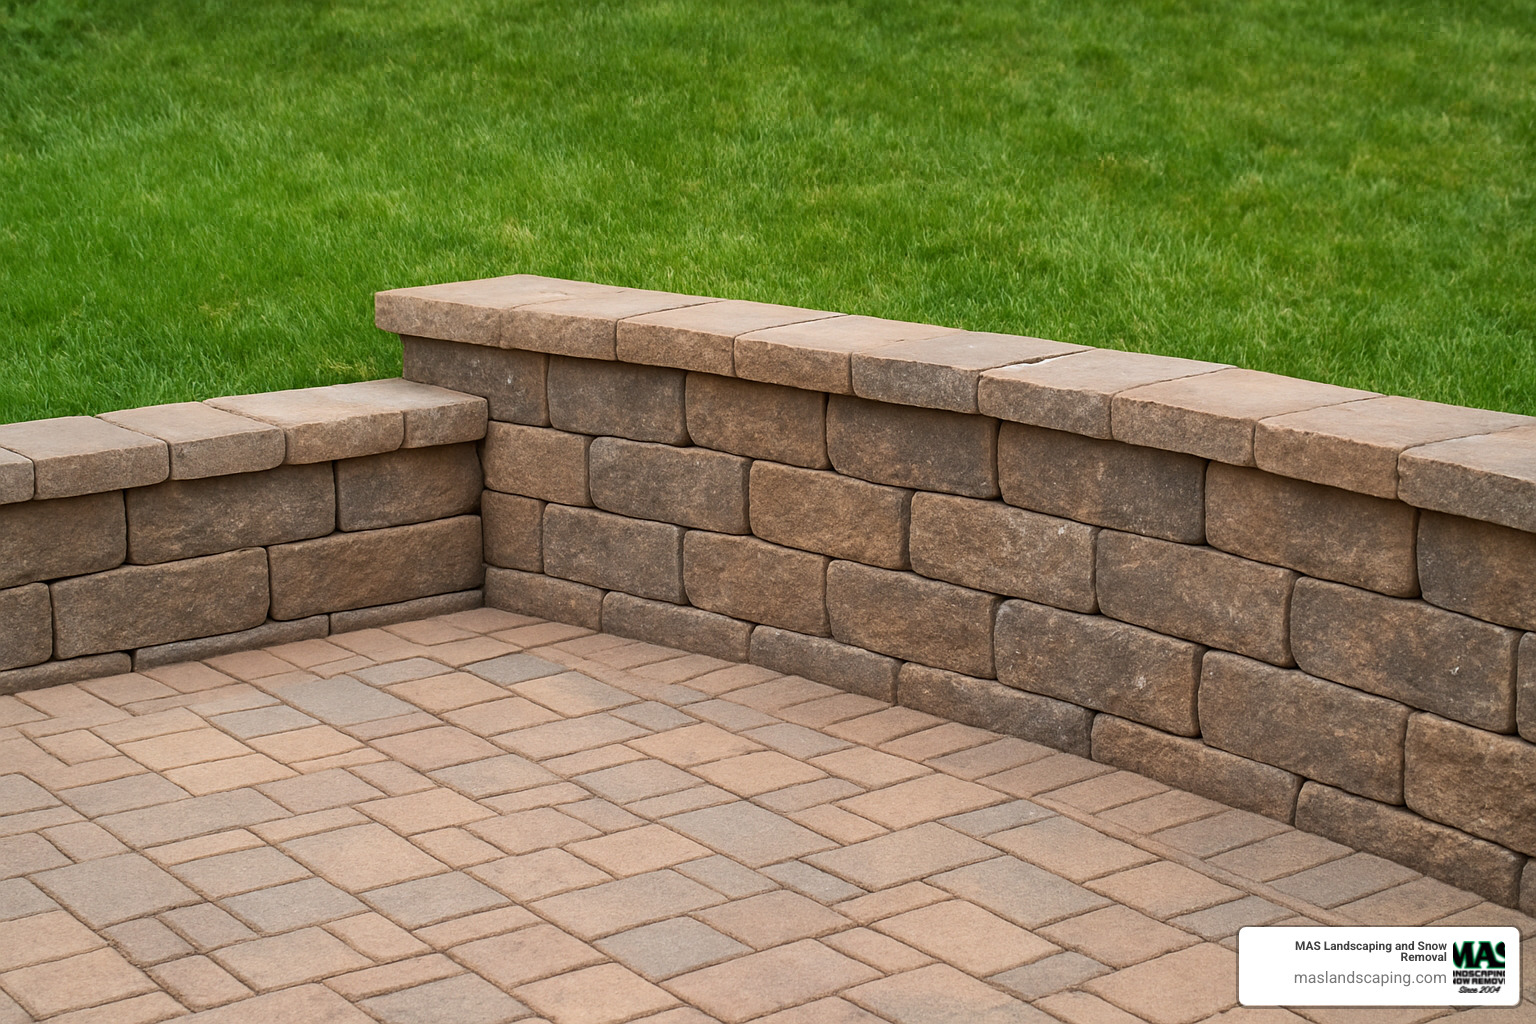
A paver retaining wall is a sturdy structure built to hold back soil where there are differences in ground elevation, using interlocking concrete blocks or pavers that rely on weight and setback to create stability.
Quick Facts About Paver Retaining Walls:
– Purpose: Hold back soil, prevent erosion, create level areas on slopes
– Lifespan: 80+ years with quality materials and proper installation
– Height Guidelines: Walls over 3-4 feet typically require permits and engineering
– Key Components: Base preparation, drainage system, backfill, and proper compaction
– Material Strength: Premium blocks engineered with minimum 5000 PSI compression strength
When contemplating your outdoor space change, a paver retaining wall offers both functional benefits and aesthetic appeal. Unlike traditional wood retaining walls that rot over time, or poured concrete walls that can crack, segmental paver walls combine durability with design flexibility.
Retaining walls serve multiple purposes beyond just holding back soil. They can transform sloped or uneven terrain into functional, level areas for gardens, patios, or outdoor living spaces. They prevent erosion, manage water runoff, and can significantly improve your property’s usable space and value.
The physics behind these walls is simple but critical—they work as a lever system, with the wall’s weight and setback counteracting the horizontal pressure from the soil behind it. This is why proper design and construction techniques are essential for longevity.
Whether you’re considering a small garden wall or a major slope-taming project, understanding the basics of paver retaining walls will help you make informed decisions about your landscape investment.
In this guide, we’ll walk through everything you need to know about building a paver retaining wall from the ground up—from planning and materials to construction techniques and finishing touches.
Easy paver retaining wall glossary:
– brick retaining wall
– retaining wall stone
– decorative retaining wall
What Makes a Paver Retaining Wall Unique?
A paver retaining wall isn’t just your average garden wall—it’s an engineering marvel disguised as a beautiful landscape feature. These walls consist of individual concrete blocks specifically designed to hold back soil and create stability where your yard changes elevation. Unlike traditional walls, paver retaining walls work as a team—each block interlocking with its neighbors while the entire system leans slightly backward (what pros call “batter”) to counteract the pressure from the soil behind it.
What really sets these walls apart is their incredible versatility. Each block is manufactured to exacting standards—typically with at least 5000 PSI compressive strength—ensuring they can weather our harsh Massachusetts winters without cracking or crumbling. Think of them as the “tough guys” of your landscape that still manage to look great at family gatherings!
| Wall Type | Lifespan | Appearance | Installation Complexity | Best Applications |
|---|---|---|---|---|
| Paver Block | 80+ years | Variety of textures and colors | Moderate | Residential walls up to 10+ ft with engineering |
| Timber/Railroad Ties | 15-20 years | Rustic, natural | Low to moderate | Garden walls, low terraces |
| Poured Concrete | 50+ years | Uniform, can be stamped | High (requires forms) | Large commercial projects |
| Natural Stone | 100+ years | Unique, organic | High (skilled masonry) | Decorative walls, historic properties |
| Gabion | 50+ years | Industrial, can be decorative | Moderate | Erosion control, modern design |
Primary Functions & Benefits of Paver Retaining Walls
Beyond simply holding back dirt, paver retaining walls are true multitaskers in your landscape.
First and foremost, they’re erosion fighters. Our New England weather can be tough on sloped properties, but a properly built wall keeps your soil exactly where it belongs—not washing away during those spring downpours that we see in Saugus, Everett, and surrounding towns.
They’re also space creators. Have a sloped yard that’s practically unusable? A terraced system of paver retaining walls can transform that hillside into flat, functional outdoor spaces—perfect for gardens, play areas, or patios. This is especially valuable in communities like Lynnfield and Melrose where many properties feature natural elevation changes.
Your outdoor living space gets defined boundaries too. Walls naturally create “rooms” in your landscape—maybe a dining area here, a cozy fire pit gathering space there. They bring structure and purpose to what might otherwise be an undefined yard.
Let’s talk value—a well-built paver retaining wall isn’t just pretty; it’s an investment. Homeowners typically see returns of 20-30% on their investment when these features are properly designed and constructed. That hillside solution becomes a selling point!
And don’t forget about water management. When built with proper drainage (more on that later), these walls direct water away from your home’s foundation—potentially saving you thousands in water damage repairs down the road.
How Paver Systems Differ From Timber, Poured Concrete & Natural Stone
When comparing wall materials, paver retaining walls truly shine in several important ways:
Against timber walls, the difference is night and day. While those railroad tie walls might look charming initially, they’re on borrowed time from day one. Timber walls last just 15-20 years before nature takes its course with rot and warping. Paver walls? They’ll still be standing strong after 80+ years. Plus, traditional railroad ties contain creosote which, according to EPA research, poses health concerns during production and disposal—something you don’t worry about with concrete pavers.
Compared to poured concrete walls, paver retaining walls offer remarkable flexibility. No need for extensive formwork, heavy equipment, or perfect weather conditions during installation. Building in stages? No problem. And if damage occurs years later, you can replace individual blocks rather than jackhammering an entire wall section.
Natural stone walls certainly have timeless appeal, but they come with challenges. Paver walls provide consistency in sizing and interlocking features that make installation more predictable and often less expensive. Natural stone requires skilled masonry work that can significantly increase your project cost, while modern paver systems offer engineered solutions for curves, corners, and even integrated features like lighting or seating.
The National Concrete Masonry Association confirms what we’ve seen in countless projects—properly installed segmental retaining walls stand up to significant environmental stresses while maintaining their structural integrity decade after decade. They’re simply built to last, look great, and solve real problems in your landscape.
Plan Like a Pro: Design & Engineering Essentials
Before breaking ground on your paver retaining wall, thorough planning is essential. At MAS Landscaping and Snow Removal, we approach each project with careful site analysis and engineering considerations to ensure long-lasting results.
Site Analysis Fundamentals
When we visit homes in Revere, Chelsea, and surrounding areas, we often start by examining the soil. Soil type makes a huge difference—clay soils hold more water and push harder against walls than sandy soils do. Think of clay as that stubborn friend who doesn’t budge easily!
Wall height is another critical factor. The physics are straightforward but important: taller walls face more pressure from the soil behind them. It’s like trying to hold back a crowd—the taller your barrier, the more force you need to keep things stable.
Will there be anything heavy sitting near your wall? Driveways, sheds, or even regular foot traffic create what we call surcharge loads. These add extra pressure your wall needs to handle. Many homeowners overlook this factor until it’s too late.
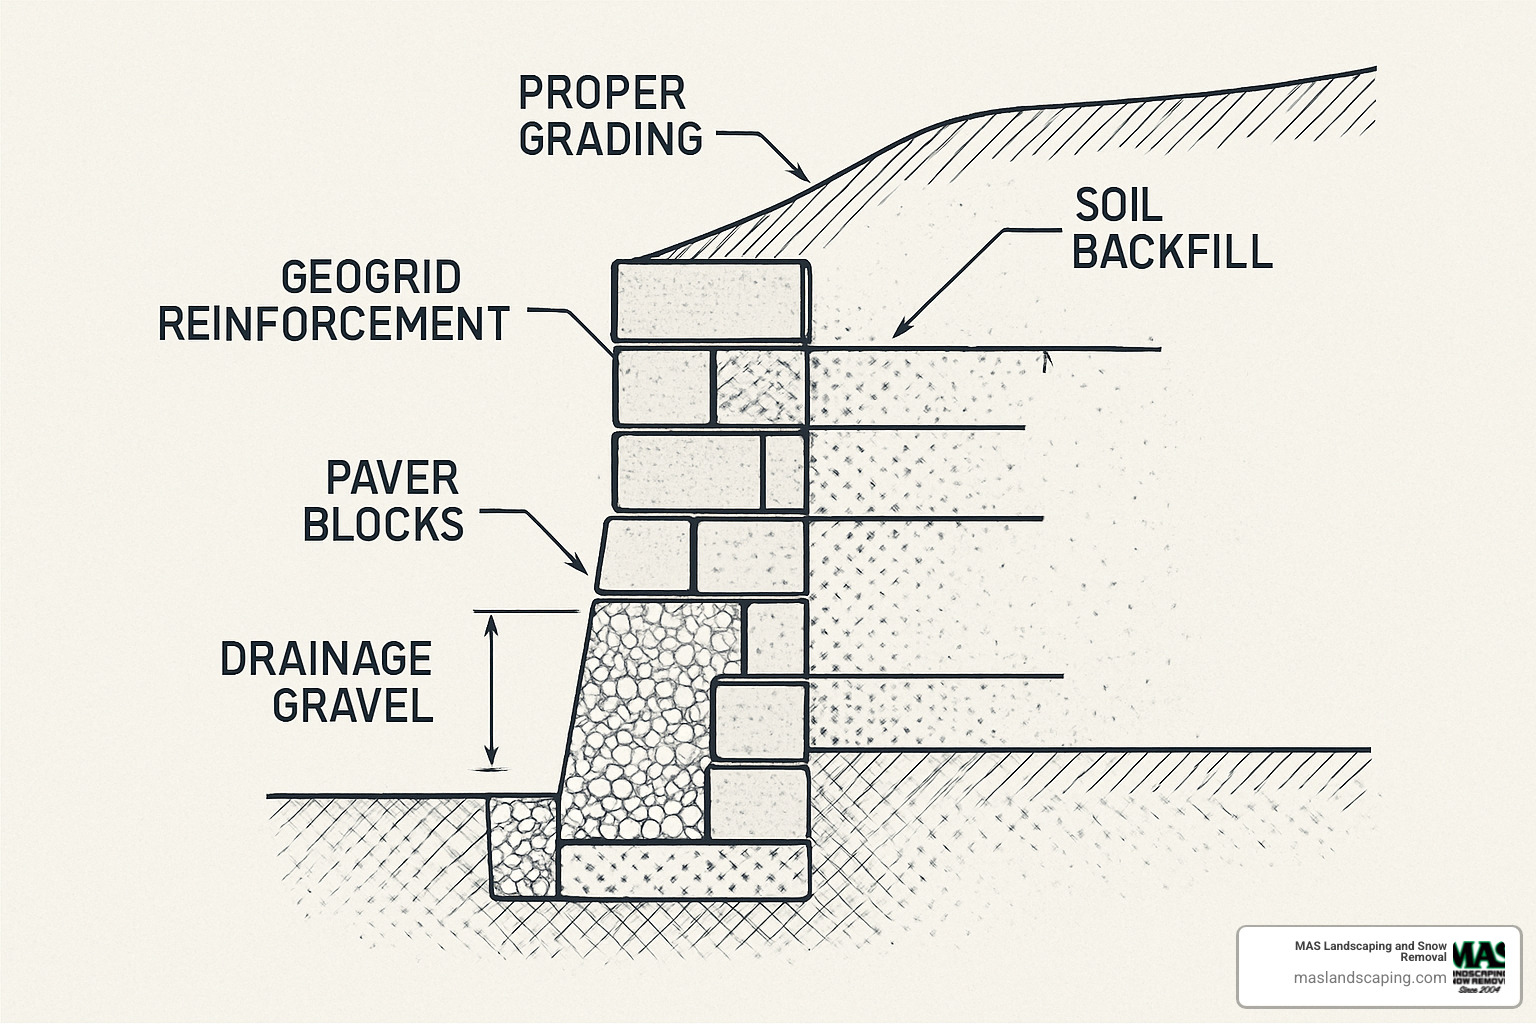
One secret to a stable wall is actually building it with a slight backward lean. This setback or “batter” (typically ½ to 1 inch per vertical foot) dramatically increases stability. It’s counterintuitive, but a perfectly vertical wall is actually less stable than one with a slight lean backward.
In our New England climate, we can’t ignore the frost line. Your wall’s foundation must extend below this line (about 4 feet deep in Massachusetts) or have proper drainage to prevent frost heave damage. We’ve seen many DIY walls fail simply because this detail was overlooked.
Engineering Components
When your wall climbs above 3 feet, additional engineering elements become crucial for long-term success.
Geogrid reinforcement is like adding invisible support beams behind your wall. These synthetic mesh materials extend into the soil, creating a reinforced mass that works with your wall rather than against it. For walls over 4 feet, we typically layer these every 1-2 courses of block.
The base foundation is your wall’s unsung hero. It should be thick, level, and properly compacted—generally about one-half to three-fourths of the wall’s height for gravity walls. Using crushed stone rather than rounded gravel makes a world of difference in stability.
When walls exceed 4 feet, most towns in our service area require permits and professional engineering. We’ve worked with local building departments in Malden, Medford, and Saugus for years and can help steer these requirements. Don’t skip this step—unpermitted walls can lead to fines and even removal orders.
Aesthetic Considerations
Your retaining wall isn’t just functional—it’s also a prominent landscape feature. Modern paver blocks come in dozens of colors and textures that can complement your home’s style. We often bring samples to help clients visualize the finished project.
Consider incorporating built-in features like lighting, seating areas, or planting pockets. These elements transform a simple wall into a multifunctional landscape feature. We’ve designed walls with integrated steps, hidden lighting, and even outdoor kitchen components.
Curves and corners add visual interest but require special planning. Gentle curves often look more natural in the landscape than straight lines, though they require more cutting and fitting during installation.
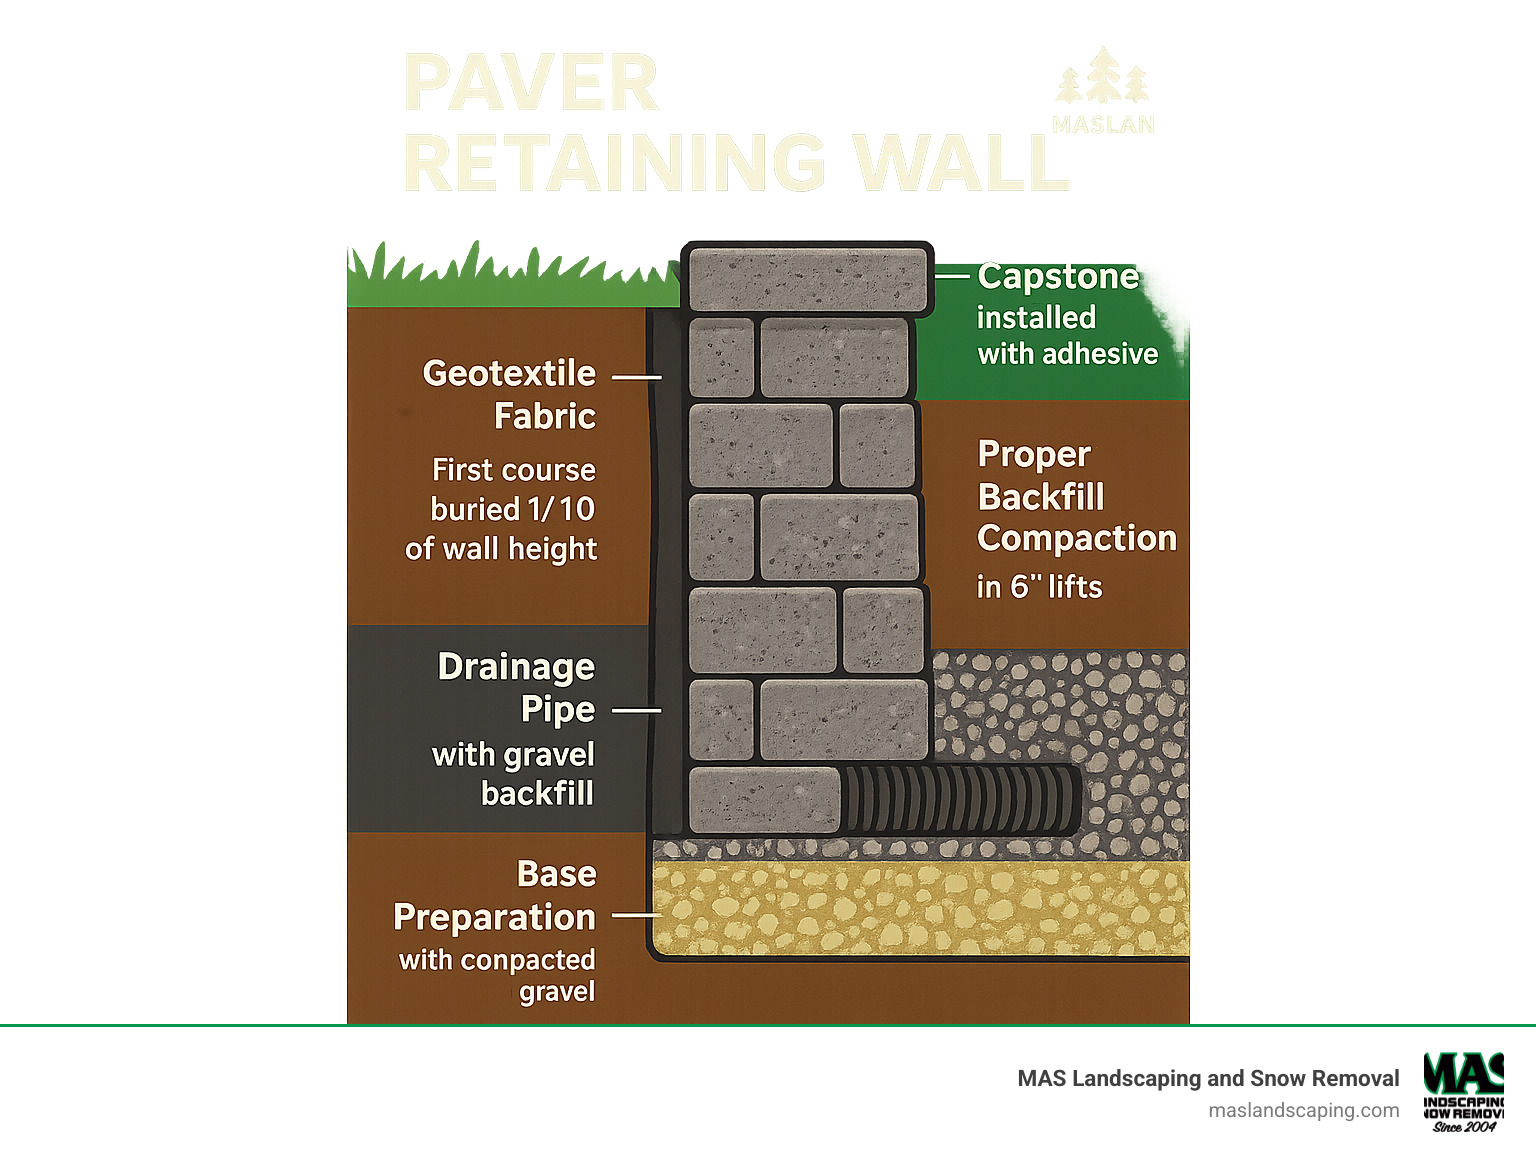
Don’t forget the finishing touch—cap stones provide a polished look while protecting the structure beneath. They’re available in various profiles from sleek and modern to rustic and textured.
Drainage & Erosion Control—The #1 Longevity Factor
If walls could talk, they’d all say the same thing: “Keep me dry!” Water is the primary enemy of any paver retaining wall. When water builds up behind a wall, it creates hydrostatic pressure that can topple even well-built structures.
Proper drainage starts with a perforated pipe at the base of the wall. This 4-inch pipe acts like a hidden gutter, collecting water and directing it away from your wall. It should have a slight slope (minimum ¼ inch per foot) to keep water moving.
Behind your wall, we always install at least 12 inches of clean, drainage stone. This creates a zone where water can flow freely down to the pipe instead of pushing against your wall. It’s like creating a vertical river behind your wall.
Filter fabric (geotextile) prevents soil from washing into your drainage stone and clogging the system. Think of it as a coffee filter—it lets water pass through while keeping the grounds (soil) separate.
For taller walls, we include weep holes at the base—small openings that give water an escape route. They’re simple but effective insurance against water buildup.
According to scientific research, up to 80% of retaining wall failures relate directly to poor drainage. The small additional cost of proper drainage components pays enormous dividends in wall longevity.
When to Call a Civil Engineer or Retaining Wall Company
While we love empowering homeowners with DIY knowledge, there are clear situations where professional help becomes necessary.
Wall height is the most obvious indicator—walls over 3-4 feet tall enter a different category of engineering requirements. The forces increase exponentially with height, not linearly.
Complex site conditions like steep slopes, poor soil quality, or nearby structures also signal the need for professional help. We recently worked on a project in Lynnfield where underground springs complicated the drainage design—something a homeowner might not have identified before breaking ground.
If your wall will support structures like driveways, pools, or buildings, professional engineering is non-negotiable. The stakes are simply too high to guess at proper design.
Local building codes vary significantly between the communities we serve. What’s permitted in Everett might require engineering in Malden. Our team stays current on these requirements so you don’t have to learn the hard way.
At MAS Landscaping and Snow Removal, we’ve installed retaining wall installation projects throughout our service area. We understand the local soil conditions, building codes, and unique challenges of New England landscaping. Whether you’re planning a small garden wall or a major slope-taming project, we’re happy to provide guidance—even if you ultimately decide to tackle it yourself.
Step-by-Step Guide to Building a Paver Retaining Wall
Now that we’ve covered the planning essentials, let’s walk through the actual construction process for your paver retaining wall. Following these steps will help ensure a successful project with long-lasting results.
1. Project Layout and Marking
Before you dig that first shovelful of dirt, proper layout is crucial. Grab some stakes, string, and marking paint to outline exactly where your wall will sit. This might seem tedious, but trust me—this small investment of time prevents major headaches later.
Always call 811 (Dig Safe) before you start excavating. Nothing ruins a weekend project faster than accidentally hitting a gas line or electrical cable! Once you’ve confirmed it’s safe to dig, double-check all your measurements and make sure your wall aligns properly with existing structures and property lines.
2. Excavation and Base Preparation
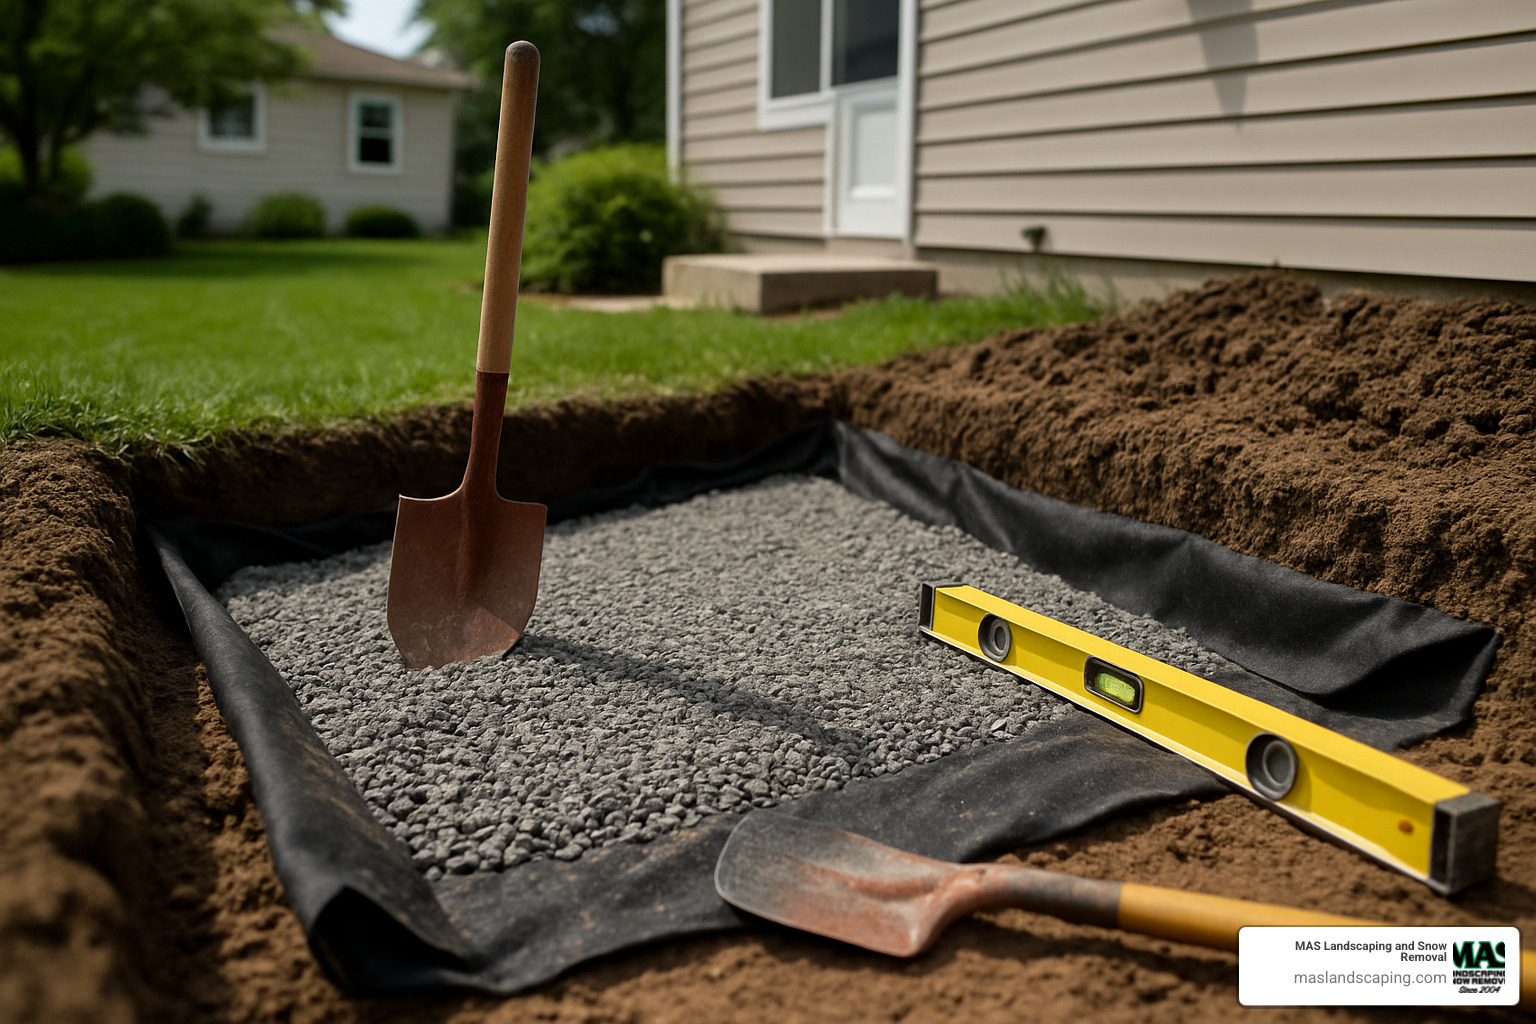
The foundation of your paver retaining wall is literally… well, the foundation. Dig a trench about 24 inches wide. How deep? You’ll need room for 6-8 inches of base material, plus enough depth to bury about 1/10 of your wall’s total height in that first course.
Here in Massachusetts, you might need to go deeper to get below the frost line depending on your wall’s height. Once your trench is dug, compact the soil at the bottom until it’s firm and level. Next comes the crushed stone base—add it in 3-inch layers (what pros call “lifts”), compacting each layer thoroughly before adding the next.
Take your time with leveling. A base that’s off by even half an inch can lead to a wall that’s noticeably crooked by the time you reach the top!
3. Installing the First Course
Your first course sets the stage for everything that follows. Start by positioning your perforated drainage pipe along the back of the trench. This humble pipe is your wall’s best friend, directing water away before it can cause problems.
Lay filter fabric along the back of the trench and up the excavated area. This prevents soil from washing into your drainage stone.
Now place your first block at either the lowest point or next to a fixed feature. This block must be absolutely perfect—level in all directions—as it’s the foundation for your entire wall. Continue placing blocks side by side, checking level as you go. A rubber mallet is perfect for making those tiny adjustments that make all the difference.
Once your first course is in place, add drainage stone behind it, making sure to cover that drainage pipe you installed earlier.
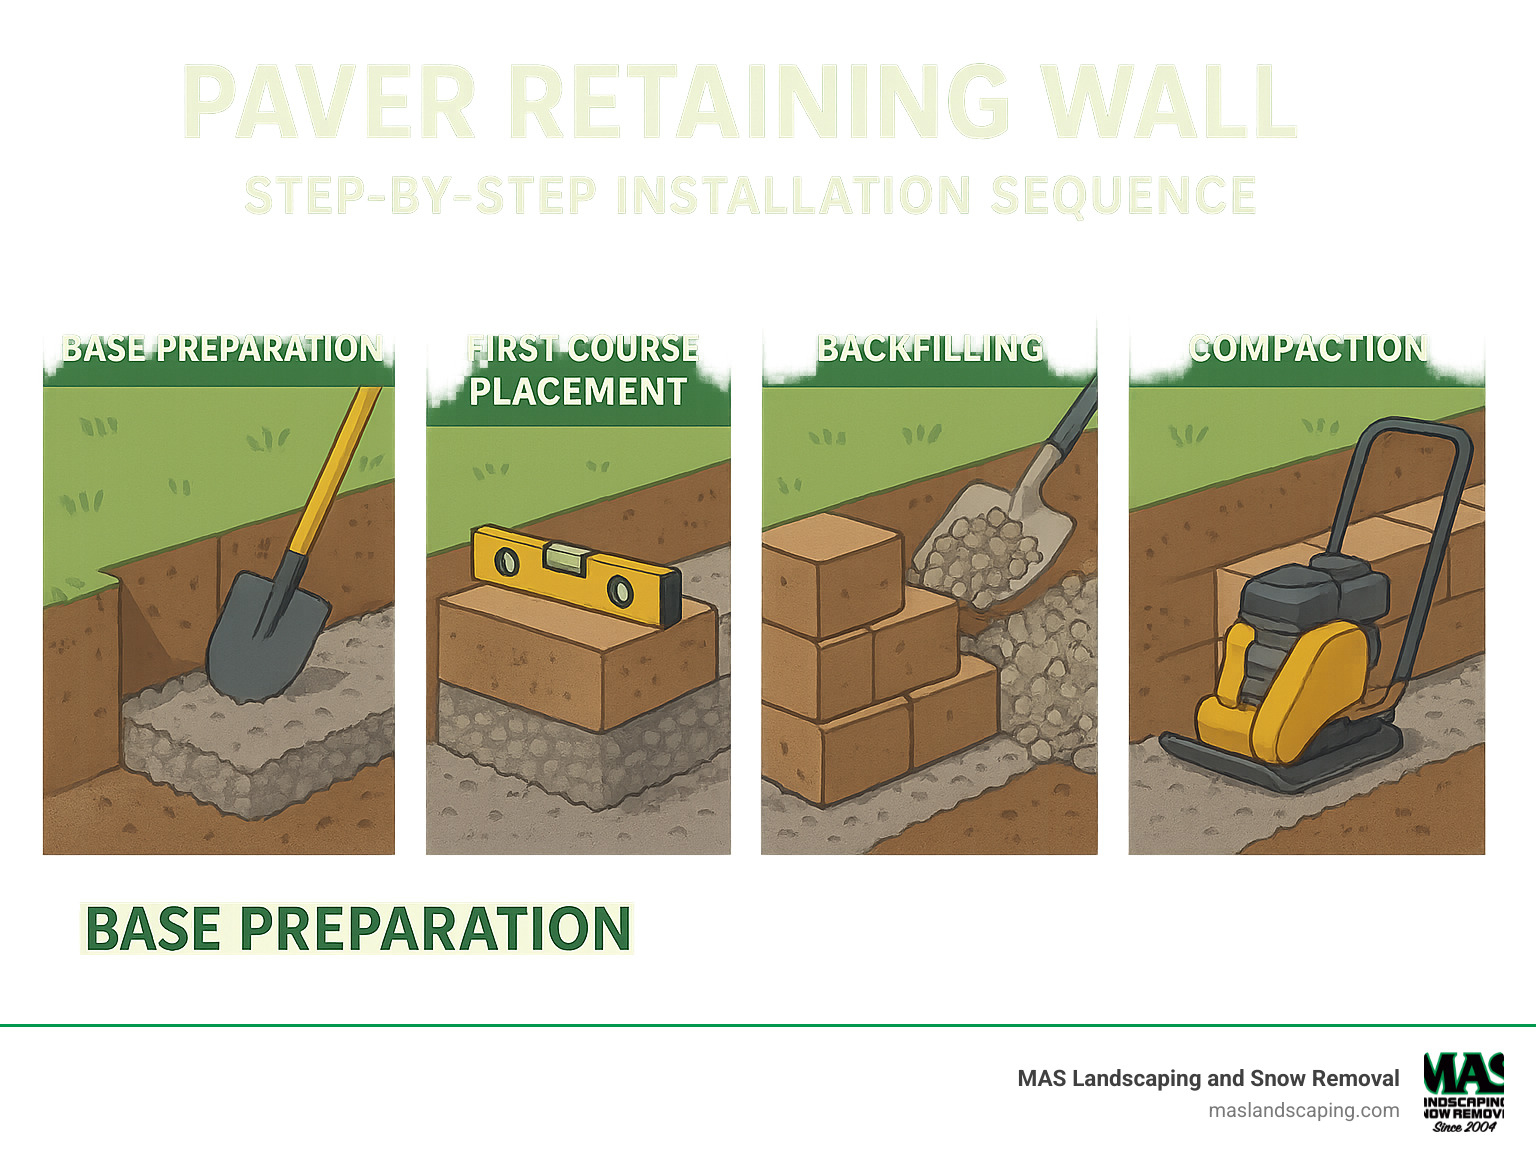
4. Building Subsequent Courses
This is where your wall starts taking shape! Position your second course blocks to straddle the joints of the first course—like building with Legos, this staggered pattern creates maximum stability.
Slight backward lean we talked about? Now’s the time to implement it. Most manufacturers recommend a setback of 1/2 to 1 inch per course. This might not seem like much, but it dramatically increases your wall’s ability to resist pressure from the soil behind it.
Depending on your block system, you might need pins, clips, or special lip designs to secure courses together. Follow the manufacturer’s guidelines here—they designed the system for a reason!
For walls over 3 feet tall, you’ll likely need to install geogrid reinforcement at specified intervals. This synthetic mesh extends back into the soil mass, creating what engineers call a “reinforced soil mass” that works with your wall as a unified system.
As you build upward, continue adding drainage stone (at least 12 inches) directly behind the wall and approved fill material beyond that. Compact every 6 inches of fill—this prevents future settling that could stress your wall. And keep checking that everything stays level and properly aligned as you go up.
5. Installing the Cap Course
The cap course isn’t just decorative—it’s the finishing touch that helps protect and stabilize your entire wall. Start by thoroughly cleaning the top course of blocks to ensure good adhesion.
Apply a high-quality concrete adhesive designed specifically for retaining walls. This keeps your caps from shifting over time—especially important in our New England freeze-thaw cycles. Place your cap blocks carefully, ideally staggering the joints from the course below for added stability.
Take your time here and make sure everything is perfectly aligned before the adhesive sets. A beautiful cap course is what everyone notices first!
6. Final Backfilling and Grading
You’re in the home stretch! Complete the drainage layer by ensuring the drainage stone extends fully behind the wall. Fold the filter fabric over the top of this drainage stone—this simple step prevents soil from washing down into your carefully constructed drainage system.
Finish backfilling with appropriate soil, continuing to compact in 6-inch lifts. Create a slight slope away from the wall (at least 1/2 inch per foot) to direct surface water away from your structure. Finally, add topsoil and landscaping to complete your project. Just be careful not to disturb the wall structure with aggressive planting.
Tools & Materials Checklist
Building a paver retaining wall requires some specific equipment. For tools, you’ll need the basics like a shovel, pick, wheelbarrow, and tape measure, plus some specialty items like a line level, mason’s string, 4-foot carpenter’s level, rubber mallet, and safety gear. A plate compactor is essential for proper base preparation—most homeowners rent this rather than buy.
For materials, calculate your block quantity based on your wall dimensions (most manufacturers have calculators on their websites). Don’t forget cap blocks, crushed stone for the base and drainage, perforated pipe, filter fabric, concrete adhesive, and possibly geogrid reinforcement for taller walls.
Common Mistakes to Avoid
In our years of building paver retaining walls throughout Everett, Lynnfield, and Malden, we’ve seen some common pitfalls that even experienced DIYers encounter.
Poor base preparation is probably the most frequent issue. That extra hour spent getting your base perfectly level and compacted will save you days of frustration later. Neglecting proper drainage is the single biggest cause of wall failure—that perforated pipe and drainage stone aren’t optional extras!
Many DIYers also make the mistake of building walls too vertical without proper setback. A wall that doesn’t lean slightly backward is fighting physics—and physics always wins eventually. Using clay soil as backfill is another common error; it holds water and creates massive pressure against your wall.
For walls over 3 feet, skipping geogrid reinforcement is asking for trouble. And don’t forget to check if you need permits—having to tear down and rebuild because you overlooked permit requirements is a painful lesson to learn.
DIY vs Professional Installation
Is building a paver retaining wall a good DIY project? It certainly can be, especially if your wall is under 3 feet tall, you have some experience with similar projects, and you have access to the right equipment. DIY can be rewarding and cost-effective when done right.
However, there are clear situations where professional installation makes more sense. If your wall exceeds 3 feet in height, needs permits and engineering, or the site has challenging conditions like poor soil or drainage issues, calling in experts will save you time, stress, and potentially money in the long run.
At MAS Landscaping and Snow Removal, we’ve built countless retaining walls throughout Saugus, Everett, and surrounding communities. Our team understands the unique soil conditions and building requirements in Massachusetts, and we offer comprehensive retaining wall services backed by our workmanship guarantee. Whether you’re looking for guidance on a DIY project or full professional installation, we’re here to help ensure your wall stands the test of time.
Budgeting & Cost Factors for Paver Retaining Walls
Planning for your paver retaining wall project requires understanding what drives the costs. Like most home improvement projects, retaining walls have several variables that influence the final price tag. Let’s break down what you can expect to pay and why.
Key Cost Factors
The size of your wall naturally plays the biggest role in determining cost. A small garden wall will cost significantly less than a large slope-stabilizing structure. Height especially matters—taller walls need deeper foundations, more materials, and often engineering expertise.
Material quality makes a substantial difference too. Just like shopping for furniture, you’ll find good, better, and best options. Economy blocks might look similar to premium ones at first glance, but differences in durability, color-fastness, and warranty protection justify the price difference.
Your property’s unique characteristics also impact the bottom line. Is your backyard easily accessible for equipment, or will materials need to be hand-carried? Is your soil sandy and well-draining, or clay-heavy and challenging? The answers affect labor costs significantly.
Engineering requirements add another layer to your budget planning. Walls over 4 feet tall typically need professional engineering plans in most Massachusetts communities we serve. While this adds cost upfront, it’s essential for safety and longevity.
Don’t forget about the invisible heroes of your wall—the drainage components. Proper drainage systems might seem like an optional expense, but they’re actually the lifeline of your wall. Without them, even the most beautifully built wall can fail prematurely.
For taller walls, geogrid reinforcement becomes necessary. These synthetic mesh materials extend into the soil behind the wall, creating a reinforced mass that acts as part of the wall system. They add cost but dramatically increase stability.
Finally, the finishing touches—caps, curves, corners, and integrated features like lighting or built-in seating—all contribute to the final price but also to the wow-factor of your completed project.
Typical Cost Ranges
Based on industry data (not MAS Landscaping and Snow Removal pricing), paver retaining walls nationwide typically cost between $100-$261+ per linear foot, including professional installation. For perspective, a typical 60-foot wall might range from about $6,800 on the low end to over $15,000 for premium materials and complex designs.
The cost breakdown usually follows a consistent pattern: materials account for 35-40% of your budget, labor takes the largest chunk at 45-55%, equipment rental runs 5-15%, and permits/engineering costs vary by location and project complexity.
Regional factors affect pricing too. Here in Massachusetts, our frost line depth, seasonal considerations, and local material availability all influence costs differently than in other parts of the country.
Money-Saving Tips Without Cutting Corners
Building a quality paver retaining wall doesn’t mean emptying your savings account. Here are some smart ways to manage costs without compromising on quality:
Roll up your sleeves for the site preparation. Clearing brush, removing old structures, and even some basic excavation work can reduce labor costs if you’re willing and able to tackle these tasks yourself.
Consider scheduling your project during the off-season. Fall and winter months (weather permitting) often mean more competitive pricing as contractors like us have more availability in our schedule.
Bundle multiple projects for better value. If you’re also planning a patio or walkway, combining projects often leads to efficiencies in labor and material delivery costs.
For larger walls, phased construction might make financial sense. Building your wall in planned stages allows you to spread the investment over time while still achieving your landscape goals.
When selecting materials, simpler block designs often cost less than premium multi-piece systems while providing identical structural integrity. The basic blocks might lack some aesthetic features, but they’ll hold back soil just as effectively.
Don’t be shy about getting multiple quotes for your project. This ensures you’re receiving competitive pricing and might reveal different approaches to solving your landscape challenges.
At MAS Landscaping and Snow Removal, we take pride in finding the sweet spot between quality and affordability for our clients throughout Saugus, Everett, Lynnfield, Malden and surrounding communities. We’re happy to walk you through options that fit your budget while still creating a wall you’ll be proud of for decades. For more detailed information about costs specific to your project, visit our page on paver retaining wall cost.
Maintaining & Upgrading Your Wall for Decades
With proper installation and care, your paver retaining wall can be a lasting feature of your landscape for 80+ years. Like any quality investment in your property, a little attention goes a long way in preserving both function and beauty.
Regular Maintenance Schedule
The good news about paver retaining walls is they’re remarkably low-maintenance compared to other landscape features. Still, a simple annual inspection each spring can prevent small issues from becoming big problems.
Walk along your wall looking for any block movement or shifting that wasn’t there before. Check for cracks or damage to individual blocks, which might indicate pressure points developing. Make sure your drainage systems are clear and functioning properly—this is absolutely crucial after winter thaws and spring rains here in Massachusetts.
The changing seasons each bring their own maintenance needs. In spring, clear any debris from drainage outlets that might have accumulated during winter. Summer is the time to keep an eye on vegetation—those volunteer plants that sprout near your wall might have root systems that can eventually cause damage. Come fall, be diligent about removing leaves and organic matter from behind and around your wall. And in our New England winters, try to avoid using de-icing salts near your wall, as they can damage concrete over time.
Common Maintenance Tasks
Most paver retaining wall maintenance is straightforward enough for any homeowner to handle. If your wall has open joints, they may need occasional replenishment with polymeric sand to maintain their integrity. This simple step prevents weeds and helps lock blocks in place.
When it comes to plants, it’s best to keep deep-rooted varieties at least 3 feet from your wall. Those roots can exert surprising pressure over time! Small, shallow-rooted plants are generally fine and can actually improve the wall’s appearance.
That white, powdery substance you might notice on your blocks? That’s efflorescence—mineral deposits that naturally migrate to the surface. It’s harmless but can be easily removed with a mild vinegar solution or a commercial efflorescence cleaner.
Drainage maintenance might be the single most important factor in your wall’s longevity. Take time each year to ensure drain outlets remain clear and functioning. If water isn’t flowing freely through your drainage system, a simple flush with a garden hose can often solve the problem.
If you notice slight settling, address it promptly. What starts as a minor issue can progress if left unchecked. And while gentle pressure washing (under 1500 PSI) can remove dirt and algae, avoid high pressure that could damage your block surfaces.
Enhancing Your Wall Over Time
One of the wonderful aspects of paver retaining walls is their adaptability. Your wall can evolve with your needs and tastes over the years.
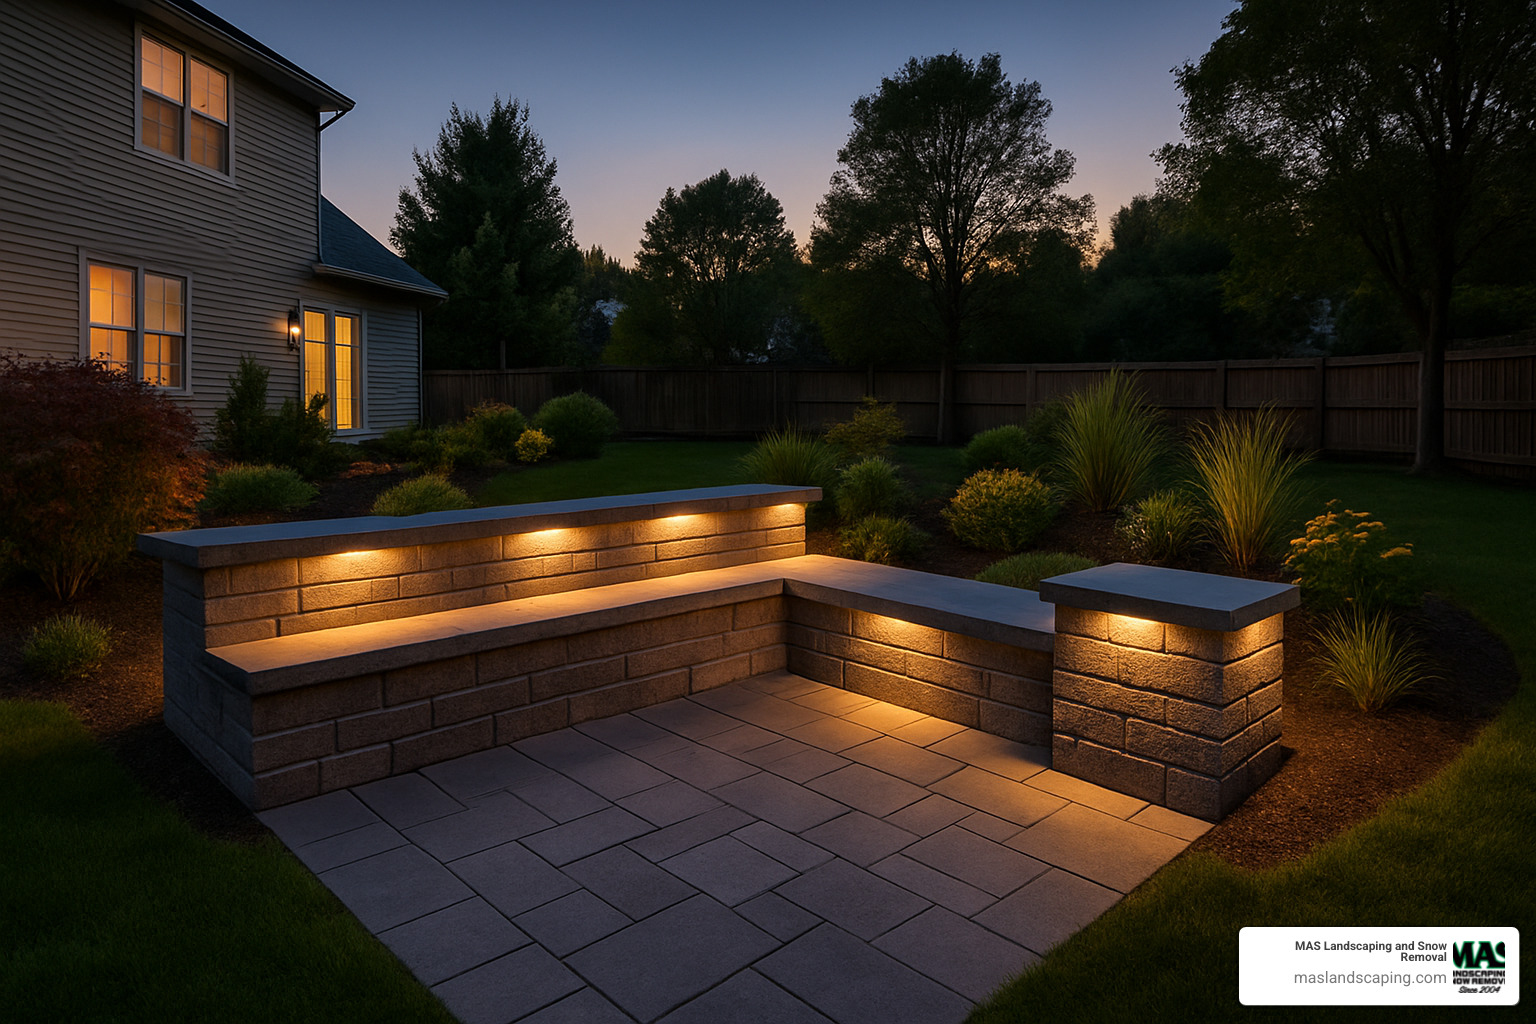
Lighting transforms both the function and mood of your outdoor space. Adding low-voltage LED lighting systems not only improves safety but creates dramatic nighttime effects that showcase your landscaping. Many of our clients in Saugus and surrounding towns have found that lighting extends their enjoyment of outdoor spaces well into the evening.
Consider replacing standard caps with wider options to create built-in seating—perfect for casual gatherings or just enjoying your garden. For the plant enthusiasts, installing planting pockets or attaching planters adds vertical greenery that softens the wall’s appearance.
Water features like small waterfalls or fountains can turn your wall into a focal point that engages multiple senses. The sound of flowing water adds a peaceful dimension to your outdoor environment.
For those who eventually want a fresh look without a complete rebuild, some newer wall systems allow for changing just the facing panels while maintaining the structural portion of the wall. And as your outdoor living needs grow, adding coordinating pavers to create or expand patio spaces can beautifully complement your existing wall.
Latest Design Trends in Paver Retaining Walls
The world of paver retaining walls has come a long way from the basic blocks of yesteryear. Today’s trends focus on multi-functionality and personalization.
Modular multi-face systems now offer interchangeable fascia panels that allow you to mix colors, textures, and patterns directly on the wall surface. This customization creates truly unique designs that reflect your personal style.
We’re seeing more clients throughout our service area requesting mixed materials—combining different block types with natural stone accents or metal elements for distinctive, personalized designs. These combinations add visual interest and can tie together different elements in your landscape.
The integration of outdoor living features has become particularly popular. Walls that incorporate built-in seating, fire pits, planters, and even outdoor kitchen components maximize functionality in limited spaces. This approach is especially valuable in the tighter lot sizes we often work with in communities like Chelsea and Revere.
Tiered and terraced designs using multiple shorter walls instead of one tall wall create visual interest while providing usable planting or seating areas. This approach often feels more natural in the landscape and creates opportunities for varied plantings.
For the environmentally conscious homeowner, permeable solutions that allow water infiltration are gaining popularity, particularly in areas with stormwater management regulations. These systems help reduce runoff while still providing the structural benefits of a traditional wall.
Smart lighting integration with programmable LED systems that change colors or respond to movement improves both safety and ambiance. These systems can be controlled from your smartphone, allowing you to adjust lighting for different occasions.
Throughout the communities we serve—from Malden to Melrose and beyond—we’re noticing growing interest in retaining walls that do more than just hold back soil. Today’s homeowners want multi-functional outdoor spaces that extend their living areas while enhancing property value, and a well-designed paver retaining wall can be the foundation of that change.
Frequently Asked Questions About Paver Retaining Walls
How tall can I build a paver retaining wall without a permit?
“So, how high can I build before I need to call the town?” This is probably the most common question we hear from homeowners across Saugus, Everett, and surrounding communities.
In most municipalities throughout our service area, you can typically build a paver retaining wall up to 3-4 feet tall without needing a permit. However, I always tell my clients to think of this as a general guideline rather than a hard rule.
Every town has its own specific requirements. In some places, they measure from the bottom of your first course to the top of the cap, while others might consider the total height differential the wall creates. Walls near property lines often face stricter scrutiny, and any wall supporting a structure (like a driveway or deck) will almost certainly require permits regardless of height.
If your property sits in a conservation area or wetland buffer zone, you might face additional restrictions even for smaller walls. We’ve helped many homeowners in Melrose and Revere steer these requirements, and I’m always surprised by how much local regulations can vary.
Before you dig that first shovel of dirt, it’s worth a quick call to your building department. At MAS Landscaping, we’re happy to help guide you through the permitting process for your specific location—it’s much easier than having to modify or remove a wall later!
Do I really need drainage pipe behind a small garden wall?
I hear this question often, especially for decorative garden walls, and my answer is always a friendly but firm “yes!”
Even small paver retaining walls benefit tremendously from proper drainage. While the full drainage system becomes increasingly critical as walls get taller, even those cute little 18-inch garden borders can fail prematurely without some drainage consideration.
Here’s why: When water builds up behind any wall, it creates pressure—hydrostatic pressure, to be technical. This pressure can be surprisingly powerful, especially after heavy New England spring rains or during freeze-thaw cycles. I’ve seen many DIY walls push forward or bulge simply because this basic principle was overlooked.
For smaller garden walls under 2 feet, you can often simplify the approach. At minimum, include a 6-12 inch layer of drainage stone behind the wall. Consider adding some simple weep holes at the base, and always make sure the ground slopes away from the top of your wall.
The small additional cost of basic drainage components provides tremendous insurance against premature failure. Trust me—the few extra dollars spent on gravel now will save you from rebuilding your wall a few years down the road!
What maintenance should I expect after the first year?
Good news! A properly built paver retaining wall is remarkably low-maintenance, especially after it gets through its “settling in” period.
During the first year, it’s completely normal to see some minor settling as the base compacts under the wall’s weight. You might notice slight movement of cap stones or some compression of the backfill material. These aren’t defects—they’re just part of your wall finding its final position.
After that initial period, maintenance becomes pretty straightforward. I recommend a simple annual spring inspection when you’re already out doing your yard cleanup. Look for any block movement, check that water is draining properly, and make sure no deep-rooted plants are trying to establish themselves too close to your wall.
Occasional cleaning to remove dirt, pollen, or the whitish powder called efflorescence might be needed, especially on lighter-colored walls. A gentle pressure washing (keep it under 1500 PSI) usually does the trick.
Most of our clients in Malden and Chelsea find that their walls require very little attention after proper installation. The maintenance is almost entirely preventative rather than reactive—a quick check now prevents problems later.
Can I build a curved paver retaining wall?
Absolutely! In fact, the ability to create beautiful curves is one of the biggest advantages of paver retaining walls over poured concrete options.
Curves add such visual interest to a landscape—they feel more natural and can transform an ordinary retaining wall into a true design feature. Many of our clients in Medford and Revere prefer curved walls that follow natural contours or create more organic-looking garden spaces.
If you’re planning curves, choose a block system designed with this in mind. Some blocks have slightly tapered sides specifically to accommodate curves without creating gaps. For tight inside curves, you might need to cut some blocks, while outside curves typically require more blocks than straight sections.
A simple trick we use: lay out your desired curve with a garden hose or rope before excavating. This gives you a clear visual guide and helps calculate materials more accurately. Just remember to maintain a consistent setback (that slight backward lean) around curves—it’s even more important for structural integrity on curved sections.
How do I choose the right block style for my home?
Selecting the perfect block style can feel overwhelming with so many options available, but I like to help clients break it down to three main considerations.
First, think about your home’s architecture. Traditional New England homes often pair beautifully with classic tumbled or split-face blocks that have a more established, timeless look. More contemporary homes in our service area tend to suit sleeker, more modern block profiles with cleaner lines. Whenever possible, try to match or complement existing hardscape elements like walkways or patios.
Second, be practical about your functional requirements. Taller walls need blocks with specific structural capabilities—not all pretty blocks can handle significant height. If you’re planning tight curves or complex corners, certain block types will make construction much easier. And if you’re dreaming of integrated features like built-in lighting or seating, you’ll need systems designed for those purposes.
Finally, consider your maintenance preferences. In our Massachusetts climate, textured surfaces generally hide dirt and winter salt residue better than smooth faces. Darker colors typically show less staining over time, and some finishes are more resistant to efflorescence (that white powdery substance that can appear on concrete).
At MAS Landscaping and Snow Removal, we help clients throughout Everett, Lynnfield, and surrounding areas select block styles that not only look beautiful but also match their practical needs. We’re happy to provide samples and show you portfolio examples of completed projects to help you visualize how different options might look in your specific landscape.
Conclusion
Building a paver retaining wall is both a science and an art. When done right, these walls transform your property in ways that go far beyond just holding back soil. They turn sloped areas into usable spaces, boost your property’s value, and add character to your landscape.
After walking through this guide, here’s what I hope you’ll take away:
First, never skip the planning phase. Understanding your unique site conditions, soil type, and drainage needs before you dig that first shovelful of dirt will save you headaches (and money) down the road.
Drainage isn’t optional – it’s absolutely essential. I can’t stress this enough: water is your wall’s biggest enemy. The number one reason retaining walls fail is poor water management. Those drainage pipes and gravel backfill aren’t places to cut corners if you want your wall to last.
Remember to respect the physics. Retaining walls work with gravity and leverage, which means proper base preparation, the right amount of setback, and appropriate reinforcement aren’t just suggestions – they’re requirements for a stable structure.
Know your limits. While DIY construction works great for smaller walls, there comes a point where professional expertise becomes necessary. Walls over 3-4 feet tall typically need engineering know-how and permits. When in doubt, reach out to experts.
The good news? Once built correctly, your paver retaining wall needs surprisingly little maintenance. A quick annual inspection and some basic upkeep will keep it functioning beautifully for decades.
At MAS Landscaping and Snow Removal, we’ve built countless paver retaining walls throughout Everett, Lynnfield, Malden, Melrose, Medford, Revere, Saugus, and Chelsea. Our team understands Massachusetts soil conditions, weather challenges, and what looks best in New England landscapes.
Whether you’re dreaming of a simple garden wall or tackling a major slope change, we’re here to help from the initial design sketches through professional installation and beyond. For more information about our retaining wall installation services or to schedule a consultation, please reach out to us.
With the right approach and proper care, your paver retaining wall will stand strong for generations while making your outdoor space more beautiful, functional, and valuable. That’s an investment worth making.
