Patio Paver Installation: 7 Essential Tips for Success
Patio paver installation transforms your backyard into a beautiful, low-maintenance extension of your living space. It might sound like a complex task, but with the right guidance, you can create a stunning outdoor area that stands the test of time. Here’s a quick overview to get you started:
- Plan Your Space: Design the patio, consider patterns, and calculate materials.
- Prepare the Ground: Clear vegetation and debris, ensure a solid base.
- Lay the Pavers: Carefully place, level, and secure your chosen pavers.
- Finishing Touches: Add sand between pavers, compact and seal for durability.
Whether you’re aiming for a simple walkway or an intricate patio path, pavers offer an ideal solution. They are versatile, durable, and require little upkeep, making them a perfect choice for homeowners seeking elegance and functionality in their outdoor spaces.
For those in the Greater Boston area, MAS Landscaping and Snow Removal is your go-to partner. We bring your vision to life with professional expertise, ensuring your project not only meets but exceeds your expectations. With locations across cities like Everett and Lynnfield, we’re just a call away to assist with your landscaping needs.

Patio paver installation terms to learn:
– backyard with pavers and artificial grass
– brick paver patio contractor
– garden paving companies near me
Preparing the Ground for Pavers
Before you start laying pavers, it’s crucial to prepare the ground properly. This step ensures your patio will last for years without shifting or settling. Here’s how to get it right.
Clear the Area: Root and Rubble-Free
First, clear the area where you plan to install the pavers. Remove all grass, roots, and debris. You want a clean slate to work with. Use a spade and shovel to dig down to the required depth. This depth should account for the layers of gravel, sand, and the pavers themselves.
Tip: Before digging, mark the area with marking paint and use garden stakes to outline the perimeter. This helps keep your project organized.
Lay the Sand Sub-Base
Once the area is clear, it’s time to add the sand sub-base. This layer is crucial because it provides a level surface for the pavers. Spread a 1-inch layer of sand evenly across the entire area.
Use electrical conduit to help guide you in leveling the sand. Place the conduit on the base and drag a 2- x 4-foot board across it to smooth the sand. This technique ensures an even surface, which is vital for the stability of your paver patio.
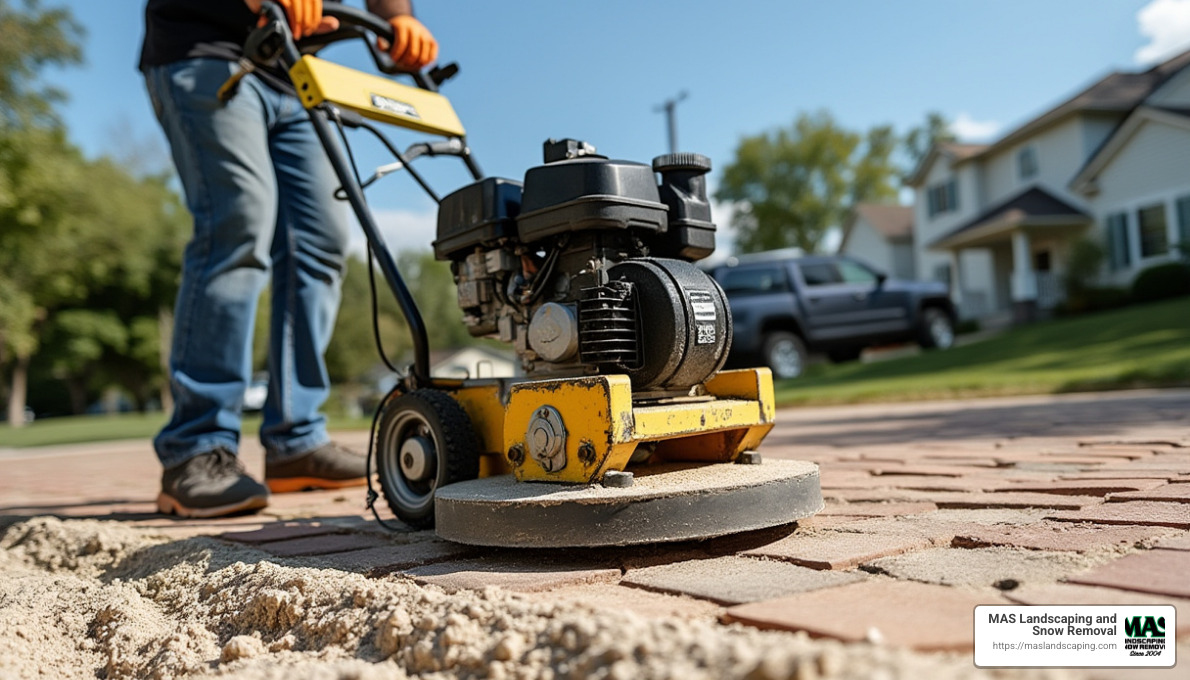
Compact the Ground: Hand or Mechanical Compactor
After leveling the sand, it’s time to compact the ground. You can use a hand tamper for small areas or a mechanical plate compactor for larger spaces. Compacting the ground helps prevent future shifting and settling of the pavers.
Tip: Lightly wet the sand before compacting. This helps the sand settle more firmly, providing a solid base for the pavers.
By preparing the ground carefully, you set the stage for a successful patio paver installation. This foundational work is essential for creating a patio that not only looks great but also withstands the test of time.
Next, let’s dive into the materials you’ll need under the pavers to ensure durability and stability.
Materials to Put Under Pavers
Choosing the right materials to put under your pavers is crucial for a long-lasting patio. Here’s a breakdown of the key materials you should consider:
Mortar
Mortar is a mix of cement, sand, and water. It’s used to bind pavers together, especially in areas that need extra stability. Mortar is ideal for heavy-duty installations, like driveways or areas with lots of foot traffic. It creates a firm bond, preventing pavers from shifting over time.
Sand
Sand is the most common material used under pavers. It acts as a leveling base, ensuring each paver sits evenly. A 1-inch layer of sand helps absorb movement and provides a cushion. Use paver sand specifically designed for this purpose, as it compacts well and resists erosion.
Bituminous Material
Bituminous material, or asphalt, is sometimes used under pavers in commercial or high-traffic areas. It offers excellent durability and water resistance. This material can also be used for pathways or patios that need to withstand heavy loads. However, it’s less common in residential settings due to its industrial nature.
Pedestals
Pedestals are adjustable supports that raise pavers off the ground. They’re great for creating liftd patios or decks with excellent drainage. Pedestals allow for easy access to utilities underneath and can be adjusted to create a perfectly level surface. They’re especially useful on rooftops or areas with uneven terrain.
Each of these materials plays a vital role in patio paver installation. Your choice will depend on the specific needs of your project, such as the type of soil, expected load, and desired longevity.
Now that you know what materials to use under your pavers, let’s move on to the step-by-step process of installing a paver patio.
Steps to Install a Paver Patio
Installing a paver patio involves several important steps, each crucial for a durable and attractive finish. Here’s a simple guide to help you through the process.
Prepare the Patio Area
Start by marking the perimeter of your patio area using marking paint. This gives you a clear outline of where you’ll work. Next, drive garden stakes into the ground just outside the painted lines. Attach a mason’s line to the stakes to ensure your patio will have the correct slope for drainage.
Clear Out Grass and Soil
With the area marked, it’s time to clear out the grass and soil. Use a spade and shovel to dig out the area to the required depth. You will need space for the paver base, sand, and pavers themselves. Maintain the correct depth and slope to ensure water drains away from any structures.
Add Paver Base
Spread a 4-inch layer of gravel using a landscape rake. This will form the base of your patio. Compact the gravel with a tamper or, for larger areas, a plate compactor. This step is crucial for creating a stable foundation.
Add and Level the Paver Sand
Lay down lengths of electrical conduit on top of the compacted gravel. These will act as guides. Pour paver sand between the conduits and use a 2- x 4-foot board to level the sand. Check your work with a level to ensure a flat surface. Remove the conduits and fill the gaps with sand.
Place the Paver Stones
Begin laying the paver stones from a corner, working outwards. Place each stone straight down into the sand and fit them snugly together. Avoid dragging the stones across the sand, and never stomp them into place. This ensures a neat and stable installation.
Cut Pavers
If you need to cut any pavers to fit your design, use a masonry saw. Always wear gloves and protective eyewear for safety. Mark the cutting line on the paver with a straight edge before cutting for precision.
Add Edging Stones or Paver Edging
Secure the edges of your patio with edging stones or paver edging. Edging stones can be set in concrete or mortar for a solid finish. Alternatively, use hard plastic edging, staking it into the ground to hold everything in place.
Finish the Patio
Spread a light layer of paver sand over the entire patio. Use a push broom to sweep the sand into the gaps between the pavers. Run a plate compactor over the surface to settle the sand and pavers. Repeat the sand and compactor process once more to ensure everything is secure.
By following these steps, you’ll create a beautiful and functional paver patio that improves your outdoor space. Now, let’s move on to frequently asked questions about patio paver installation.
Frequently Asked Questions about Patio Paver Installation
How do you prepare the ground for pavers?
Preparing the ground is the first and most important step in patio paver installation. Begin by marking the area with marking paint to outline where your patio will go. Next, use a spade and shovel to clear the area of grass and soil. Dig deep enough to accommodate the layers of gravel, sand, and pavers. A good rule of thumb is to dig down about 6 inches.
It’s crucial to ensure the ground is level and slopes away from any structures to allow water to drain properly. A slight slope of 1 inch every 8 feet is usually recommended. Use a mason’s line attached to garden stakes to maintain the correct slope.
What do you put under pavers?
Underneath your pavers, you’ll need a few key materials to ensure stability and longevity:
- Gravel Base: Start with a 4-inch layer of gravel. This provides a sturdy foundation and aids in drainage. Compact it well using a tamper or plate compactor.
- Paver Sand: Lay a 1-inch layer of sand on top of the gravel. This helps create a smooth, level surface for the pavers to rest on. Use electrical conduit as guides and a 2- x 4-foot board to level the sand.
- Paver Edging: Secure the perimeter with hard plastic edging or edging stones set in concrete or mortar. This keeps the pavers in place and maintains the integrity of the patio.
Can you lay pavers directly on dirt?
While it might be tempting to skip the base layers and lay pavers directly on dirt, this is not recommended. Without a proper base, pavers are more likely to shift, sink, or become uneven over time. The dirt alone doesn’t provide adequate drainage or stability.
By investing the effort in preparing the ground and using the appropriate base materials, you’ll ensure your patio paver installation stands the test of time and remains a beautiful feature of your outdoor space.
Conclusion
In summary, installing a patio with pavers can be a rewarding DIY project that improves your outdoor space’s beauty and functionality. By following the steps outlined—from preparing the ground to finishing the patio with paver sand—you’ll create a durable and attractive area for relaxation and entertainment.
However, if you prefer professional assistance or want to ensure the highest quality results, MAS Landscaping and Snow Removal is here to help. Our team in Saugus, MA, specializes in crafting stunning and functional outdoor spaces custom to your needs. We bring a commitment to professionalism and personalized service, leveraging our local expertise to deliver exceptional results.
Whether you’re envisioning a serene garden or a vibrant patio for family gatherings, our experts are ready to transform your yard into a personal retreat that reflects your style and meets your outdoor living needs.
Ready to improve your outdoor living space? Contact us today to get started on planning your perfect landscape with MAS Landscaping and Snow Removal. Let us help you create a beautiful and functional outdoor space that you and your family will enjoy for years to come.
