Landscape Paver Walls: 10 Best Stunning Choices 2025
Why Landscape Paver Walls Transform Your Outdoor Space
Landscape paver walls are interlocking concrete or natural stone structures that create functional barriers while adding beauty to your yard. Whether you need to hold back soil on a slope or create defined outdoor spaces, these walls offer both form and function.
Quick Overview: What You Need to Know
- Retaining walls hold back soil and prevent erosion (require proper drainage)
- Freestanding walls create boundaries and seating areas on flat ground
- Materials range from basic concrete blocks to premium natural stone veneer
- Height limits vary by location (typically 3-4 feet without permits)
- Lifespan of 50+ years with proper installation and maintenance
The numbers tell the story of why homeowners love these walls. Research shows that retaining walls can increase usable yard space by up to 50% on sloped properties by creating level terraces. They also reduce soil erosion by up to 90% in landscaped areas when properly installed with adequate drainage.
Modern paver walls use interlocking concrete blocks engineered to withstand a minimum compressive strength of 5,000 PSI. This means they resist freeze-thaw cycles and last decades longer than traditional timber walls. Plus, they’re available in over 20 styles from leading manufacturers, giving you plenty of design options.
As one industry expert notes: “Some walls divide. Ours add.” The best landscape paver walls don’t just solve problems – they create opportunities for better outdoor living.
Key terms for landscape paver walls:
Landscape Paver Walls: What They Are & Why They Matter
Think of landscape paver walls as the Swiss Army knife of outdoor construction. These modular building systems tackle your yard’s biggest challenges while making everything look intentional and beautiful. Unlike intimidating concrete pours or heavy stone work, paver walls use interlocking blocks that fit together with satisfying precision.
The magic happens in two main ways. Retaining walls are the workhorses that hold back soil on slopes – they’re literally keeping your yard from sliding downhill during the next big storm. These need proper engineering with deep foundations, drainage systems, and often permits for anything over 2-4 feet tall.
Freestanding walls are the more relaxed cousins that create boundaries and outdoor rooms on level ground. Since they’re not fighting soil pressure, they’re much simpler to build but still need solid foundations to look great for decades.
| Feature | Retaining Walls | Freestanding Walls |
|---|---|---|
| Purpose | Hold back soil on slopes | Create boundaries on flat ground |
| Foundation | Deep trench with gravel base | Shallow base, level surface |
| Drainage | Critical – requires perforated pipes | Minimal requirements |
| Height Limits | 3-4 ft without engineering | More flexible height options |
| Cost | Higher due to complexity | Lower installation costs |
Key Benefits of Landscape Paver Walls
Here’s where landscape paver walls really shine. We’ve seen homeowners completely transform their outdoor spaces, and the results speak for themselves.
Usable space creation is the game-changer. On sloped properties, retaining walls can boost your usable yard space by up to 50%. We’re talking about turning that steep, unusable slope into terraced gardens, level play areas for the kids, or that expanded patio you’ve been dreaming about.
Erosion control might not sound exciting, but it’s protecting your biggest investment. Properly installed walls reduce soil erosion by up to 90% in landscaped areas. Without them, you’re watching your topsoil wash away with every heavy rain – and potentially creating drainage headaches for your neighbors too.
Flexible seating is the bonus feature that makes everyone smile. A well-designed wall with smooth capstones becomes instant outdoor furniture. Add some weather-resistant cushions, and you’ve got comfortable seating that never needs winter storage.
The numbers don’t lie either – these improvements can boost property values while solving real problems. It’s the rare home improvement that’s both practical and profitable.
Main Types of Landscape Paver Walls
The landscape paver walls market has evolved into several smart options, each with its own personality.
Segmental block systems are the reliable workhorses. These concrete blocks lock together with rear lips or tongue-and-groove connections. They’re designed for DIY installation up to 4 feet and come in rectangular shapes for straight runs or trapezoidal blocks when you want curves.
Modular panel systems represent the next generation of wall building. These large-format panels create endless design possibilities with just two basic panel styles. They install faster than individual blocks and deliver that clean, contemporary look that’s so popular right now.
Natural stone veneer options give you the full stone appearance without the weight and complexity. These systems pair a structural concrete block core with natural stone facing – you get both the beauty and the performance without breaking your back or your budget.
Eco-friendly alternatives include recycled concrete blocks and living wall systems with built-in planting pockets. Perfect for environmentally conscious homeowners who want sustainability without sacrificing function.
Best Landscape Paver Wall Systems on the Market
When we help homeowners in Saugus and surrounding areas choose the perfect wall system, we focus on what really matters: structural integrity that lasts, ease of installation, and looks that complement your home.
The best landscape paver walls share some important features. You’ll want concrete blocks with at least 5,000 PSI compressive strength – this means they can handle New England’s freeze-thaw cycles without cracking. Interlocking technology eliminates the need for messy mortar, while multi-piece designs let you create beautiful curves and corners.
Texture options have come a long way too. Today’s blocks can mimic everything from weathered limestone to rustic fieldstone. Color blends work beautifully with traditional New England architecture, offering subtle variations that look natural rather than manufactured.
Based on internet research, you can expect material and installation costs ranging from around $25 per square foot for basic systems up to $150 or more per square foot for premium architectural panels. These are general market estimates that vary significantly based on your specific project needs and local conditions.
Budget-Friendly Picks: Classic Block Lines
Sometimes simple is exactly what you need. Entry-level concrete block systems deliver solid performance without breaking the bank, typically running under $25 per square foot for materials based on general market data.
What makes these systems budget-friendly isn’t cutting corners – it’s focusing on proven fundamentals. These DIY-stackable blocks use straightforward rectangular designs with reliable rear-lip interlocking. You’ll find them in practical colors like gray, tan, and charcoal, with textured faces that provide both grip and visual appeal.
The trade-off is flexibility. You won’t get fancy curved layouts or extensive decorative options, but you’ll get dependable performance for basic slope retention and garden bed definition. These blocks shine in utility areas, vegetable gardens, or anywhere function takes priority over form.
For weekend warriors, classic block lines offer the gentlest learning curve. The process is refreshingly straightforward: dig your trench, level the base, stack the blocks, and backfill with gravel. Most homeowners can confidently tackle walls up to 3 feet tall.
Our Landscape Walls service includes these practical options when they’re the right match for your project and budget.
Mid-Range Stars: Modular Multi-Piece Walls
Here’s where things get interesting. Mid-range systems typically fall in the $40-$75 per square foot range based on general internet research, and they offer dramatically more design flexibility while staying accessible to skilled DIYers.
Rear-lip locator systems are a game-changer for installation speed and accuracy. Instead of eyeballing each block placement, the rear lip automatically positions everything correctly. This means faster installation with fewer do-overs.
Multi-piece design opens up creative possibilities that single-size blocks simply can’t match. You can build curved layouts, create double-sided walls, integrate benches, and add steps without needing custom cuts. The variety keeps your wall from looking like a boring stack of identical blocks.
Color and texture options really expand in this category. Instead of basic gray or tan, you’ll find natural color blends that convincingly mimic quarried stone, weathered limestone, or aged brick. Surface textures range from sleek contemporary finishes to heavily textured stone faces that feel authentic to the touch.
Our Paver Retaining Wall installations frequently feature mid-range systems because they hit the sweet spot of performance, beauty, and value.
Premium Choices: Natural-Look & Architectural Panels
At the top of the market, premium landscape paver walls deliver results that rival custom masonry work. Based on general market research, expect $90-$150 or more per square foot for these sophisticated systems.
Large-format panel systems represent the cutting edge of paver technology. Instead of individual blocks, these systems use panels spanning several feet. Installation moves faster, joint lines stay cleaner, and the finished look screams quality.
The quarried stone appearance achievable with premium systems is honestly remarkable. Advanced manufacturing creates surfaces virtually indistinguishable from natural stone. Color variations, texture depth, and edge details all contribute to authenticity that fools even close inspection.
Custom fascia options take personalization to exciting new levels. Some systems let you mix different panel styles within the same wall, creating accent bands, color transitions, or textural variety. This level of customization was previously only possible with natural stone construction.
The investment in premium systems pays dividends in improved curb appeal, reduced maintenance requirements, and longevity exceeding 50 years with proper installation. When you want your wall to be a focal point rather than just functional, these systems deliver.
How to Choose the Right Landscape Paver Wall for Your Yard
Choosing the perfect landscape paver walls for your property feels overwhelming at first, but breaking it down into manageable steps makes the process much clearer. Think of it like choosing the right outfit – you want something that fits well, looks great, and serves its purpose.
Start with your home’s personality. Your wall should feel like it belongs, not like it was dropped in from another planet. If you’ve got a classic New England colonial, those weathered stone textures and warm earth tones will make your wall look like it’s been there for decades. Modern homes can handle sleeker profiles and contemporary color palettes that complement clean architectural lines.
The color palette decision follows what designers call the “2-3 material rule.” Stick to two or three complementary materials or colors throughout your hardscape. If your existing walkway uses charcoal pavers, consider wall blocks in charcoal or a complementary gray tone. Too many competing colors create visual chaos that makes even expensive materials look cheap.
Height and code limits vary dramatically depending on where you live. Most areas allow walls under 3-4 feet without permits, but taller structures often need engineering review and formal approvals. A quick call to your local building department can save you from expensive surprises later. Trust us – it’s much easier to check first than to rebuild later.
Drainage design absolutely cannot be an afterthought. Poor drainage causes about 90% of retaining wall failures, and it’s completely preventable with proper planning. You’ll need perforated drain pipes, free-draining gravel backfill, and careful grading to direct water away from your wall structure.
For comprehensive guidance on making these decisions, our retaining wall services team can walk you through the specific requirements for your property.
Design Checklist for Landscape Paver Walls
Professional designers follow specific guidelines that make the difference between walls that look intentional and walls that look like afterthoughts.
Harmony with your home’s architecture tops the list. Your landscape paver walls should feel like they were always meant to be there. Traditional homes benefit from textured, natural-looking blocks that echo old stone construction. Contemporary homes can handle smoother, more geometric profiles that complement modern design elements.
Following the 2-3 material rule prevents the “hardware store explosion” look that happens when too many different materials compete for attention. If your patio uses specific colored pavers, choose wall blocks that either match or create intentional contrast without clashing.
Lighting integration planning transforms walls from daytime-only features to evening focal points. Integrated LED up-lighting highlights texture and creates dramatic nighttime effects. Planning electrical rough-ins during construction costs a fraction of retrofitting later.
Capstone selection dramatically impacts both appearance and function. Flat capstones create clean lines and usable surfaces perfect for seating during outdoor gatherings. Sloped caps shed water more effectively but aren’t suitable for sitting. Choose based on your primary goal for the wall.
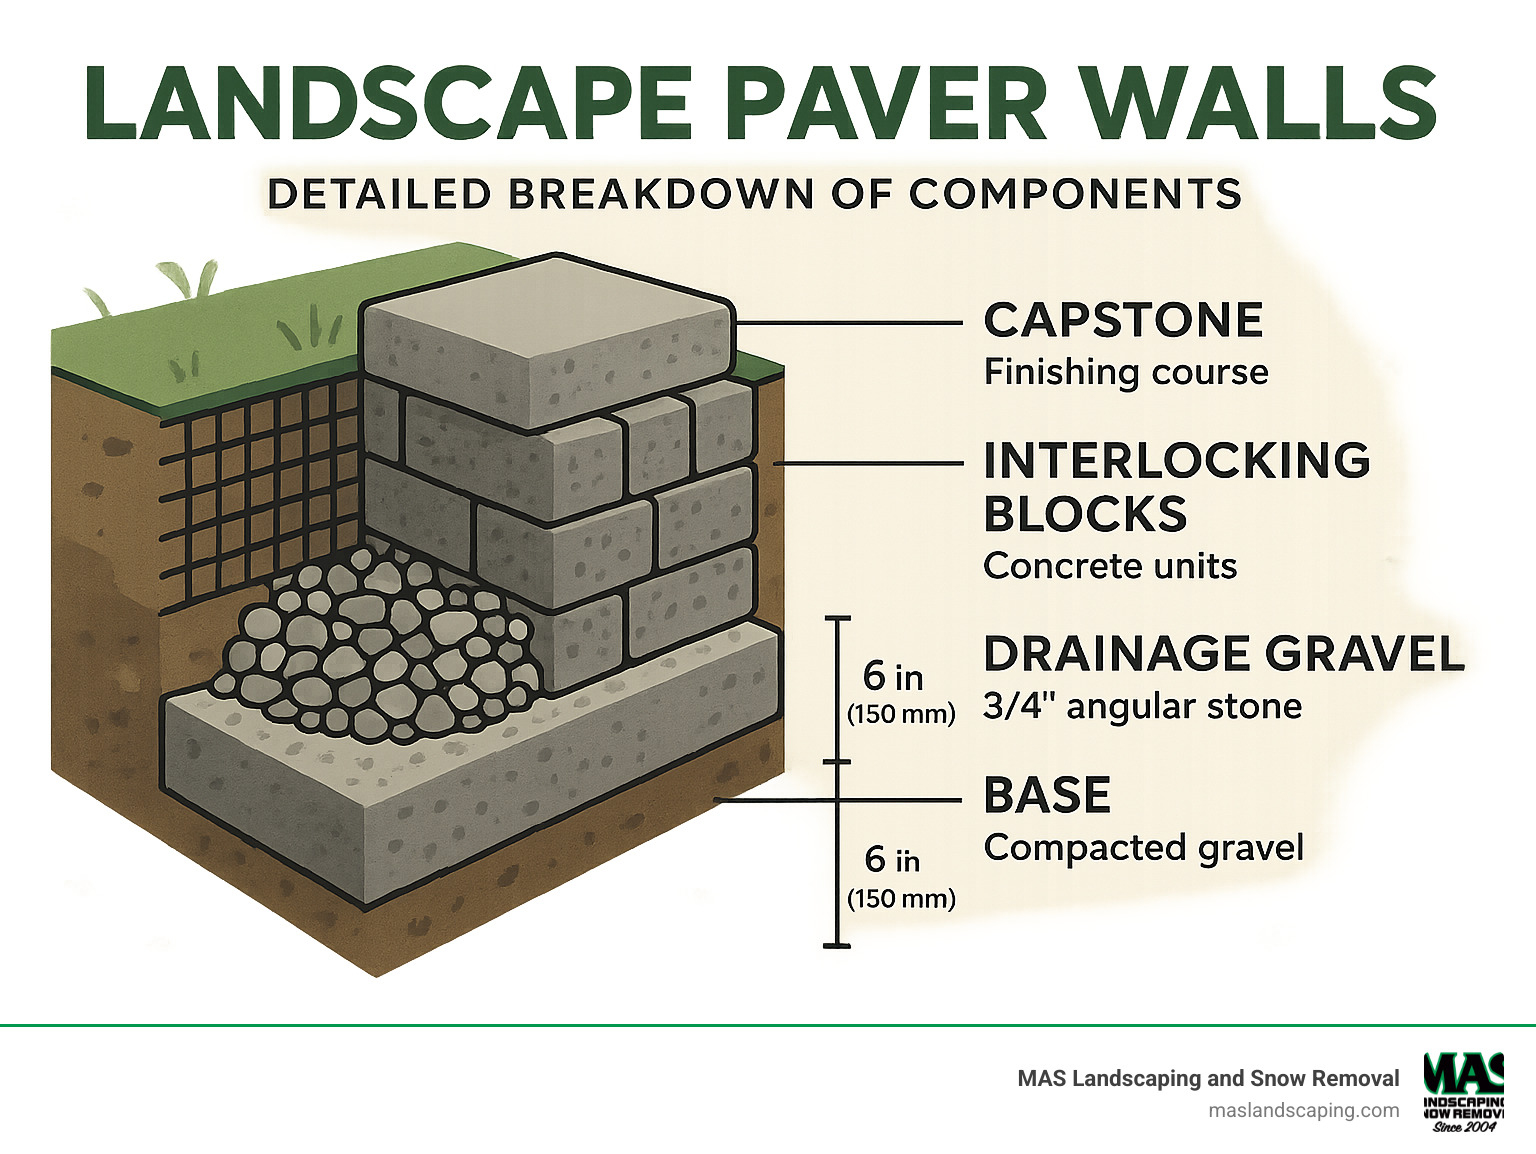
Structural Must-Haves for landscape paver walls
No matter which system catches your eye, certain structural elements determine whether your wall lasts five years or fifty years. These aren’t optional upgrades – they’re the foundation of success.
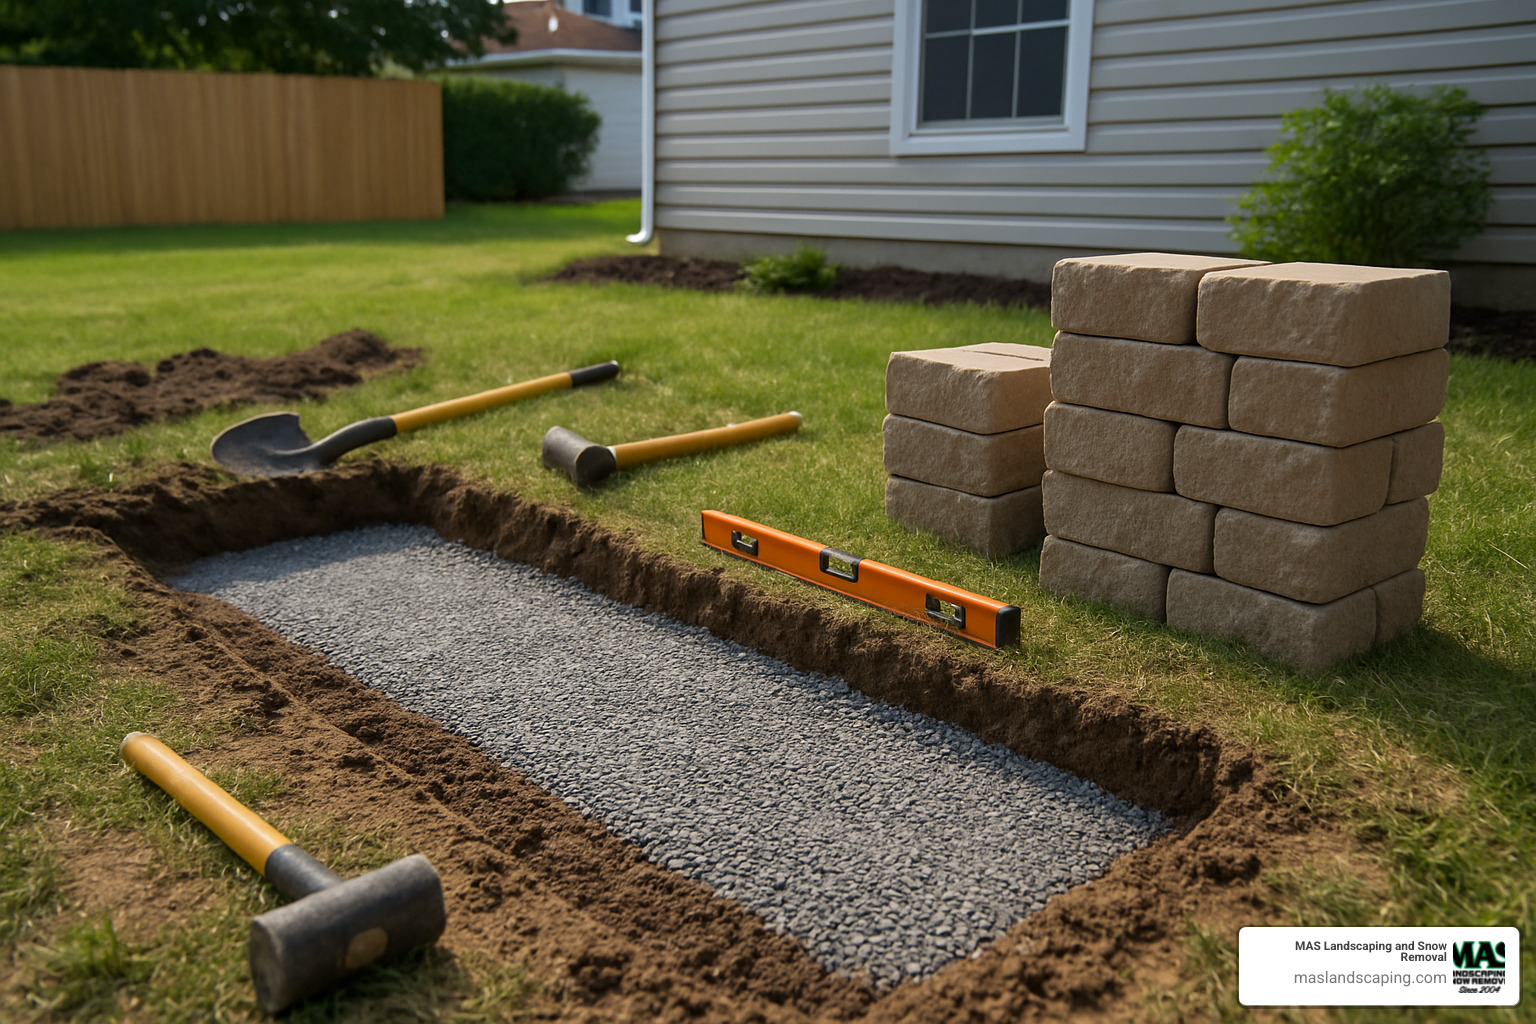
Proper base preparation literally supports everything else. Excavate below the frost line, install 6-8 inches of compacted gravel base, and achieve perfect leveling before placing the first block. Every shortcut here multiplies into expensive problems later.
Geogrid reinforcement becomes essential for walls over 3 feet or in challenging soil conditions. These synthetic fabric layers work like rebar in concrete – they distribute loads and prevent wall movement by tying the structure to the soil mass behind it.
Perforated pipe drainage prevents the hydrostatic pressure buildup that pushes walls over during heavy rains. Install 4-inch perforated drain pipe at the base, surrounded by free-draining gravel. This simple addition prevents most catastrophic wall failures.
Free-draining gravel backfill might seem expensive compared to using native soil, but it’s non-negotiable for retaining walls. Clean gravel or engineered fill allows water to drain freely instead of building pressure behind your wall.
For professional installation that includes all these structural requirements, our bulk retaining wall blocks service ensures every detail meets or exceeds local standards.
DIY vs. Professional Installation
The decision between DIY and professional installation depends on several factors: your skill level, available time, tool access, and project complexity.
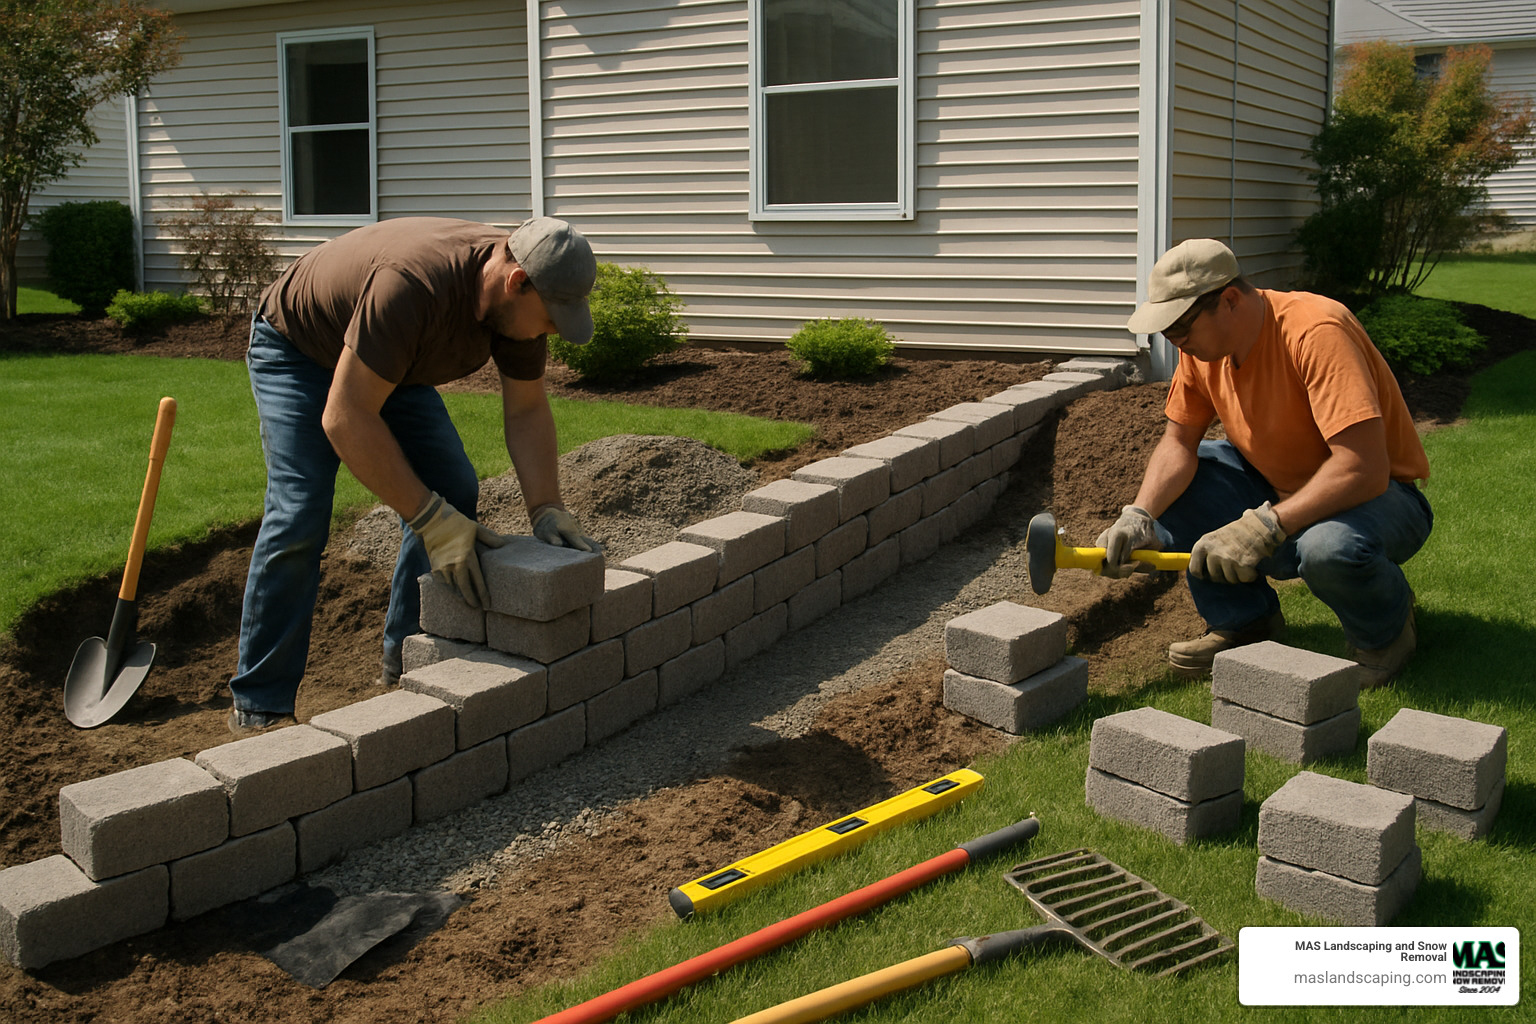
DIY Tool Requirements: Basic paver wall installation requires specific tools: a plate compactor for base preparation, a mason’s level for accuracy, a circular saw with masonry blade for cutting blocks, safety equipment including eye protection and work gloves, and a wheelbarrow for material transport.
Time Investment Reality: Most DIYers underestimate the time required. A simple 3-foot high, 20-foot long wall typically takes a skilled DIYer 2-3 full weekends. This includes excavation, base preparation, block installation, and backfilling. Professional crews complete similar projects in 1-2 days.
Warranty Considerations: Professional installations typically include warranties on both materials and workmanship. DIY projects rely entirely on manufacturer material warranties. If problems develop, you’re responsible for diagnosis and repairs.
The decision point often comes down to complexity and consequences. Simple, low walls in non-critical areas can be DIY projects for motivated homeowners. Complex walls, steep slopes, or structures near buildings benefit from professional expertise.
Our Retaining Wall Installation service handles projects where professional expertise provides the best value and peace of mind.
Step-By-Step Snapshot
For those considering DIY installation, here’s the basic process:
Trench Depth Rule: Bury half the height of your first course of blocks, plus 3 inches for base material. A 6-inch block needs a 6-inch deep trench (3 inches for the buried block, 3 inches for base).
First Course Level: This is critical – everything else builds on this foundation. Use a 4-foot level and take your time. Small errors here become big problems at the top of the wall.
Stagger Joints: Like brickwork, each course should overlap the joints below. Cut end blocks on alternating courses to achieve proper staggering. This locks the wall together structurally.
Cap Adhesive: Use construction adhesive on capstones to prevent movement. This is especially important for seating walls where people will put weight on the top course.
When to Call the Pros
Certain situations strongly favor professional installation:
Walls Over 4 Feet: Engineering requirements, permit complexities, and structural demands make tall walls professional territory. The consequences of failure are too significant for experimentation.
Complex Curves: Curved walls require precise cutting and fitting. Professional installers have the tools and experience to create smooth curves without waste or gaps.
Heavy Soils: Clay soils, poor drainage conditions, or unstable ground require professional assessment and specialized techniques. These conditions cause most DIY wall failures.
Drainage Issues: If your property has existing drainage problems, adding a retaining wall without addressing underlying issues can make problems worse. Professional evaluation prevents expensive mistakes.
For projects requiring professional expertise, our Retaining Wall Company brings decades of experience to ensure successful outcomes.
Frequently Asked Questions about Landscape Paver Walls
We get these questions almost daily from homeowners in Saugus, Everett, and surrounding areas. Here are the honest answers based on our years of experience installing landscape paver walls throughout New England.
How much do landscape paver walls cost?
This is always the first question, and honestly, it’s like asking “how much does a car cost?” The answer depends on what you’re looking for.
Based on general market research we’ve reviewed, landscape paver walls typically range from $25 per square foot for basic systems up to $150+ per square foot for premium installations. But here’s what really drives those costs:
Material selection makes the biggest difference. Basic concrete blocks with simple textures hit that lower price range, while premium natural stone veneer systems or large-format architectural panels push toward the higher end. The engineering behind these systems is remarkable—you’re paying for decades of durability, not just pretty looks.
Wall height and complexity significantly impact pricing. A simple 2-foot garden wall is straightforward. A 6-foot retaining wall holding back a steep slope? That requires engineering review, deeper foundations, drainage systems, and often permits. The structural requirements multiply quickly with height.
Site conditions can make or break a budget. Easy access with stable soil keeps costs reasonable. Tight spaces requiring hand-digging, poor drainage needing extensive correction, or unstable soil requiring special foundations—these realities add up fast.
Every property is different, which is why we always recommend an on-site consultation. We can give you accurate numbers based on your specific situation rather than broad estimates that might not apply to your project.
Do I need a permit for my wall?
The permit question keeps many homeowners awake at night, but it’s usually simpler than people think.
Most low walls don’t need permits. In our area, walls under 3-4 feet typically fly under the permit radar, especially freestanding walls that aren’t holding back soil. These are considered standard landscaping improvements, like planting a garden or installing a fence.
Retaining walls get more scrutiny because they’re dealing with soil pressure and potential safety issues. Even relatively short retaining walls might need permits if they’re near property lines, holding back significant slopes, or in areas with specific soil conditions.
Height is the big trigger. Once you hit 4 feet or more, most municipalities want to see engineering plans and issue permits. This isn’t bureaucratic hassle—it’s safety insurance. Tall walls under load can cause serious problems if they fail.
Here’s the good news: we handle permit applications all the time for our clients in Saugus, Everett, and surrounding towns. We know the local requirements, the inspectors, and how to steer the process smoothly. You don’t have to figure this out alone.
When in doubt, check first. It’s much easier to get a permit before you build than to deal with compliance issues after your wall is finished. For more information about building permits and requirements, you can check the International Code Council’s guidelines which many local jurisdictions follow.
How long will a paver wall last?
This is where landscape paver walls really shine compared to other options.
Properly installed concrete paver walls last 50+ years with basic maintenance. We’ve seen walls from the 1970s that still look great and function perfectly. The secret is in the engineering—modern paver blocks are designed to handle freeze-thaw cycles, soil pressure, and decades of weather without breaking down.
The “properly installed” part is crucial. A wall with poor drainage might fail in 5-10 years regardless of block quality. But when you get the foundation right, install proper drainage, and use quality materials, these walls outlast almost everything else you can build.
Material quality matters tremendously. Blocks with 5,000+ PSI compressive strength resist cracking and deterioration. Cheaper blocks might save money upfront but need replacement much sooner. It’s the classic “buy once, cry once” scenario.
Maintenance is minimal but important. Occasional cleaning, checking drainage after heavy rains, and replacing joint sand every few years keeps everything functioning smoothly. Compare this to timber walls that need replacement every 5-10 years, or natural stone walls that might need repointing every 15-20 years.
The bottom line? A well-built paver wall is probably the last wall you’ll ever need to install on that spot. That’s why we focus so much on getting the installation right the first time—it’s an investment in decades of worry-free performance.
Conclusion
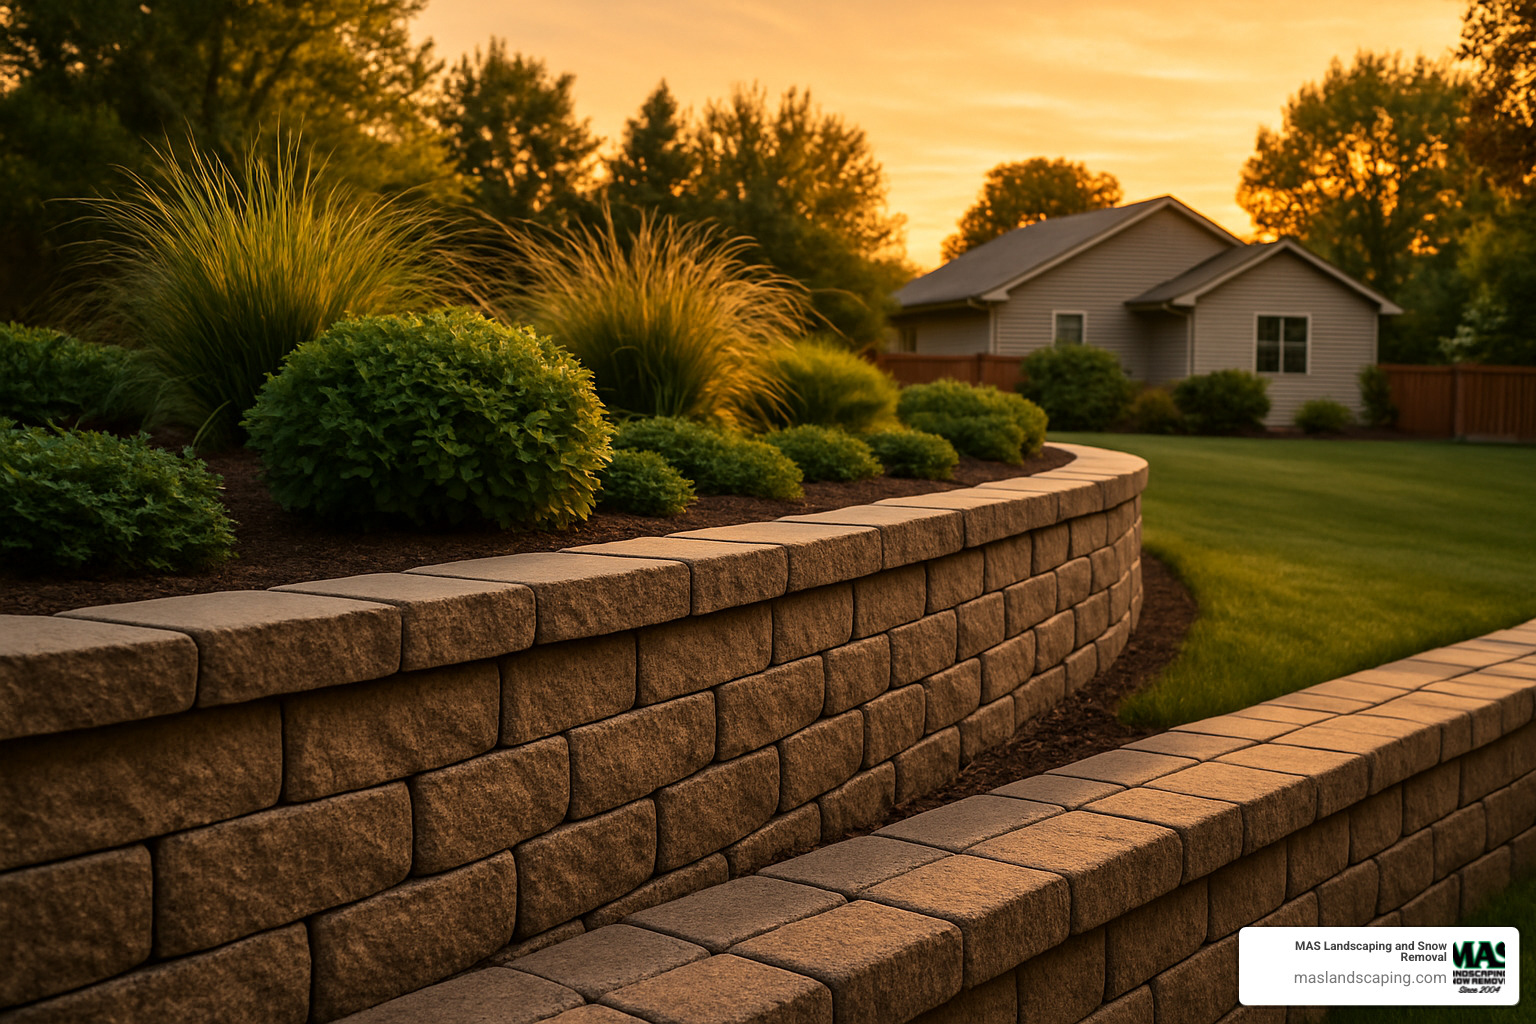
Standing in your backyard at sunset, looking at a beautifully crafted landscape paver walls system that perfectly frames your outdoor space – that’s the change we’re talking about. These aren’t just functional structures; they’re investments in your property’s future and your family’s outdoor enjoyment.
The beauty of modern paver wall systems lies in their versatility. Budget-friendly classic blocks get the job done without breaking the bank, perfect for utility areas or straightforward slope control. Mid-range modular systems offer that sweet spot of design flexibility and visual appeal that most homeowners love. And premium architectural panels? They create outdoor spaces that look like they belong in luxury magazines.
Here in Saugus, Everett, Lynnfield, Malden, and throughout our New England service areas, we’ve seen how the right wall system transforms properties. Steep, unusable slopes become terraced gardens that increase usable space by up to 50%. Erosion problems that once threatened foundations disappear with proper drainage systems that reduce soil loss by up to 90%. Property values climb as outdoor living spaces become more functional and beautiful.
At MAS Landscaping and Snow Removal, we understand that every property tells a different story. Your colonial home needs different design considerations than your neighbor’s contemporary build. Your clay soil presents different challenges than sandy conditions down the street. That’s why our local expertise matters – we know what works in our climate, with our soil conditions, and with New England’s unique architectural character.
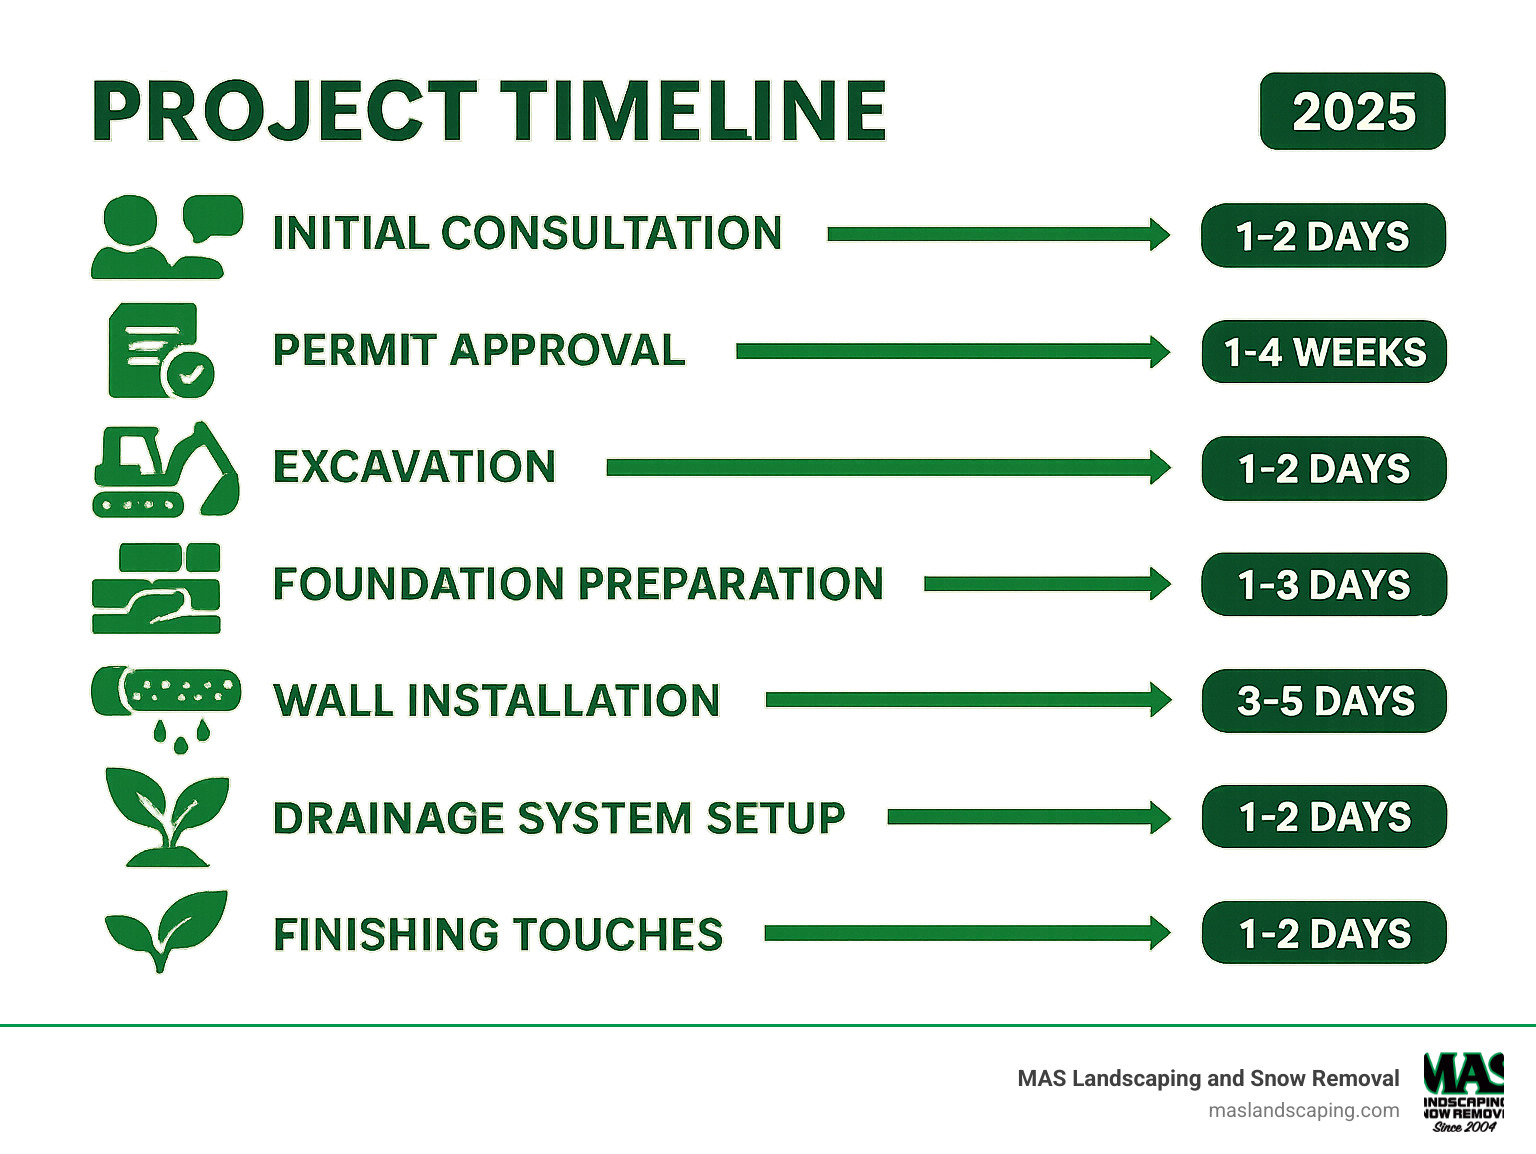
The timeline for your project doesn’t have to be overwhelming. Most installations follow a predictable path: initial consultation and design, permit approval when needed, careful excavation and foundation prep, precise wall installation, proper drainage system setup, and final landscaping touches. Professional installation typically wraps up in days, not weeks.
Whether you’re dreaming of integrated seating areas for family gatherings, erosion control that protects your investment, or simply more usable outdoor space for the kids to play, the right paver wall system makes it possible. With 50+ years of expected lifespan and minimal maintenance requirements, you’re not just solving today’s problems – you’re creating lasting value.
Ready to see what’s possible for your outdoor space? We’d love to walk your property with you, discuss your vision, and show you how a custom Paver Patio with Retaining Wall combination can transform your yard into the outdoor living space you’ve always wanted.
Get your free consultation today – because great outdoor spaces don’t happen by accident. They happen when local expertise meets your unique vision. Let’s build something beautiful together.
