


Why Draining Your Sprinkler System for Winter Could Save You Thousands
Draining your sprinkler system for winter is one of the most important steps you can take to protect your irrigation investment before freezing temperatures arrive in New England.
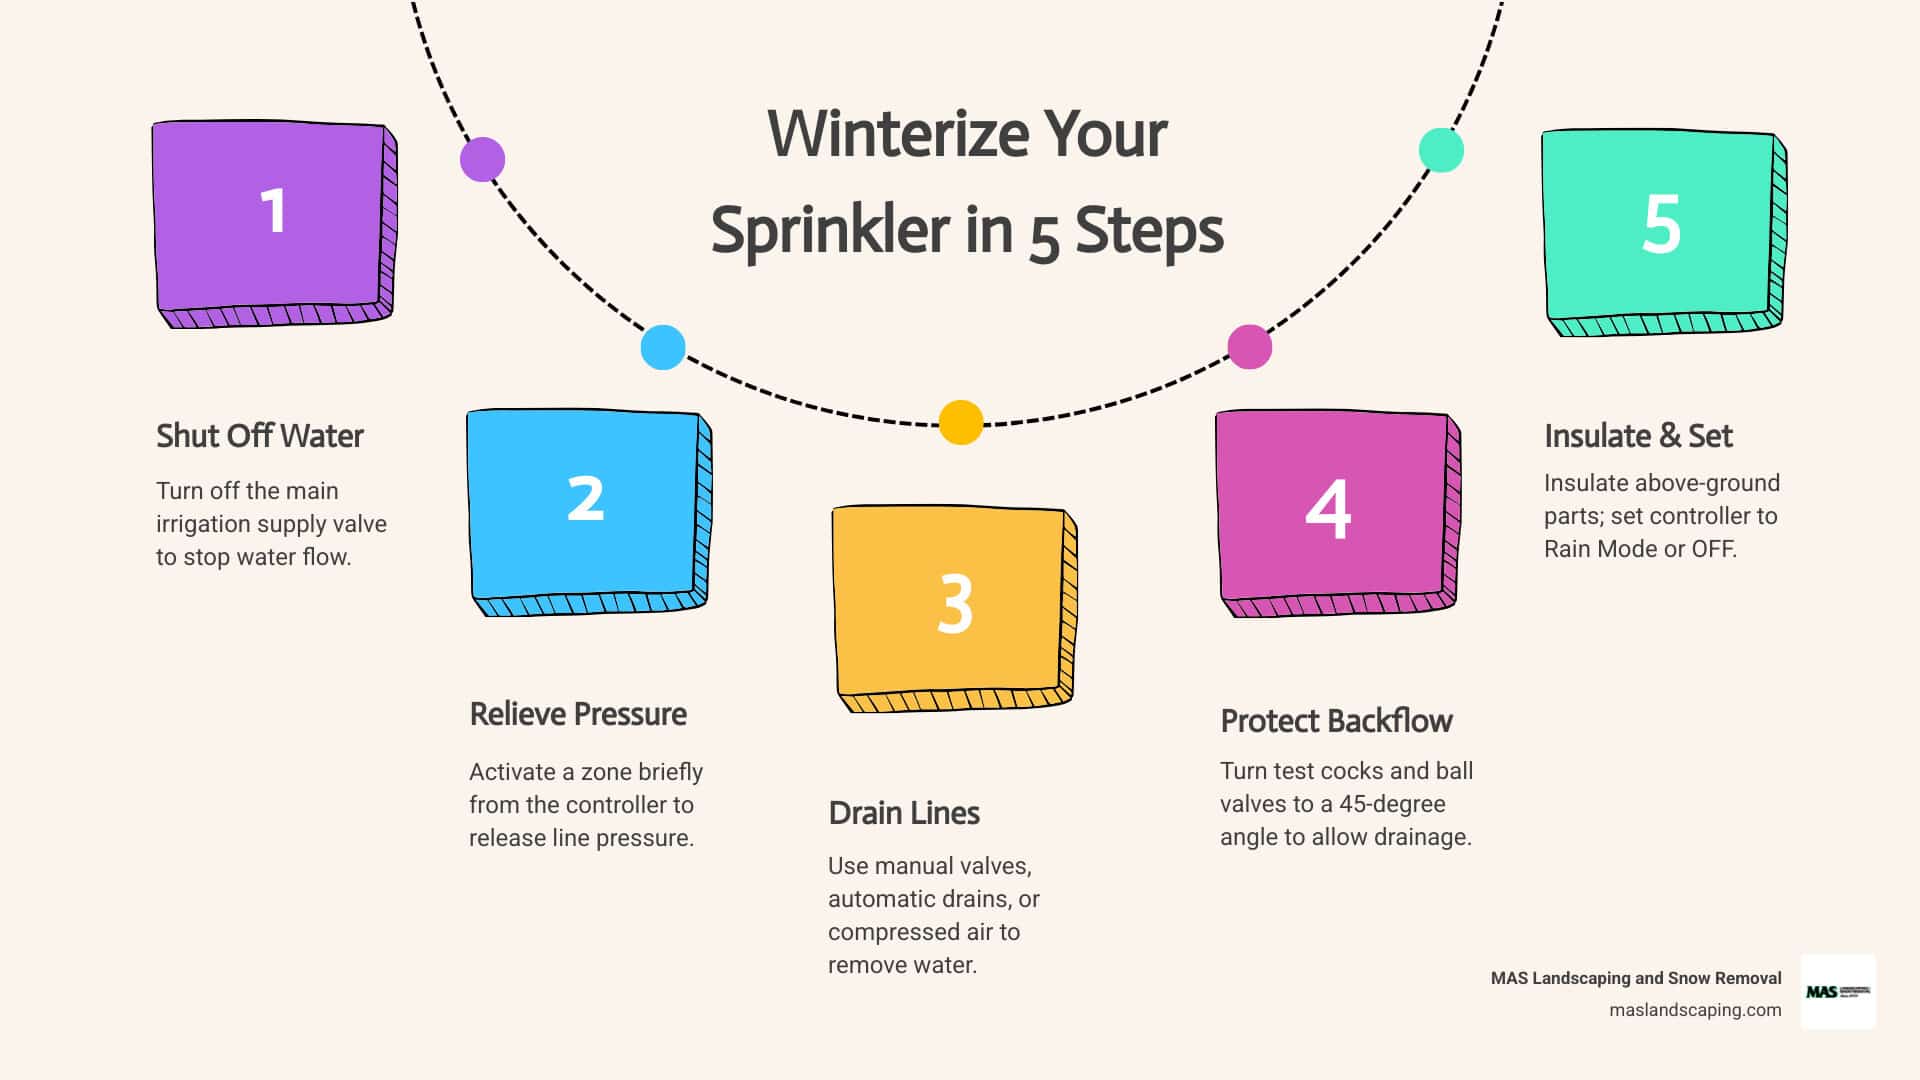
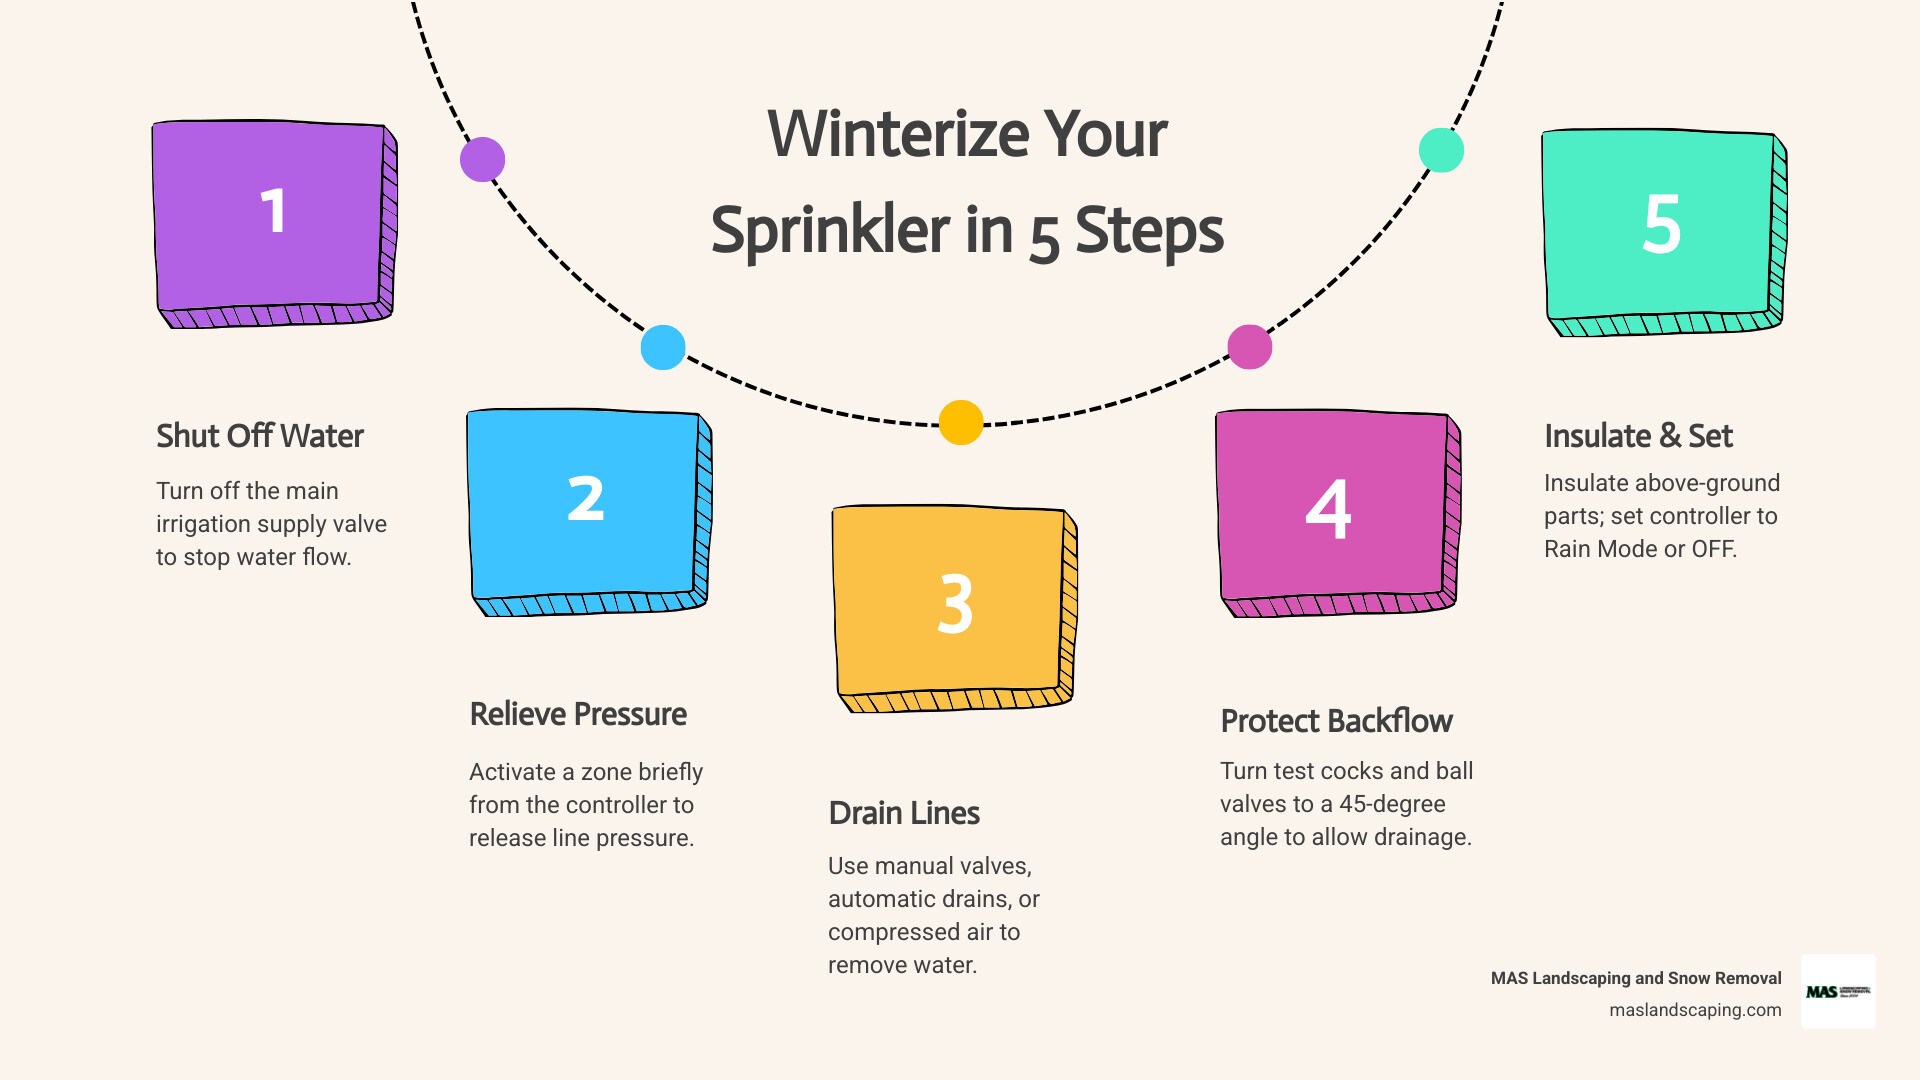
Here is a quick overview of how to drain your sprinkler system for winter:
- Shut off the main irrigation water supply valve
- Relieve pressure by briefly activating a zone from the controller
- Drain the lines using manual valves, automatic valves, or a compressed air blowout
- Winterize the backflow preventer by turning test cocks and ball valves to a 45-degree angle
- Insulate all above-ground pipes, valves, and the backflow preventer
- Set the controller to Rain Mode or OFF — do not unplug it
If you live in the Greater Boston area, timing matters. Night-time temperatures can drop below 32°F as early as October. That is your deadline.
The stakes are real. Water expands by roughly one-eleventh of its volume when it freezes. That expansion force is strong enough to crack PVC pipes, shatter backflow components, and split valve bodies — damage that often stays hidden underground until you fire up the system in spring and find soggy patches, dead zones, or a skyrocketing water bill.
In fact, irrigation and utility professionals consistently report that the majority of their winter emergency calls come from homes where the sprinkler system was never properly winterized.
The good news? With the right method and the right timing, this is entirely preventable.
Quick draining sprinkler system for winter definitions:
Why Draining Sprinkler System for Winter Is Essential
Water is a bit of a rebel. While most substances contract and shrink when they get cold, water does the exact opposite. As temperatures drop below 39°F, water actually begins to expand, reaching its maximum volume expansion of about 9% (or one-eleventh) once it solidifies into ice at 32°F.
When that water is trapped inside the rigid plastic PVC or polyethylene pipes of your lawn irrigation system, it has nowhere to go. The expanding ice exerts thousands of pounds of pressure per square inch. This physical force easily shatters plastic fittings, splits pipe walls, and destroys delicate brass and rubber valves.
The worst part about freeze damage is that it is incredibly sneaky. Because your irrigation lines are buried, you will not see the cracked pipes or split fittings during the winter. Instead, the damage reveals itself in the spring as:
- Soggy, waterlogged patches in your lawn.
- Sprinkler heads that fail to pop up or only sputter weak streams of water.
- Unseen underground leaks that silently waste thousands of gallons of water, leading to astronomical utility bills.
By learning how to properly execute a draining sprinkler system for winter routine, you ensure that no residual water remains inside these vulnerable components. Taking the time to winterize protects your investment and prevents the headache of major spring repairs. For a deeper look at how these systems are structured, you can read more in this guide on How to Drain a Sprinkler System for Winter – Hockers Home Services.
Choosing the Right Method for Draining Your Irrigation System
Before you grab your tools, you need to understand that not all sprinkler systems are drained the same way. The right method depends entirely on your system’s design, layout, and the local climate.
Here in Massachusetts—including Saugus, Lynnfield, Everett, and Malden—our winters bring deep ground freezes. Because the frost line regularly extends below the shallow depth of typical residential irrigation pipes, choosing the correct draining method is critical.
There are three primary methods used to clear water from irrigation lines:
- Manual Draining: Best for systems designed with physical manual valves at all low-elevation points.
- Automatic Draining: Best for systems equipped with automatic, spring-loaded valves that open when pressure drops.
- Compressed Air Blow-Out: The gold standard for cold climates, using high-volume air to physically force every drop of water out of the lines.
To help you understand the differences, here is a quick comparison:
| Feature | Manual Draining | Automatic Draining | Compressed Air Blow-Out |
|---|---|---|---|
| Primary Mechanism | Gravity | Spring-loaded valves | High-volume compressed air |
| Reliability in Cold Climates | Moderate (traps water in low spots) | Moderate (valves can stick or fail) | High (fully clears all lines) |
| Risk of Pipe Damage | Low | Low | Moderate (if air pressure exceeds limits) |
| DIY Friendliness | High | High | Low to Moderate (requires special compressor) |
Understanding these methods is also a key factor in managing the ins and outs of average yard sprinkler system cost, as choosing the wrong method for your yard’s topography can result in costly freeze damage.
Manual Draining Sprinkler System for Winter
Manual systems are designed with physical drain valves installed at the absolute lowest points of the piping. To use this method, you must first shut off the main water supply. Once the water is off, you open one zone valve at a time to relieve pressure in the mainline.
Next, you slowly open the manual drain valves located in your underground valve boxes or near low-elevation sprinkler heads. Gravity pulls the water down and out of the pipes.
Tip: If your manual drains discharge into the soil, we highly recommend installing a gravel-filled dry well directly beneath the valve. This prevents mud from clogging the drain opening and ensures the discharged water drains away quickly.
Automatic Draining Sprinkler System for Winter
Automatic drain systems utilize spring-loaded valves (such as the Rain Bird 16A-FDV) installed along the lateral lines. These clever devices are held closed by water pressure when the system is running. Once the main water supply is shut off and the system pressure drops below a specific threshold (typically 10 PSI), the internal springs push the valves open, allowing water to drain out into the surrounding soil.
While this sounds completely hands-off, automatic systems are not foolproof. Over time, shifting soils can create unexpected low spots in your pipes that trap water away from the automatic drains. Additionally, dirt and mineral deposits can cause the spring-loaded mechanisms to stick. For a technical deep-dive into how these automatic components behave, refer to the General Guide to Irrigation System Winterisation.
The Compressed Air Blow-Out Method
For homeowners in New England, the compressed air blow-out is the most reliable way to guarantee your pipes will not freeze. This method uses a high-volume air compressor connected directly to your irrigation mainline to blow all residual water out through the sprinkler heads.
However, this method requires a clear understanding of the physics of air pressure. Air viscosity is significantly lower than water viscosity, meaning compressed air generates much higher physical stress on plastic pipes than water does.
To prevent shattering your pipes, you must adhere to strict limits:
- Polyethylene (flexible) pipes: Do not exceed 50 PSI.
- PVC (rigid) pipes: Do not exceed 80 PSI (though keeping it under 50 PSI is highly recommended).
- Air Volume (CFM): You need a high-volume compressor capable of delivering 10 to 25 Cubic Feet per Minute (CFM).
A standard small garage shop compressor (which typically produces high pressure but very low CFM) is highly dangerous; trying to build up a “surge” of pressure in the tank to compensate for low volume can easily rupture your system. For more scientific insights into these pressure limits, consult the Home Sprinkler Systems: Preparing Your Sprinkler System for Winter | Colorado State University Extension.
Step-by-Step Guide to Winterizing Your Sprinkler System
Winterizing your sprinkler system is a project that typically takes anywhere from 30 minutes to 3 hours, depending on the size and design of your system.
Before starting, put on safety goggles. Compressed air and high-pressure water can cause physical injury or send small rocks and debris flying from sprinkler heads. Ensure all children and pets are safely indoors.
If you have a larger property, such as a 4 zone sprinkler system kit, taking your time on each step is key to avoiding mistakes.
Step 1: Shutting Off Water and Relieving Pressure
The very first step is to isolate your sprinkler system from your home’s main water supply.
- Locate your main irrigation shut-off valve (often called an isolation valve). This is typically found in your basement, crawl space, utility room, or in an outdoor underground box with a green lid. Slowly turn the valve to the fully closed position.
- Go to your sprinkler controller and manually activate one of your watering zones. Let it run for a minute. Since the water supply is shut off, this will quickly relieve the built-up pressure inside the mainline.
- If you have an indoor drain valve (often a small brass cap near the main shut-off), place a bucket underneath it and slowly open it. Expect about a quarter of a bucket of water to drain out. This empties the pipe section leading from inside your home to the outdoor components.
Step 2: Draining and Protecting the Backflow Preventer
Your backflow preventer is the most critical and expensive above-ground component of your system. Because it sits above ground, it is highly vulnerable to early autumn frosts.
- Locate the test cocks (small screw-like valves on the side of the backflow assembly). Using a flathead screwdriver, turn each test cock screw exactly 1/4 turn to open them.
- Locate the two main ball valves on the backflow device. Turn both handles to a 45-degree angle. Leaving these valves half-open prevents water from becoming trapped inside the internal ball-and-seal mechanism. If left fully open or fully closed, trapped water will freeze, expand, and crack the brass body of the valve.
- For detailed diagrams on different backflow models, check out the manufacturer-direct Winterization Guide.
Step 3: Insulating Above-Ground Components
Any pipe or valve exposed to the open air must be insulated to protect it from freezing temperatures before the ground itself freezes.
- Wrap all exposed above-ground copper or plastic piping with self-sticking foam insulation tape or foam tubes.
- Cover your backflow preventer with a specialized insulated pouch. Secure it tightly at the bottom.
- Important safety note: When applying insulation, be absolutely sure you do not block the air vents or drain outlets on the backflow preventer, as these must remain clear to function properly.
Step 4: Executing the Compressed Air Blow-Out Safely
If you are using the blowout method, follow this precise sequence to protect your system from heat and pressure damage:
- Attach your compressor’s airline to the blowout port located downstream of your backflow preventer. Never blow compressed air directly through a backflow preventer, as the friction and dry heat can easily melt the delicate rubber seals and plastic internal components.
- Set your compressor’s regulator to a maximum of 50 PSI.
- Using your controller, activate the zone that is located furthest from the compressor.
- Slowly introduce air into the system. You will see water sputter and then mist out of the active sprinkler heads.
- Do not blow out any single zone for more than 2 minutes at a time. Compressed air generates dry friction heat inside plastic pipes. Sustained heat can melt PVC walls or ruin the water-lubricated gear drives inside your sprinkler heads. Instead, run short, 1-to-2-minute cycles, switching between zones to allow the pipes to cool down.
- Once you see only a fine mist escaping the heads, shut off the air compressor. Repeat the process on the next closest zone until all zones are clear. For more safety tips, check out Winterizing Your Sprinkler.
Step 5: Managing the Controller and Timers
What should you do with your automatic sprinkler timer during the winter?
- Do not unplug the controller. Leaving the transformer plugged in generates a small amount of internal heat. This heat is highly beneficial as it reduces moisture inside the cabinet, preventing condensation from corroding the delicate circuit boards.
- Switch the controller to “Rain Mode” or “OFF”. This preserves all your programmed watering settings for the spring while preventing the system from sending electrical signals to open the valves during the winter.
- Disconnect the “Common” wire (usually marked C or COM). If your irrigation system utilizes a booster pump or water pump, physically disconnect the common wire from the terminal strip. This ensures that a winter power surge or accidental timer activation won’t run your pump dry, which would quickly overheat and destroy it.
Common Winterization Mistakes and Average Costs
Even well-intentioned homeowners can make simple mistakes that lead to expensive spring repairs. The most common errors include:
- Leaving water trapped in low spots: Relying solely on gravity draining when pipes have settled and created underground dips.
- Using excessive air pressure: Using a high-pressure, low-volume compressor that shatters PVC fittings.
- Forgetting the backflow device: Leaving backflow ball valves fully closed, cracking the brass housing.
- Unplugging smart controllers: Losing custom programming and preventing smart units from receiving critical off-season software updates.
If these mistakes occur, the financial consequences can be steep. Based on average national internet data, the cost of professional winterization typically ranges from $80 to $350, depending on the size and complexity of your system.
However, if you neglect winterization and suffer freeze damage, repair costs can skyrocket. Replacing a cracked brass backflow preventer alone can cost anywhere from $450 to over $1,200, and excavating your lawn to locate and repair multiple shattered underground PVC lines can easily exceed $1,500. For context on overall system investments, see our breakdown of the cost of new lawn irrigation system installation.
(Please note: These pricing figures are average ranges based on general internet data and do not represent actual service costs for MAS Landscaping and Snow Removal.)
Frequently Asked Questions about Sprinkler Winterization
When is the best time to drain my sprinkler system in Massachusetts?
In the Greater Boston area—including Essex and Middlesex Counties—you should complete your sprinkler winterization by mid-to-late October. While we often enjoy beautiful, sunny autumn days, night-time temperatures can quickly plummet below 32°F. It is crucial to beat the first hard freeze of the season by at least one week to prevent early frost damage.
Can I use a standard 2 HP shop compressor for a blowout?
No. A standard 2 HP home shop compressor is designed for high pressure but has a very low volume (typically only 2 to 5 CFM). To safely clear water from sprinkler lines, you need high volume (10 to 25 CFM) at low pressure (under 50 PSI). Attempting to use a small shop compressor by letting pressure build up in the tank and releasing a high-pressure surge is highly dangerous and can easily shatter your plastic pipes and valves.
Should I completely unplug my sprinkler controller for the winter?
We do not recommend unplugging your controller. Instead, turn the dial to the “OFF” or “Rain Mode” setting. Keeping the unit plugged in allows the internal transformer to generate a small amount of heat, which wards off condensation and prevents corrosion on the electrical components. It also preserves your customized program settings for a seamless spring start-up.
Conclusion
Draining your sprinkler system for winter doesn’t have to be a source of stress. By understanding the physics of water expansion, choosing the right method for your yard’s layout, and following a careful step-by-step process, you can easily protect your irrigation system from New England’s harsh winter elements.
If you would rather have complete peace of mind, or if you don’t have access to a commercial-grade, high-volume air compressor, we are here to help. At MAS Landscaping and Snow Removal, based in Saugus, MA, we provide professional, local irrigation winterization services throughout Everett, Lynnfield, Malden, Medford, Melrose, and the surrounding areas. Our experienced team will ensure your system is completely cleared, insulated, and protected for a smooth, hassle-free start-up next spring.
Ready to secure your system before the cold sets in? Schedule your winterization service with us today!