Garden Wall Construction: Top 10 Expert Tips for Success
Garden wall construction is a transformative technique that not only improves the beauty of your outdoor space but also provides practical benefits such as erosion control and additional landscaping opportunities. Whether you’re aiming to create a small retaining wall for your flower beds or a beautiful structure to define your property line, understanding the essentials of constructing a garden wall is key to achieving a durable and visually appealing result.
Quick Highlights:
- Improve aesthetics: Add depth and texture to your outdoor space.
- Prevent erosion: Keep landscape soil in place, especially in sloped areas.
- Functionality: Create usable space for gardens or seating areas.
- DIY Possibilities: Many garden walls can be built as a DIY project with the right tools and guidance.
Building a garden wall requires a thoughtful approach, from selecting the right materials like bricks or concrete blocks to ensuring a solid foundation and understanding local regulations. By following proven techniques, you can enjoy a garden wall that stands the test of time, becoming a priceless feature in your outdoor landscape.

Learn more about Garden wall construction:
– Custom wall services
– Landscape Walls
– Wall construction services
Planning Your Garden Wall
Planning your garden wall is a crucial step in ensuring a successful and long-lasting structure. Let’s break down the key considerations for garden wall construction to help you get started.
Choosing the Right Materials
When it comes to selecting materials, you have several options, each with its own benefits:
- Bricks: These are classic and versatile, offering a timeless look. They are durable and can be arranged in various patterns for unique designs.
- Stones: Natural stones provide a rustic and organic appearance. They are ideal for creating a natural aesthetic but can be more challenging to work with due to their irregular shapes.
- Concrete Blocks: These are strong and uniform, making them a popular choice for DIY projects. They come in different sizes and can be easily stacked.
- Interlocking Blocks: Designed for easy assembly, these blocks fit together like puzzle pieces. They provide added stability and are great for beginner builders.
Choosing the right material depends on your design goals, budget, and the desired aesthetic of your garden wall.
Understanding Local Regulations
Before you start building, understand the local regulations that may affect your project:
- Building Permits: Depending on the height and location of your wall, you might need a building permit. Check with your local authorities to ensure compliance.
- HOA Restrictions: If you live in a community with a Homeowner’s Association (HOA), review their guidelines. HOAs often have specific rules about the appearance and height of garden walls.
- Planning Permission: In some areas, especially near historical sites or protected landscapes, you may need additional planning permission.
Taking the time to understand and follow these regulations will save you from potential fines and ensure your garden wall is built legally.
Design Considerations
When planning your garden wall, consider the following design elements:
- Location: Choose a spot that complements your landscape and serves the intended purpose, whether it’s for privacy, decoration, or retaining soil.
- Height: Determine how tall you want your wall to be. Walls over 3 feet may require additional structural support and permits.
- Design: Think about the overall look you want to achieve. Do you prefer a straight, formal appearance, or a curved, natural design?
Planning your garden wall carefully will ensure it meets both aesthetic and functional needs, while also adhering to local regulations. With the right materials and a clear understanding of the rules, you’re well on your way to creating a beautiful and lasting addition to your outdoor space.
Preparing the Foundation
A solid foundation is key to a sturdy and long-lasting garden wall. Let’s explore the essential steps of garden wall construction, starting with digging the trench and laying the gravel base.
Digging the Trench
The trench is the backbone of your garden wall. It needs to be dug with precision for stability and durability. Here’s how to do it right:
- Depth and Width: Generally, you’ll want your trench to be about 6 inches deep and as wide as the blocks you’re using. This allows for a solid base that can support the wall’s weight.
- Tools: Use a flat-nose shovel for digging a square trench and a spade shovel for deeper digging. These tools make it easier to achieve the desired depth and width.
- Leveling: Keep your trench as level as possible. Use a string line as a guide to maintain a consistent depth. This will help ensure your wall is straight and stable.
- Safety: Always wear gloves and safety glasses while digging to protect your hands and eyes from debris.
If your wall is on a slope, you’ll need to dig a stepped trench to maintain a level wall. Start at the bottom of the slope and dig until you reach about 9.5 inches deep, then step up and continue.
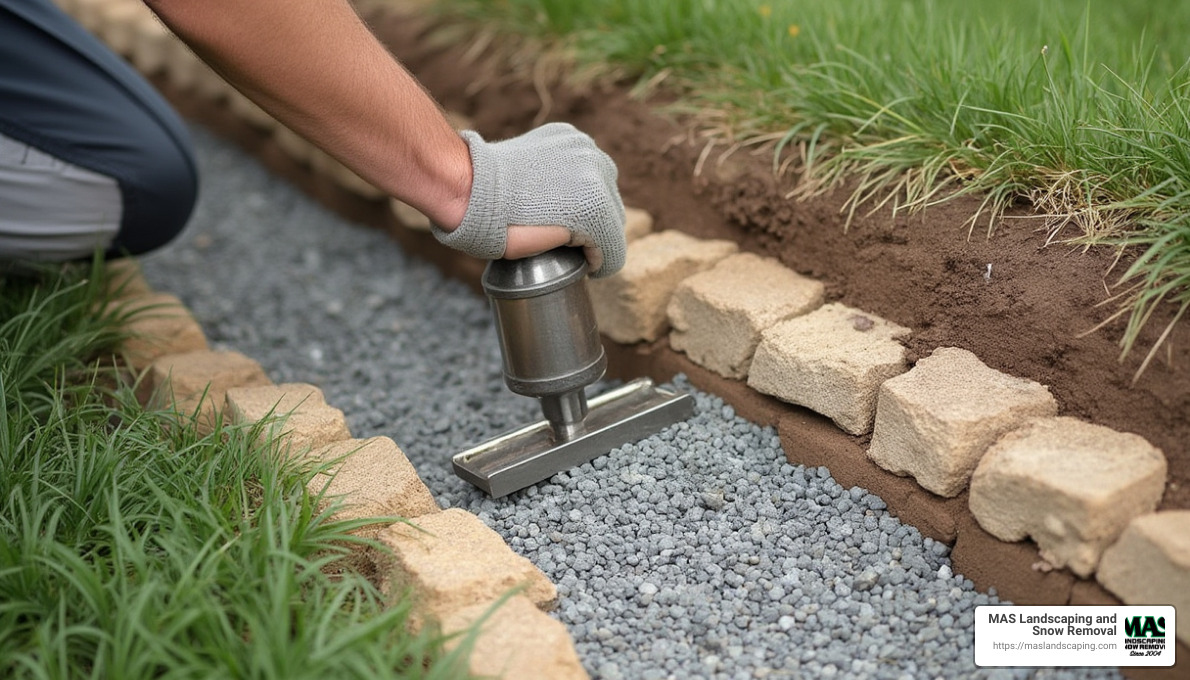
Laying the Gravel Base
Once your trench is ready, it’s time to lay the gravel base. This step is crucial for drainage and stability.
- Gravel Type: Use coarse gravel, such as crushed stone, which compacts well and provides excellent drainage.
- Compacting: Lay the gravel in 2-inch layers and use a hand tamper to compact each layer thoroughly. This creates a firm foundation that prevents the wall from shifting over time.
- Leveling: Use a four-foot level and a rake to ensure the gravel is even. A level base simplifies the process of laying the first row of blocks.
If you’re building on a slope, only add the gravel base to the bottom step initially. You’ll add more gravel as you build up the wall.
By carefully digging the trench and laying a compacted gravel base, you’re setting the stage for a stable and durable garden wall. Next, we’ll explore how to build the wall itself, starting with the first course of blocks.
Building the Wall
Once your foundation is set, it’s time to start building the wall. This involves laying the first course, adding additional courses, installing drainage, and backfilling the wall. Let’s break down each step to ensure your garden wall is both sturdy and visually appealing.
Laying the First Course
The first course of blocks is crucial for the stability of your garden wall. Here’s how to get it right:
- Leveling and Positioning: Begin by placing the first block at one end of the trench. Use a carpenter’s level to ensure it’s perfectly level from side to side and front to back. Adjust the gravel base as needed to achieve a level position.
- Tools: A rubber mallet is helpful for gently tapping the blocks into place without causing damage. A string line can guide you in keeping the row straight.
- Interlocking Blocks: If you’re using interlocking blocks, ensure they fit snugly together. This will improve the wall’s strength and help distribute weight evenly.
Adding Additional Courses
With the first course in place, you can start adding more layers to your wall:
- Staggering: For each new course, stagger the blocks so that the vertical seams do not align with those of the previous row. This increases the wall’s stability and creates a visually pleasing pattern.
- Interlocking and Adhesive: For added security, apply landscape adhesive between courses, especially if you’re using cap blocks. This isn’t always necessary, but it can prevent movement over time.
- Checking Levels: As you build, frequently check the level of each course. This ensures that the wall remains straight and even as you stack higher.
Installing Drainage
Proper drainage is essential to maintain the integrity of your garden wall, particularly in areas with heavy rainfall:
- Drain Pipe: If your area is prone to heavy rains, install a perforated corrugated pipe behind the wall. This pipe should run the entire length of the wall and lead to a suitable drainage point.
- Gravel and Landscape Fabric: Cover the pipe with a drain sleeve to prevent sediment from clogging it. Then, pour gravel behind the wall to cover the pipe completely. Use landscape fabric to separate the gravel from the soil, which helps maintain drainage efficiency.
Backfilling the Wall
Backfilling is the final step in garden wall construction and is crucial for stability and drainage:
- Materials: Use gravel or sand as backfill material. Gravel allows for better drainage and settling, while sand is useful for creating a smooth surface.
- Technique: Shovel the backfill material in small portions and tamp it down as you go. This prevents hollow areas and ensures the material settles completely.
- Soil Mix: Fill the remaining space with a well-draining soil mix if you plan to grow plants or grass behind the wall.
By following these steps, you can build a garden wall that is both functional and attractive. Next, we’ll explore the finishing touches that can improve the aesthetic appeal of your wall, such as installing capstones and incorporating decorative elements.
Finishing Touches
Once the wall structure is complete, it’s time to focus on the finishing touches that will transform your garden wall from a simple structure into a stunning feature of your landscape. This involves installing capstones and enhancing the aesthetics with plants and decorative elements.
Installing Capstones
Capstones not only provide a polished look but also help protect your wall from the elements. Here’s how to install them correctly:
- Adhesive Application: Use a strong construction adhesive to secure the capstones to the top course of your wall. This ensures that they stay in place and adds an extra layer of stability to the structure.
- Overhang: Allow the capstones to overhang the retaining blocks by about 1 to 1.5 inches. This overhang not only adds visual appeal but also helps direct water away from the wall, reducing erosion.
- Securing: Press each capstone firmly into place after applying adhesive. Double-check that they are level and aligned for a seamless finish.
Enhancing Aesthetics
With the capstones in place, it’s time to improve the aesthetic appeal of your garden wall with landscaping and decorative elements:
- Plants and Bushes: Consider planting a variety of bushes, flowers, or succulents along the base of the wall. These can soften the hard lines of the wall and add color and texture to your garden. Native plants are a great choice as they require less maintenance and are better adapted to the local climate.
- Climbing Plants: Add climbing plants like ivy or climbing roses to the wall. These plants can create a lush, green backdrop and add a vertical dimension to your garden design. Make sure to choose plants that suit your climate and wall orientation.
- Decorative Elements: Incorporate decorative elements such as garden sculptures, lighting, or water features. These can serve as focal points and further improve the overall design.
By paying attention to these finishing touches, you can create a garden wall that not only serves a functional purpose but also adds significant beauty to your outdoor space. Up next, we’ll address some frequently asked questions about garden wall construction to help you make informed decisions for your project.
Frequently Asked Questions about Garden Wall Construction
What is the cheapest way to build a garden wall?
Building a garden wall on a budget is possible with the right materials and approach. Bricks are a popular choice for cost-effective garden wall construction. They are durable, readily available, and can be sourced at competitive prices.
Another option is using concrete blocks or interlocking blocks, which can be less expensive than natural stone. These materials are easy to work with and require less skill to install, making them ideal for DIY projects.
To further reduce costs, consider using reclaimed materials, such as old bricks or stones, which not only save money but also add character to your wall.
Do garden walls need foundations?
Yes, garden walls require a firm foundation to ensure stability and longevity. The foundation acts as the base that supports the weight of the wall and prevents it from shifting or collapsing over time.
For most garden walls, especially those over 600mm high, a concrete base is recommended. This involves digging a trench and filling it with a mixture of ballast and cement. The foundation should be at least 150mm thick and wide enough to accommodate the width of the wall plus an additional 100mm on each side.
For dwarf walls (less than 600mm high), the foundation requirements may be less stringent, but it’s still important to provide a stable base, particularly if the wall will be load-bearing or subjected to environmental stresses.
Do I need permission for a garden wall?
Before starting your garden wall construction, check whether you need planning permission. Regulations can vary depending on your location and the specifics of your project.
In many areas, you may not need permission for a garden wall if it meets certain height restrictions. However, if your property is a listed building or located in a conservation area, you may be subject to stricter regulations.
It’s always a good idea to consult with your local planning authority to understand the specific requirements and avoid any legal issues down the road. This ensures that your project complies with local building codes and regulations, giving you peace of mind as you improve your outdoor space.
Conclusion
When it comes to garden wall construction, choosing the right partner is crucial. At MAS Landscaping and Snow Removal, we bring a unique blend of professionalism, personalized service, and local expertise to every project. Our commitment to quality and customer satisfaction sets us apart in the landscaping industry.
Why Choose MAS Landscaping and Snow Removal?
- Professional Service: Our team is fully licensed and insured, ensuring that your project is in safe hands. We adhere to the highest standards of craftsmanship and quality, providing you with peace of mind throughout the construction process.
- Local Expertise: Based in Saugus, MA, we have a deep understanding of the local climate and environmental conditions. This allows us to select the perfect materials and designs that not only thrive but also complement the local landscape. Our familiarity with local zoning laws and building codes ensures your project progresses smoothly, without any legal hassles.
- Personalized Approach: We understand that every client’s needs are unique. That’s why we offer custom solutions to meet your specific requirements and preferences. Whether you’re looking to build a new garden wall or improve your existing landscape, we’re here to help you bring your vision to life.
Building a garden wall is more than just a construction project; it’s an opportunity to transform your outdoor space into a functional and beautiful extension of your home. With MAS Landscaping and Snow Removal, you can be confident that every detail is handled with professional care and expertise.
Ready to start your garden wall project? Visit our Retaining Wall Installation page to learn more about how we can help you create the perfect outdoor space. Let us bring your vision to life with a garden wall that improves both the aesthetics and functionality of your property.
