Grass Installation: Top 2024 Tips for a Beautiful Lawn
Grass installation is a crucial step for anyone looking to transform their outdoor space into a lush, inviting environment. Whether you’re a homeowner or a business owner in the Greater Boston area, having a beautiful lawn not only improves the curb appeal but also provides a functional space for relaxation and recreation. Imagine stepping outside to a green paradise that’s not only visually appealing but also serves as a safe and comfortable outdoor area for your family or employees.
- Types of Grass Installation:
- Sod: Offers immediate greenery.
- Seed: Cost-effective but takes time.
- Hydroseeding: Quick for large areas.
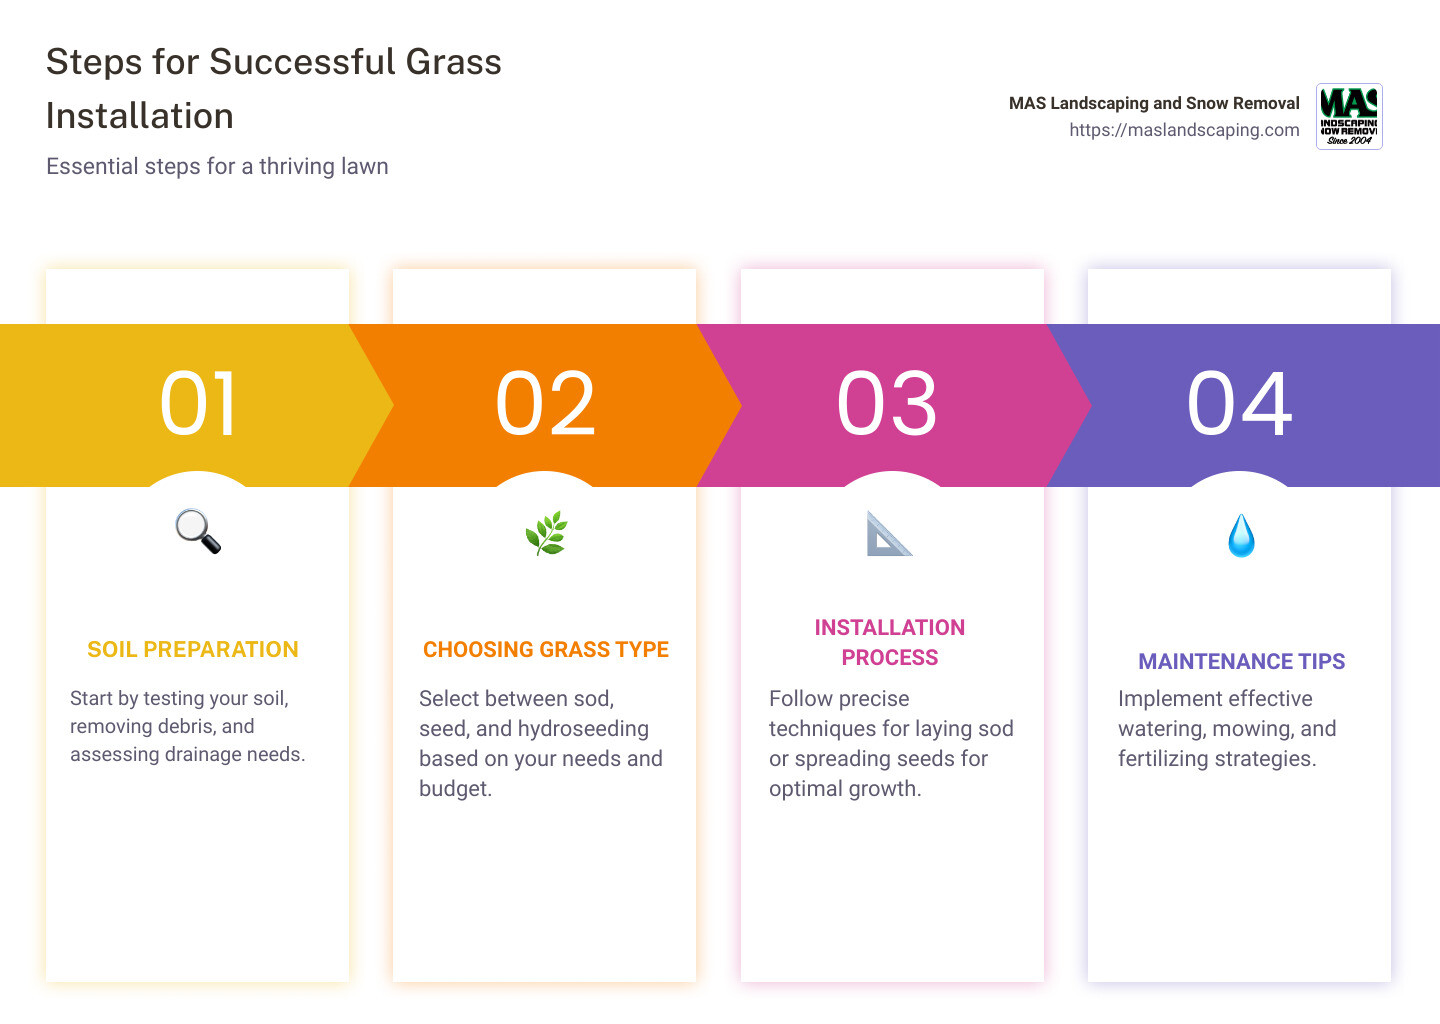
Preparation is key to successful grass installation. Proper groundwork ensures that your new lawn will not only look great but will also thrive for years to come. Preparing the soil, choosing the right grass type, and understanding the installation process are critical steps.
Poor preparation can lead to common pitfalls such as uneven surfaces, drainage issues, or improper growth, all of which can compromise the beauty and functionality of your lawn. Start by testing your soil, removing debris, and considering the drainage and leveling needs of your space.
Understanding Grass Installation Options
When it comes to grass installation, you have three main options: sod, seed, and hydroseeding. Each method has its pros and cons, and the best choice depends on your budget, timeline, and specific lawn goals.
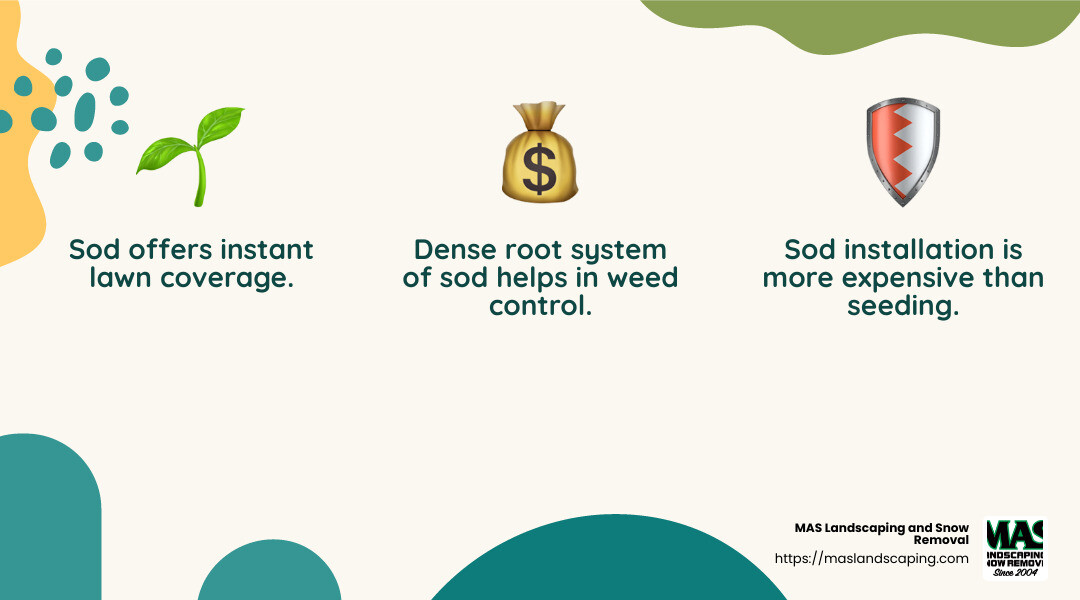
Sod: Instant Greenery
If you want a lush lawn right away, sod is the go-to option. It consists of pre-grown grass that you roll out like a carpet.
Pros:
– Immediate Results: As soon as it’s laid, your yard looks like a green oasis.
– Weed Control: Sod has a dense root system, which makes it difficult for weeds to invade.
– Easy Maintenance: Once established, sod is easier to maintain than seeded lawns.
Cons:
– Higher Cost: Sod is more expensive upfront than seeding.
– Disease Susceptibility: It can be more prone to disease compared to a seeded lawn.
Seed: Customizable and Cost-Effective
Seeding is a traditional and budget-friendly way to grow a lawn.
Pros:
– Cost-Effective: Seeding costs less than sod.
– Variety: You can choose specific grass types that suit your soil and climate.
– DIY Friendly: Many homeowners opt to seed their lawns themselves.
Cons:
– Time-Consuming: It takes longer for a seeded lawn to establish.
– Weed Growth: Ideal conditions for grass seeds also favor weeds.
Hydroseeding: Speedy for Large Areas
Hydroseeding is a technique where a slurry of seeds, mulch, and nutrients is sprayed onto the soil.
Pros:
– Fast Application: Ideal for quickly covering large areas.
– Better Germination: The mulch retains moisture and warmth, promoting seed growth.
– Cost-Effective for Large Areas: Cheaper than sod when covering vast spaces.
Cons:
– Requires Equipment: You need a hydroseeder, which can be rented or hired.
– Professional Help Preferred: While DIY is possible, professional application ensures even coverage.
Understanding these grass installation options helps you make an informed decision that aligns with your budget and lawn goals. Next, we’ll dive into how to prepare your soil to ensure your chosen method thrives.
Preparing Your Soil for Grass Installation
Before you dive into grass installation, preparing your soil is crucial. Think of it as laying a strong foundation for a house—without it, everything else could crumble. Let’s explore why soil testing and amendments are key to a successful lawn.
Soil Testing and Its Importance
Soil testing is like a check-up for your lawn. It tells you what nutrients your soil has and what it lacks. This includes understanding the pH levels, which affect how well your grass can absorb nutrients.
- pH Levels: Most grasses prefer a pH between 6.0 and 7.5. If your soil’s pH is off, your grass might struggle to grow. Lime can raise the pH, while sulfur can lower it.
- Nutrient Analysis: Soil tests reveal nutrient deficiencies. Key nutrients include nitrogen for growth, phosphorus for root development, and potassium for overall health.
You can test your soil using a DIY kit or hire a professional for more detailed results. Either way, knowing your soil’s health helps you make informed decisions about amendments.
Choosing the Right Soil Amendments
Once you know what your soil needs, it’s time to add amendments. These are materials that improve soil health, structure, and drainage.
- Compost: Adding a 2-inch layer of finished compost enriches your soil with organic matter, improving its structure and nutrient content. It also improves drainage and water retention.
- Sand: If your soil is heavy clay, mixing in sand can improve drainage. However, too much sand can lead to compaction, so balance is key.
- Fertilizer: Use a starter fertilizer to give your grass a nutrient boost. A slow-release formula, like an 18-24-12 blend, is ideal for new lawns.
Leveling Your Soil
Leveling the soil ensures a smooth, even surface for your new grass. Use an iron rake to knock down high spots and fill in low areas. Aim for a surface that’s about an inch below any paved surfaces, like driveways or walkways. This helps prevent runoff and ensures your lawn looks neat and even.
Preparing your soil with these steps sets the stage for a thriving lawn. Whether you choose sod, seed, or hydroseeding, a well-prepared soil base is essential for success. Next, we’ll explore how to install sod for a lush lawn.
How to Install Sod for a Lush Lawn
Measuring and Ordering Your Sod
Before you start laying sod, accurate measurement is crucial. It ensures you order the right amount and avoid unnecessary trips to the store.
- Measure Your Area: Use a measuring tape or a measuring wheel for accuracy. If your lawn is a simple rectangle, multiply the length by the width to get the square footage. For irregular shapes, break them into smaller sections, calculate each area, and add them up.
- Choose Your Sod Type: Sod comes in different varieties like Bermudagrass or St. Augustine, each suited for specific climates and sun conditions. Consider your local climate and the amount of sunlight your lawn receives.
- Order a Bit More: Always order slightly more sod than you calculated—around 5-10% extra. This accounts for cutting errors and ensures you have enough sod to cover your yard fully.
Step-by-Step Guide to Laying Sod
With your sod ordered, it’s time to lay it down. Follow these steps for a lush, green lawn.
- Preparation:
- Clear the Area: Remove any old grass, weeds, and debris. Use a rototiller to loosen the soil up to six inches deep.
- Level the Soil: Rake the soil to make it even. Fill in low spots and smooth out high areas. Your soil should sit about an inch below paved surfaces to prevent runoff.
- Dampen the Soil: Lightly water the soil. It should be moist but not soggy when you lay the sod.
- Installation:
- Start at a Straight Edge: Begin laying sod along a straight edge, like a driveway or sidewalk. Lay the first row tightly against the edge.
- Stagger the Seams: Like bricks, stagger the seams of the sod pieces. This prevents erosion and creates a stronger lawn.
- Avoid Gaps: Push the edges of the sod pieces together without overlapping them. This minimizes gaps where weeds can grow.
- Watering:
- Water Immediately: Once the sod is down, water it thoroughly. The goal is to soak the sod and the topsoil beneath it.
- Continue Watering: For the first two weeks, water the sod daily. The soil should stay moist to help the roots establish.
Laying sod is like putting together a giant puzzle. With careful measuring, preparation, and installation, you’ll have a lush lawn in no time. Next, we’ll cover maintenance tips to keep your new grass looking its best.
Grass Installation Maintenance Tips
Once your sod is in place, maintaining it is key to ensuring a healthy, vibrant lawn. Here are some essential tips for watering, mowing, and fertilizing your new grass.
Effective Watering Techniques
Watering is crucial for your sod’s success. Here’s how to do it right:
- Frequency: In the first week, water your sod daily, preferably in the morning. This helps the roots establish. By the second week, you can reduce to every other day. From the third week onward, aim for twice a week.
- Best Times: Early morning watering is best. It reduces evaporation and gives the sod time to absorb moisture before the heat of the day.
- Amount: Your goal is to provide about an inch of water per week, including rainfall. Use a soil probe to check moisture levels. The soil should be damp 3-4 inches below the surface.
Mowing and Fertilizing Your New Lawn
Proper mowing and fertilizing keep your grass healthy and strong.
- Height Adjustments: Wait until your grass is three inches tall before mowing for the first time. Cut it down to two inches. This helps establish strong roots. After that, follow the rule of thumb: never cut more than one-third of the grass’s height at a time.
- Nutrient Replenishment: About three to four weeks after installation, apply a starter fertilizer. A slow-release formula like 18-24-12 is a good choice. It replenishes nutrients lost during the initial heavy watering period.
A consistent maintenance routine will keep your lawn lush and green. Next, let’s tackle some frequently asked questions about grass installation.
Frequently Asked Questions about Grass Installation
How Much Does Grass Installation Cost?
The cost of grass installation can vary widely based on several factors. For a typical 1,000-square-foot backyard, installing sod can range from $300 to $900 if you do it yourself. Hiring professionals will double that cost. The price depends on the type of grass, the quality of the sod, and whether any soil preparation is needed. Always check for bulk discounts when ordering sod to save money.
Can I Install Grass on Unprepared Soil?
Installing grass on unprepared soil is not recommended. Proper soil preparation is crucial for the success of your new lawn. This involves removing existing grass or weeds, loosening the topsoil, and ensuring the soil has the right pH balance and nutrient levels. Skipping these steps can lead to poor root establishment and unhealthy grass. Think of it like building a house: a strong foundation is essential.
How Long Until My New Lawn Is Fully Established?
A newly installed lawn goes through several growth stages before it is fully established. For sod, you’ll start seeing solid root development within two to three weeks. By four weeks, the roots should be strong enough to support regular mowing and light foot traffic. Seeded lawns take longer, often two to three months, depending on the grass type and growing conditions. Regular watering, mowing, and fertilizing are key during this period to ensure healthy growth.
Next, we’ll explore the long-term benefits of maintaining your lawn with MAS Landscaping and Snow Removal.
Conclusion
A well-installed and maintained lawn offers long-term benefits that go beyond just aesthetics. A lush green space can increase property value, provide a serene environment for relaxation, and even improve air quality by absorbing carbon dioxide and releasing oxygen.
Grass installation is an investment that requires careful planning and execution. By understanding the different options available—whether it’s sod, seed, or hydroseeding—you can make informed decisions that best fit your needs and budget. Proper soil preparation, as we’ve discussed, is vital to ensure your new lawn thrives. Skipping steps like soil testing and amendment can lead to poor results, much like building on a shaky foundation.
At MAS Landscaping and Snow Removal, we pride ourselves on delivering exceptional lawn installation services. Our team based in Saugus, MA, is dedicated to changing your outdoor spaces into beautiful, functional areas that you can enjoy year-round. With our local expertise, we tailor our services to meet the specific needs of clients in Everett, Lynnfield, Malden, and surrounding areas, ensuring a personalized approach for every project.
If you’re considering a new lawn installation, whether DIY or professional, this guide has equipped you with the knowledge needed for success. However, if you prefer expert assistance, contact us at MAS Landscaping and Snow Removal to help bring your vision to life. We offer a commitment to quality and customer satisfaction, ensuring that your landscape not only meets but exceeds your expectations.
In conclusion, investing in a new lawn is more than just a project; it’s a step towards enhancing your home’s beauty and functionality for years to come. Let us help you create a stunning outdoor space that reflects your personal taste and lifestyle.
