




Why Paver Sand Sealer Is the Key to a Long-Lasting Patio
Paver sand sealer is a protective coating that does two jobs at once: it seals the surface of your pavers and locks the sand in the joints between them. Here’s a quick overview of what it does and why it matters:
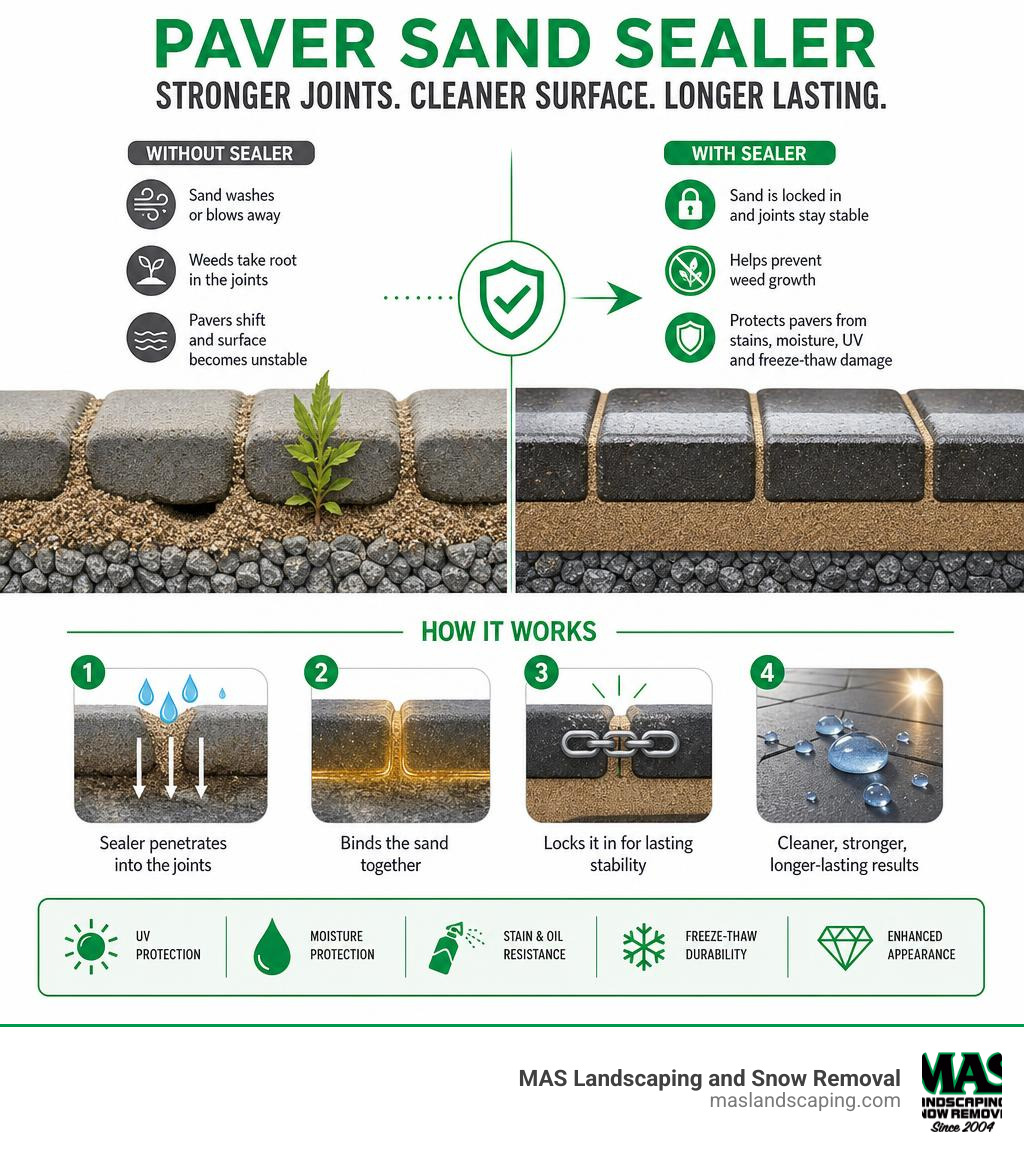
- Stabilizes joint sand so it doesn’t wash or blow away
- Prevents weeds from taking root between pavers
- Protects against stains, oil, UV fading, and moisture
- Enhances appearance — available in natural/matte or wet-look gloss finishes
- Extends paver life by reducing erosion and freeze-thaw damage
If you have a paver patio, driveway, or walkway, you’ve probably noticed sand slowly disappearing from the joints over time. Wind, rain, and foot traffic all work against you. Once that sand is gone, pavers shift, weeds move in, and the whole surface becomes unstable.
That’s exactly the problem a paver sand sealer solves.
Unlike a standard paver sealer — which only protects the surface — a paver sand sealer penetrates down into the joints, binding the sand together so it stays in place. The result is a more stable, cleaner, and better-looking surface that holds up season after season, including through New England’s tough freeze-thaw winters.
Whether you’re sealing a new patio or restoring an older one, understanding how this product works will help you get the most out of your investment.
Paver sand sealer terms to learn:
What is a Paver Sand Sealer and How Does It Work?
At its core, a paver sand sealer (often called a joint stabilizer or stabilizing sealer) is a specialized liquid formula designed to penetrate both the porous surface of your paving stones and the loose sand packed in the joints between them.
When you sweep standard joint sand into your patio, it remains loose. Over time, heavy rain, wind, and even routine maintenance like leaf blowing will wash or blow that sand away. A stabilizing sealer acts as a powerful adhesive. Once applied, the liquid flows into the sand joints, coating the individual sand grains. As it cures, it binds those grains together into a semi-flexible, durable matrix.
This process of sand stabilization is crucial. It transforms loose sand into a barrier that resists erosion and prevents weed seeds from finding a home in the joints. It also stops ants and other pests from excavating the sand to build nests. Furthermore, by locking the sand in place, the sealer ensures the interlocking design of your pavers remains structurally sound, preventing shifting and sagging under heavy foot or vehicular traffic.
For homeowners in Saugus, Lynnfield, and across the Middlesex and Essex county areas, this protection is especially vital. Our harsh New England winters bring moisture that seeps into unsealed joints, freezes, expands by about 10%, and causes severe shifting. A high-quality sealer prevents water from pooling in those joints in the first place.
For more details on how these sealers protect your hardscape, check out our guide on concrete paver sealers.
How It Differs from Regular Sealer and Polymeric Sand
It is easy to get confused by the terminology of patio restoration. You might hear terms like “regular paver sealer,” “joint stabilizer,” and “polymeric sand” thrown around. Here is how they break down:
- Regular Paver Sealer: This product is designed solely to protect the surface of the paving stones. It forms a protective barrier against oil, grease, stains, and UV rays, but it does not have the adhesive properties required to bind joint sand. If you apply a regular surface sealer, your joint sand will remain loose and vulnerable to washout.
- Polymeric Sand: This is a dry mixture of graded sand and special polymer additives. When swept into joints and misted with water, the polymers activate, hardening the sand. While highly effective, polymeric sand does not protect the paver surface itself from staining or fading.
- Paver Sand Sealer (2-in-1 Stabilizer): This liquid product does both jobs. It is applied over the entire patio—surface and joints alike. It seals and protects the stone surfaces while simultaneously soaking into the joints to bind the sand. It is an excellent choice for stabilizing standard joint sand without having to completely excavate and replace it with polymeric sand.
To learn more about the application process, you can read our guide on how to seal patio pavers.
Choosing the Right Paver Sand Sealer
Selecting the right sealer depends on your aesthetic preferences, the type of pavers you have, and your local climate. Sealers generally fall into different categories based on their chemical base (water-based vs. solvent-based) and their final appearance (matte vs. wet look).
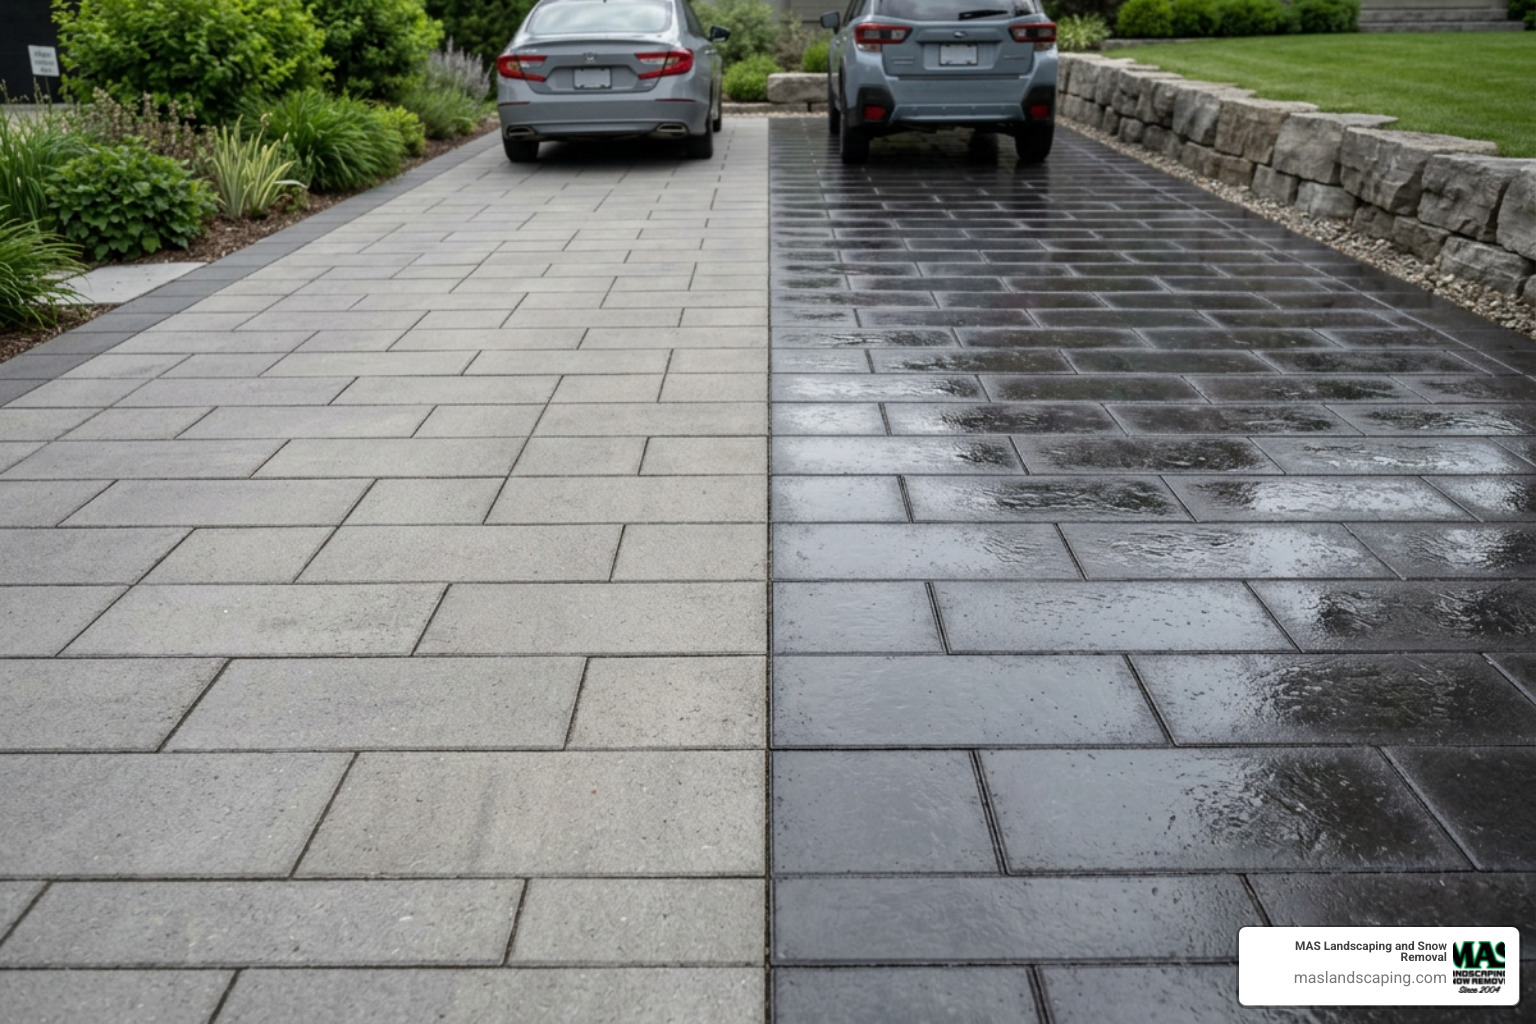
Before making a choice, it is helpful to look at the overall goals of your project. If you want a deep color enhancement, a wet-look sealer is ideal. If you prefer to keep the original, raw look of your stone, a natural matte sealer is the way to go. For more tips on selecting the perfect product, read our wet look paver sealer guide.
Water-Based vs. Solvent-Based Paver Sand Sealer
The chemical base of your sealer impacts everything from environmental safety and smell to how deeply the product penetrates the surface.
- Water-Based Sealers: These are modern, eco-friendly formulations. They have very low Volatile Organic Compound (VOC) levels, meaning they do not emit harsh, toxic chemical fumes during application. They typically apply with a milky white appearance (which helps you see where you have already applied it) and dry completely clear. Cleanup is easy, requiring only soap and water. High-quality options like the Techniseal Natural Look Joint Stabilizer offer excellent sand stabilization while preserving the natural look of the pavers.
- Solvent-Based Sealers: These are traditional, chemical-heavy sealers. They use solvents to carry the acrylic polymers deep into the concrete or stone. They have higher VOC levels, a strong odor during application, and require mineral spirits or white spirit for cleanup. However, they excel in penetration depth and often provide a highly durable, glossier finish.
Wet Look vs. Natural Look Finishes
Once you choose the chemical base, you need to decide on the final look.
- Wet Look Finishes: These sealers enrich the natural colors of your pavers, making them look vibrant and saturated—just like they do right after a light rain. They are available in semi-gloss or high-gloss finishes. They are perfect for older, faded pavers that need a visual boost.
- Natural/Matte Look Finishes: If you love the understated, earthy look of your natural stone or concrete pavers, a natural look sealer is your best bet. It provides all the joint stabilization and stain resistance of a gloss sealer but dries completely flat, leaving the color and texture of the pavers unchanged.
For a deeper dive into non-glossy protective options, read our article about natural look paver sealers.
Step-by-Step Guide: How to Apply Paver Sand Sealer
Applying a paver sand sealer is a highly rewarding DIY project, but it requires patience and strict attention to detail. Cutting corners—especially during the cleaning phase—will lead to trapped dirt, white hazing, or joint failure.

For a complete overview of the process from start to finish, read our step-by-step guide to sealing patio pavers.
Preparing the Paver Surface and Joints
Preparation is 90% of the job. If you seal over dirty pavers, you will permanently lock in those stains.
- Clear the Area: Remove all furniture, grills, and potted plants from the patio.
- Weed and Debris Removal: Pull any weeds growing in the joints. Use a stiff-bristled broom to sweep away loose dirt, leaves, and organic debris.
- Deep Cleaning: Wash the surface thoroughly. If you have oil stains, tire marks, or efflorescence (a white, powdery salt buildup common on concrete), use a specialized cleaner. For advice on selecting the right products, check out how to choose the best driveway paver cleaner.
- Pressure Washing: Carefully pressure wash the patio. Keep the nozzle at an angle and at least 12 inches from the surface to avoid washing out too much joint sand.
- Drying Time: Allow the patio to dry completely. This usually takes 24 to 48 hours depending on the weather. The sand must be dry to its full depth before sealing.
- Sand Replenishment: If your sand joints are low, sweep in new joint sand. The sand level should sit approximately 1/8 inch below the top edge of the pavers. Sweep away all excess sand from the surface of the pavers before sealing; any stray sand left on top will be permanently glued to the paver face.
How to Apply Paver Sand Sealer for Best Results
Once your surface is clean, dry, and sanded, you are ready to apply the sealer.
- Check the Weather: Ensure there is no rain in the forecast for at least 24 hours (ideally 48 hours). The temperature should be between 50°F and 90°F.
- Choose Your Tools: You can use a roller, a squeegee, or a low-pressure pump sprayer. A sprayer is highly recommended for even application.
- Flood the Joints: If using a sprayer, apply the sealer liberally to flood the surface and the sand joints. This ensures the sealer penetrates deep into the sand to bind it. According to the H&C Ultrapaver Water-Based Gloss Sealer PDS, you should flood the joints to ensure proper stabilization.
- Squeegee Excess: Use a foam squeegee to push excess sealer off the paver faces and into the joints. This prevents the sealer from puddling on top of the pavers, which can cause sticky, white, or uneven spots.
- Let It Dry: Standard water-based sealers are dry to the touch in about 1 to 2 hours. Keep children and pets off the surface for at least 4 hours. Allow 24 hours for light foot traffic and 48 to 72 hours before parking vehicles on the surface.
For high-quality results, popular products like Glaze ‘N Seal 1 Gal. Clear Paver Sealer and Sand Stabilizer E153 or Glaze ‘N Seal 5 Gal. Clear Paver Sealer and Sand Stabilizer 154 are widely trusted by professionals and DIYers alike.
Longevity, Maintenance, and Cost of Sealing Pavers
How long your sealer lasts depends heavily on wear and tear, sun exposure, and local weather conditions. In Massachusetts, our freezing winters and hot, humid summers put outdoor hardscapes through a lot of stress.
Generally, water-based sealers last between 2 to 3 years before requiring a maintenance coat, while high-quality solvent-based sealers can last 3 to 5 years.
To maximize the life of your sealed patio:
- Sweep regularly to prevent organic debris like leaves and pine needles from decomposing and staining the surface.
- Wash gently using a garden hose or low-pressure washer (under 1200 PSI). Avoid high-pressure settings that can crack the cured sealer.
- Avoid rock salt in the winter. Instead, use calcium chloride-based de-icers, which are much gentler on sealed concrete and stone surfaces.
For a complete breakdown of whether sealing is right for your property, read our article: Should you seal your paver patio?
Average Costs of Paver Sealing
When planning your hardscape project, it is helpful to understand the budget required. Below is a comparison table outlining average costs, lifespans, and coverage rates for common sealer types.
| Sealer Type | Average Lifespan | Coverage Rate (per gallon) | Average Cost Range (per sq. ft.)* |
|---|---|---|---|
| Water-Based Matte | 2 – 3 Years | 100 – 150 sq. ft. | $1.50 – $3.50 |
| Water-Based Gloss | 2 – 3 Years | 100 – 150 sq. ft. | $1.75 – $4.00 |
| Solvent-Based Acrylic | 3 – 5 Years | 150 – 250 sq. ft. | $2.50 – $6.00 |
*Note: These are average estimated costs based on national internet data and do not represent actual pricing for MAS Landscaping services. Actual project costs vary based on patio layout, joint width, cleaning requirements, and regional material costs.
If you are trying to decide between tackling this project yourself or hiring a local team, you can read our comprehensive guide on choosing the best paver sealer.
Frequently Asked Questions about Paver Sand Sealer
How long does paver sand sealer take to dry?
Most high-quality water-based sealers dry to the touch within 1 to 2 hours under warm, dry conditions (77°F and 50% relative humidity). However, you should wait at least 4 hours before letting pets or children walk on the patio. Allow 24 hours for normal foot traffic and a full 48 to 72 hours before subjecting the surface to heavy vehicular traffic.
Can I apply paver sand sealer over damp sand?
No! This is one of the most common causes of sealer failure. If you apply sealer over damp sand or wet pavers, you will trap moisture underneath the protective acrylic film. As the moisture tries to evaporate, it will create a cloudy, white haze beneath the sealer surface. Always wait at least 24 hours (or 48 hours after heavy power washing) for the joints to dry completely to their full depth.
What are the most common mistakes to avoid when sealing?
- Over-application: Applying too much product or letting it puddle in low spots will result in sticky, peeling, or white, cloudy patches.
- Improper cleaning: Sealing over dirt, mold, or efflorescence locks those stains in permanently.
- Sealing in direct, hot sunlight: Applying sealer on hot pavers (above 90°F) causes the product to dry too quickly, preventing it from penetrating the joints and leading to surface bubbles.
For more valuable tips before starting your project, read our guide on 10 things to know before paver sealing.
Conclusion
Protecting your hardscape investment requires the right products, proper preparation, and a little patience. By using a high-quality paver sand sealer, you can enjoy a stable, weed-free, and stain-resistant patio or walkway that enhances your home’s curb appeal for years to come.
While sealing can be a rewarding DIY project, achieving professional-grade results requires specialized equipment and experience—especially when handling deep cleaning, efflorescence removal, and precise joint flooding.
If you would rather spend your weekend relaxing on your patio instead of scrubbing it, let us handle the hard work. At MAS Landscaping and Snow Removal, we provide expert hardscaping, cleaning, and sealing services throughout Saugus, Everett, Malden, Lynnfield, and the surrounding Massachusetts communities.
Contact us today to schedule a professional patio installation or restoration quote!
