Lawn Installation: 5 Flawless Steps
Why Proper Lawn Installation Matters for Your Home
Lawn installation means creating a brand-new grass surface with sod, seed, or hydroseed. Choosing the right method – and installing it correctly – is what separates a picture-perfect yard from one that struggles for years.
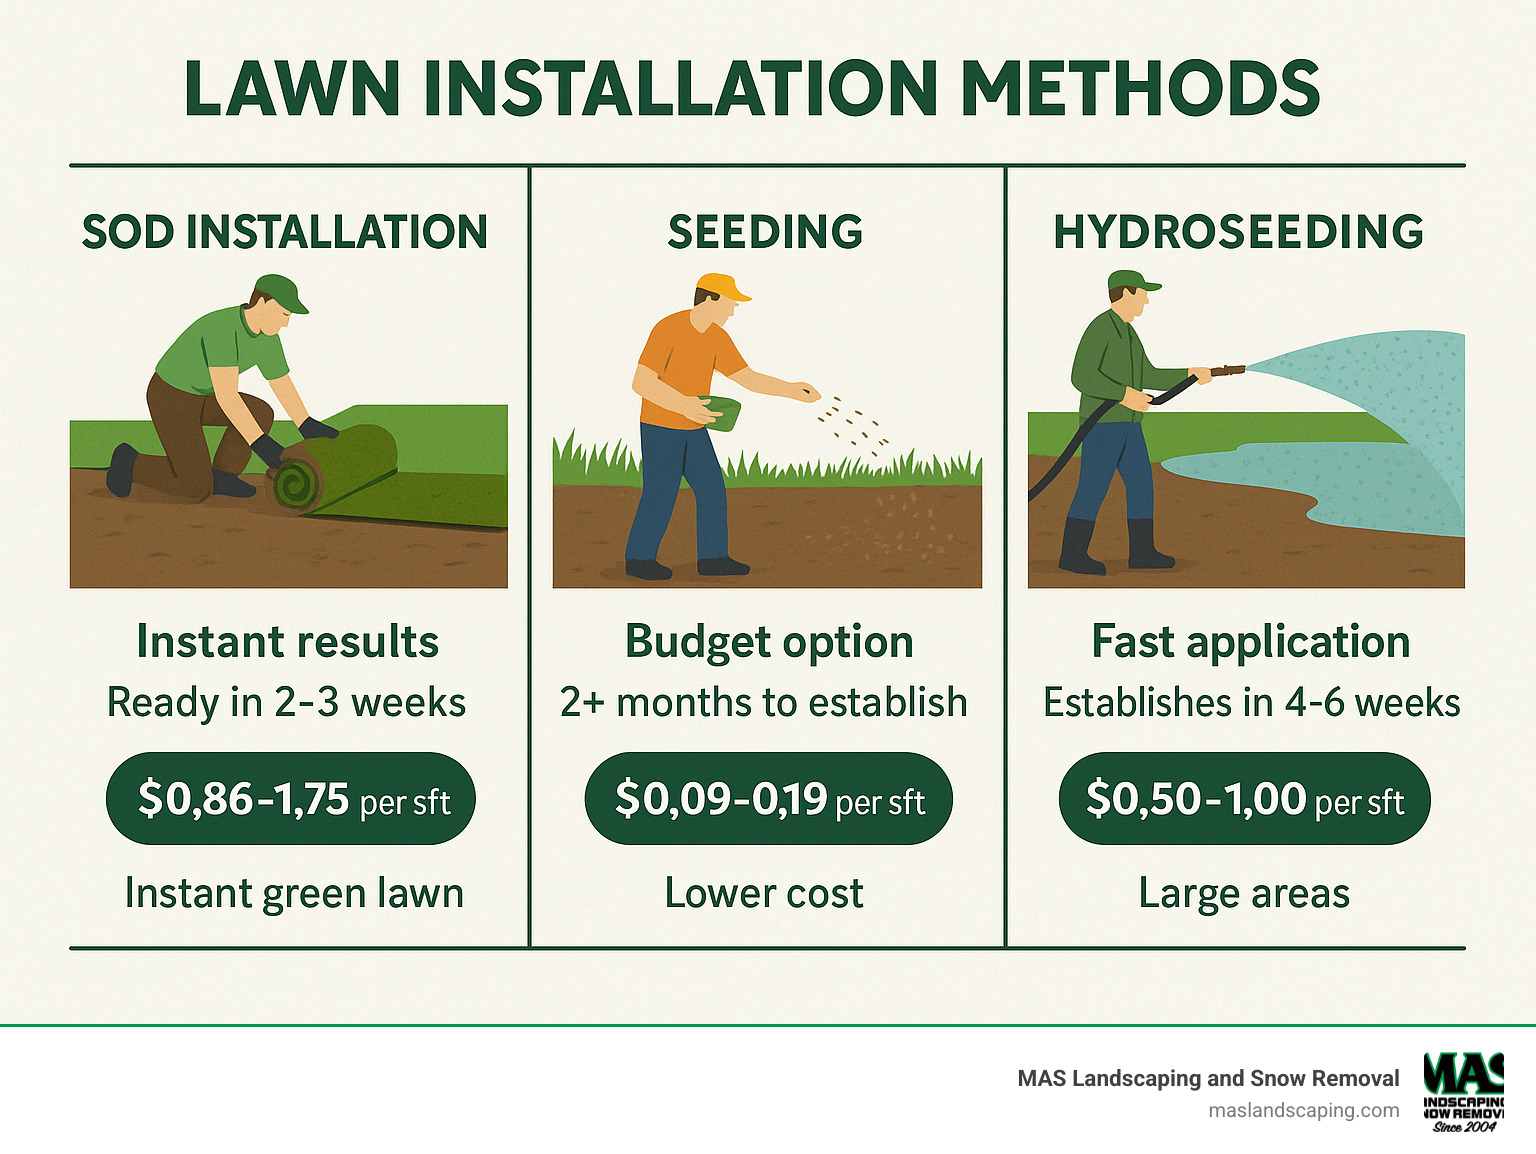
Quick snapshot of each option:
- Sod: $0.86–$1.75 per sq ft (national average), usable in 2–3 weeks
- Seeding: $0.09–$0.19 per sq ft, needs 2 + months to fill in
- Hydroseeding: $0.50–$1.00 per sq ft, covers big areas fast, ready in 4–6 weeks
Done properly, new turf can raise a home’s value by 15 – 20 %, cut summertime soil temperatures by up to 30 °F, and supply enough oxygen for a family of four from just 50 sq ft of grass.
The secret? Solid prep work: healthy soil, the right grass for our Massachusetts climate, and careful early-stage care. Miss one of those steps and even premium sod will under-perform.
Step 1: Planning Your Perfect Lawn
Successful lawn installation begins long before the first seed is cast or the first roll of sod is laid. A thoughtful plan that matches grass type, timing, and site conditions to your goals is the foundation of a durable, beautiful lawn.
Pick the Right Grass
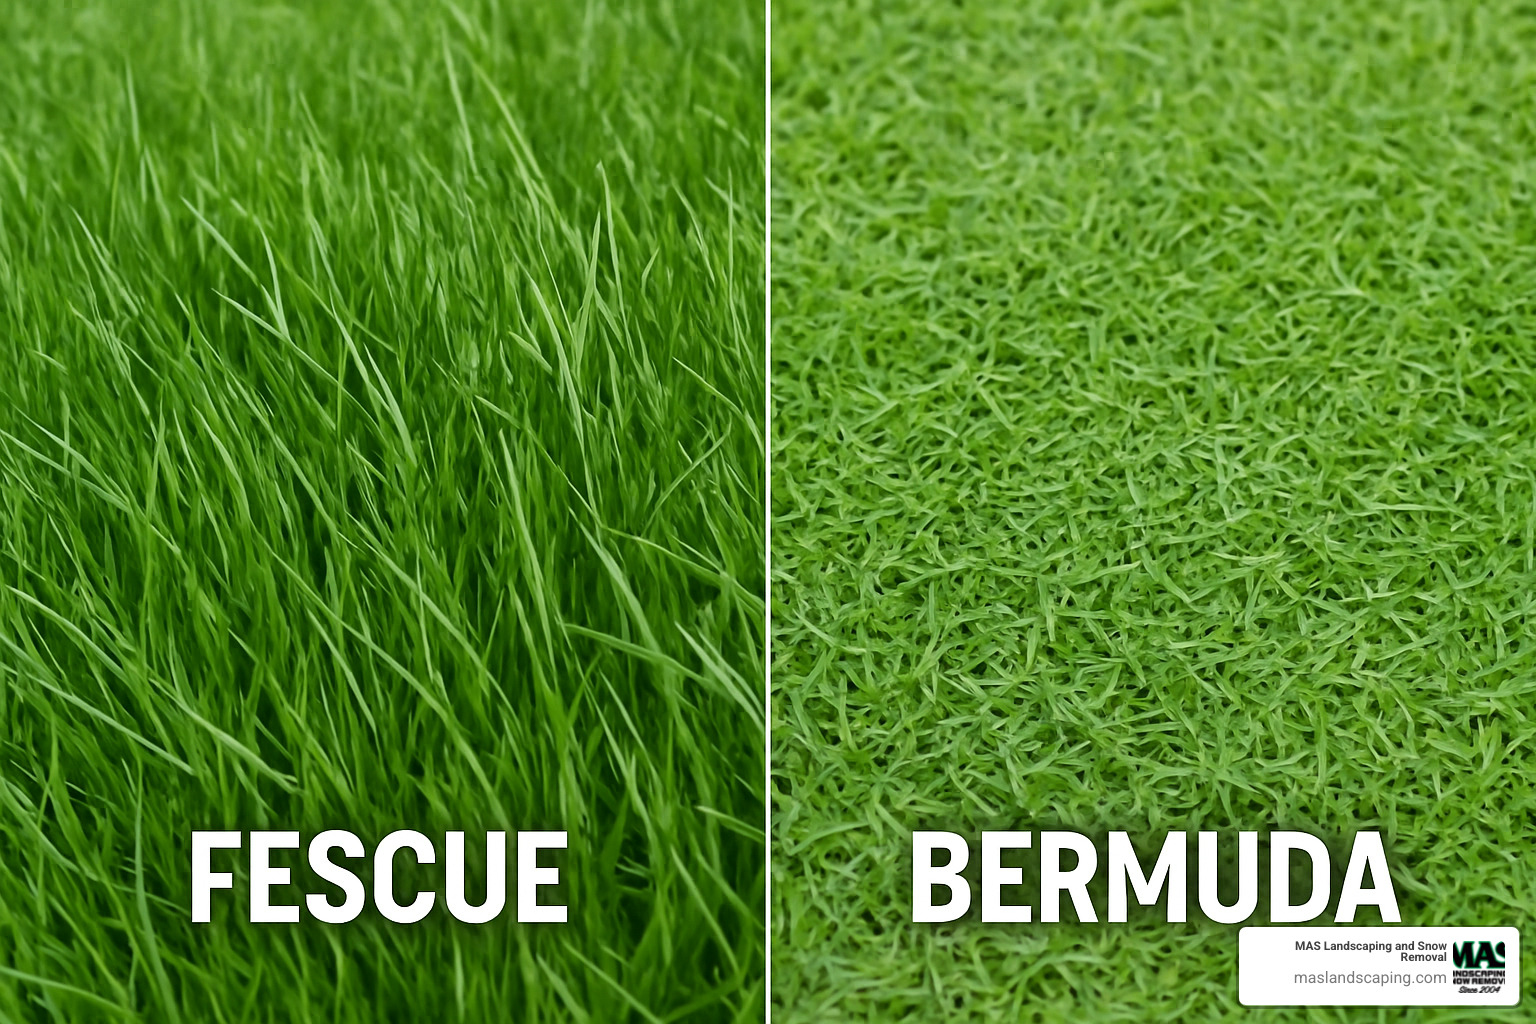
For Saugus-area lawns, where winters are cold and summers can be warm and humid, cool-season grass mixes are the undisputed champions. Each type offers unique strengths:
- Kentucky bluegrass: This is the classic, picture-perfect lawn grass. It boasts a rich, dark green color and a lush feel. It spreads via underground stems called rhizomes, allowing it to self-repair from minor damage. However, it requires full sun and consistent watering to thrive.
- Tall fescue: The workhorse of New England lawns. Its deep root system makes it the most drought-tolerant and rugged of the cool-season grasses. It stands up well to foot traffic from kids and pets, making it an excellent choice for active families.
- Perennial ryegrass: Known for its rapid germination, perennial ryegrass is often included in seed mixes to provide quick ground cover and erosion control. It has a fine texture and shiny blades, and it holds up well in high-traffic areas.
- Fine fescue: This is a group of grasses (including Creeping Red, Chewings, and Hard Fescue) that are the top performers in shady, low-maintenance areas. They have very fine, needle-like blades and require less water and fertilizer than other types.
Warm-season choices like Bermuda, Zoysia, and Centipede grass cannot survive our long, cold winters and will not create a sustainable lawn in Massachusetts.
More details: grass installation.
Assess Your Site Conditions
Before choosing a grass blend, take a walk around your property. How much sun does the area get? Is it full sun (6+ hours), partial shade (4-6 hours), or deep shade (less than 4 hours)? Is the area for high-traffic play or just for show? Answering these questions will help you or your landscape professional select a seed mix perfectly custom to your yard’s specific needs.
Best Planting Windows
Timing is critical for giving your new lawn a strong start.
- Early fall (late Aug – mid-Sep): This is the gold standard. The soil is still warm from the summer, encouraging rapid germination, while the cooler air temperatures reduce stress on the young grass. Weed competition is also significantly lower in the fall.
- Late spring (Apr – May): Spring planting is a viable second option. You must wait until soil temperatures consistently reach 60°F. The main challenge is that the young lawn will face the stress of summer heat and potential drought soon after establishing, requiring more diligent watering.
Avoid installing a lawn in the middle of summer or too late in the fall, as extreme heat or an early frost can be fatal to new grass.
Soil temperature tips: How do you install a new lawn?.
Step 2: Preparing the Ground for a Flawless Start
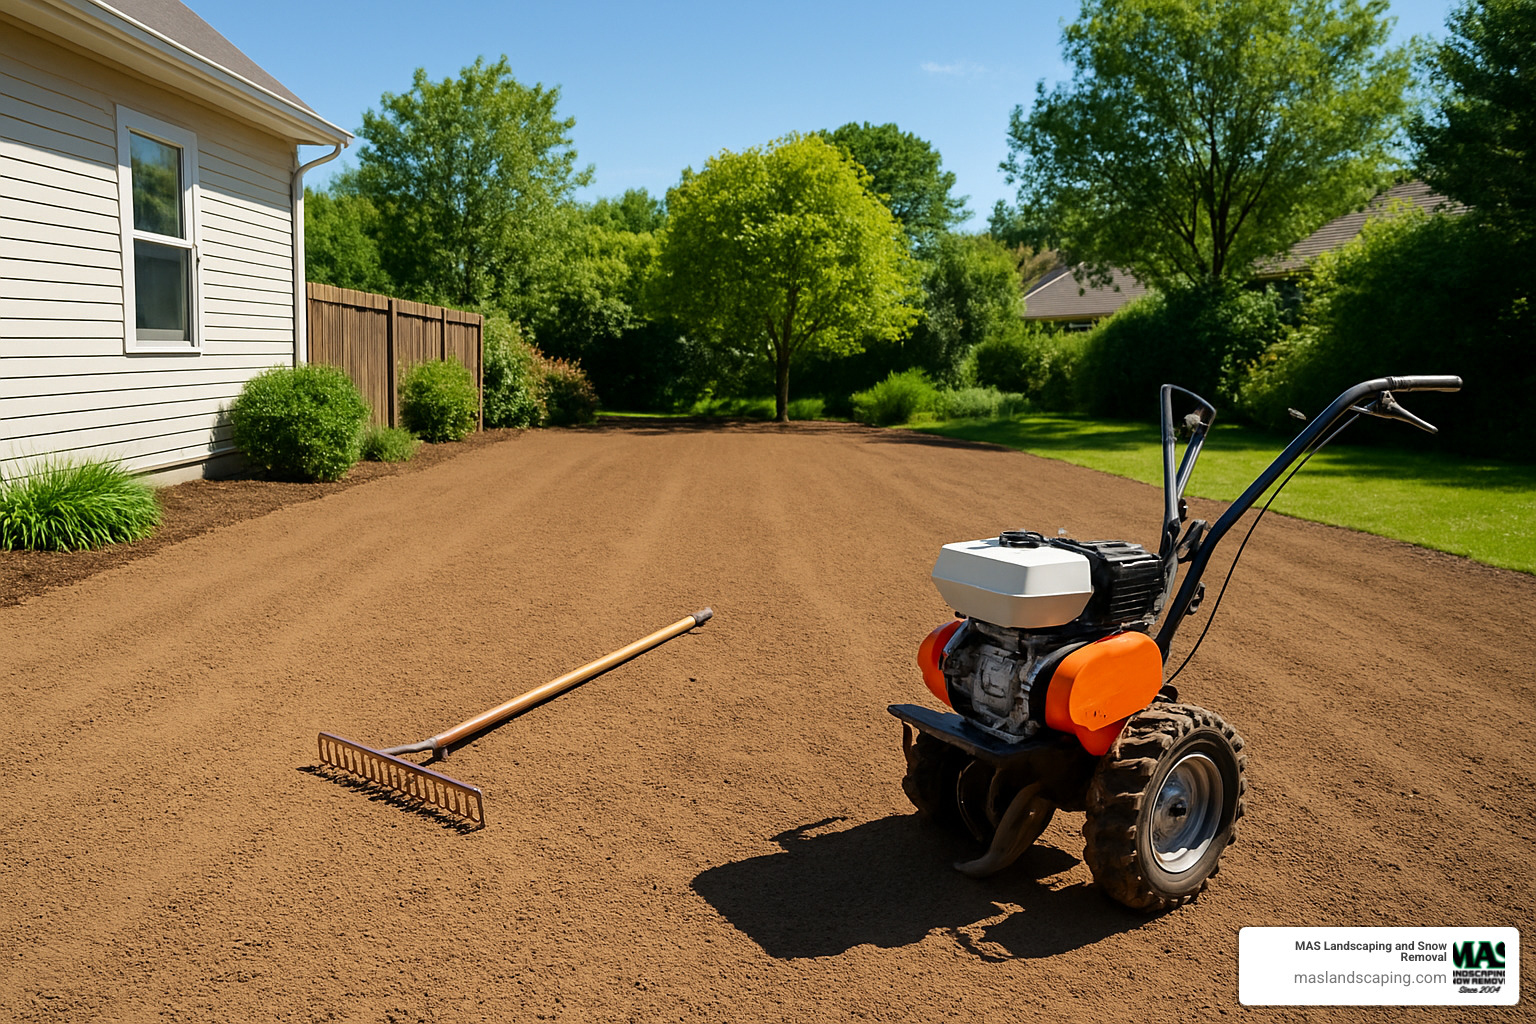
Great lawns are built from the ground up. The effort you invest in soil preparation will pay dividends for years to come, resulting in a healthier, more resilient turf that requires less intervention later on.
- Strip the site. The first step is to create a clean slate. All existing vegetation—old, patchy grass, stubborn weeds, and moss—must be completely removed. This prevents old problems from competing with your new lawn. For large areas, renting a sod cutter is the most efficient method. For smaller patches, a sharp spade or grub hoe will work. Be sure to also clear the area of any rocks, roots, and other debris.
- Test the soil. Don’t guess what your soil needs. A simple $12–$30 DIY soil test kit from a garden center will reveal your soil’s pH level and any major nutrient deficiencies. Most Massachusetts soils tend to be acidic, and grass thrives in a slightly acidic to neutral pH of 6.0-7.0. If the pH is outside this range, the grass roots can’t effectively absorb nutrients, no matter how much you fertilize.
- Amend. Based on your soil test, amend the soil to create an ideal growing medium. For acidic soil, you’ll likely need to add pelletized limestone to raise the pH. To improve structure, drainage, and microbial life in any soil, incorporate 2-3 inches of high-quality compost. Finally, spread a 3-4 inch layer of screened topsoil. This gives new roots a deep, unobstructed place to grow, which is crucial for drought resistance and overall health.
- Grade. Proper grading is essential for drainage. The ground should be sloped gently away from your home’s foundation at a rate of 1-2% (a drop of 1-2 feet for every 100 feet of distance). This prevents water from pooling near your house or creating soggy, unusable spots in the yard. After establishing the main slope, use a landscape rake to create a smooth, even surface, breaking up any clumps of soil. The final prepared grade should sit about 1 inch below the height of any adjacent sidewalks, patios, or driveways to allow the new turf to sit flush.
Full prep walk-through: How to Prepare Ground for Sod.
Step 3: Choosing Your Lawn Installation Method
| Method | Cost Range* | Install Time | Establishment | Ideal For |
|---|---|---|---|---|
| Sod | $0.86–$1.75 / sq ft | 1–2 days | 2–3 weeks | Instant curb appeal |
| Seed | $0.09–$0.90 / sq ft | 1 day | 2–6 months | Large, budget-minded areas |
| Hydroseed | $0.50–$4.50 / sq ft | 1 day | 4–6 weeks | Slopes, erosion control |
*National averages based on internet data – not MAS Landscaping prices; high-end figures are 3 × average for reference.
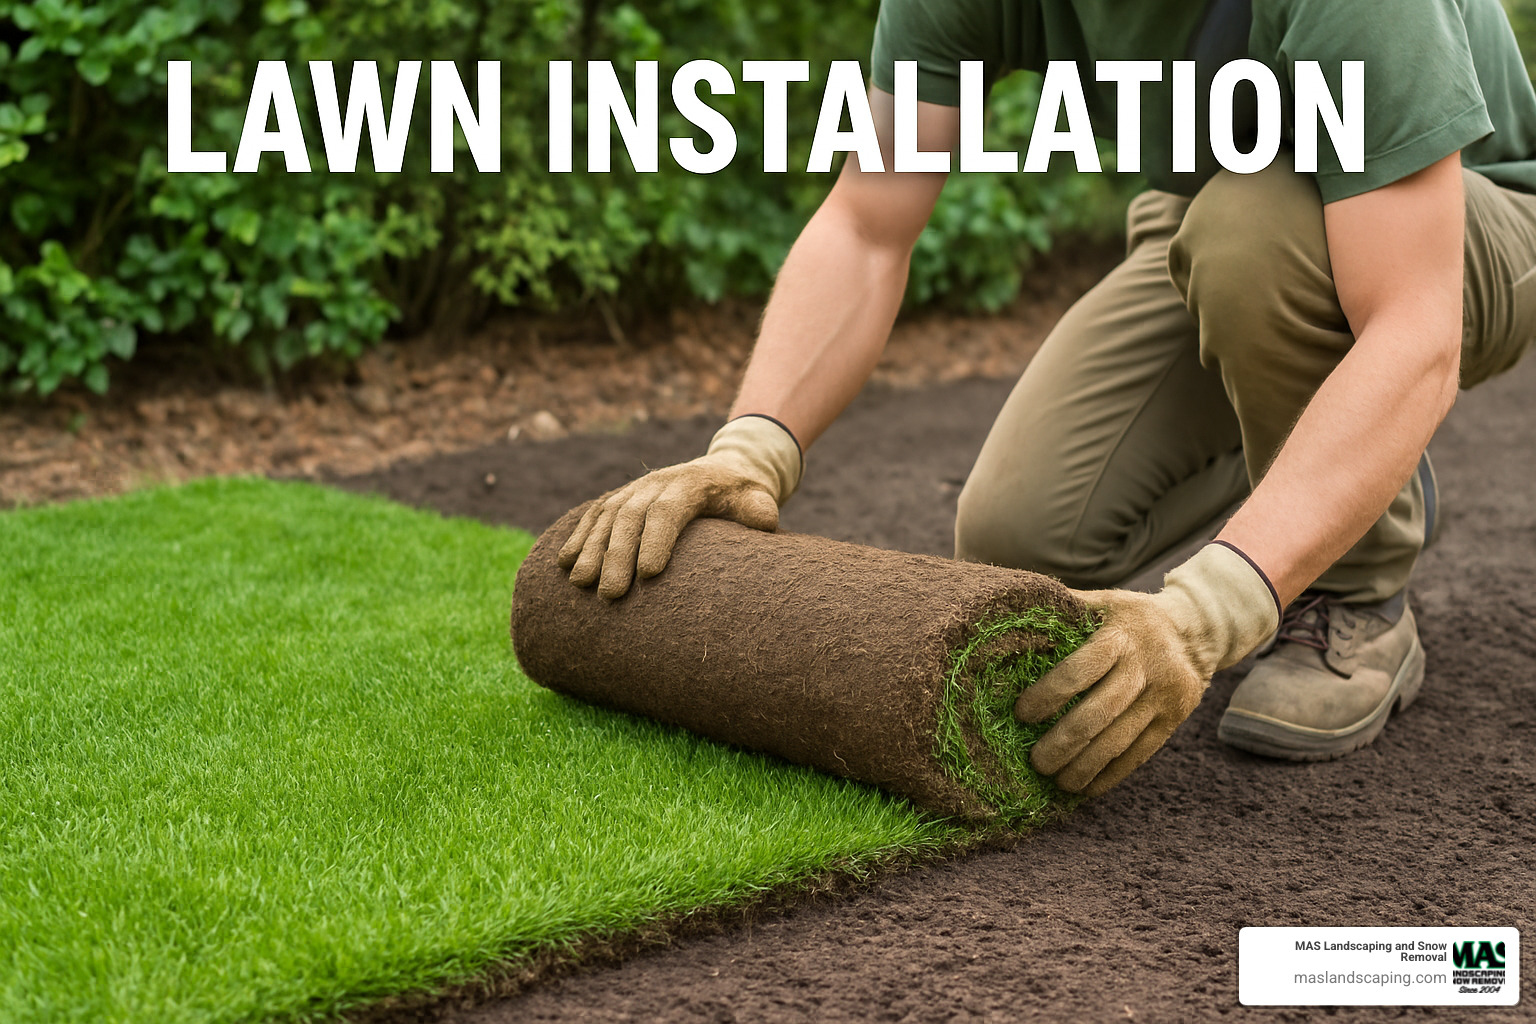
Sod – Instant Green
Sod consists of rolls of mature turf that are harvested from a farm and laid directly onto your prepared soil. It’s the fastest way to a beautiful lawn.
Pros: The primary benefit is the immediate aesthetic and functional result. It provides an instant green carpet, suppresses weeds from the start, and is highly effective for erosion control on slopes. It’s ready for light foot traffic in just a couple of weeks. Cons: The main drawback is the higher upfront material cost. Sod is also perishable and must be installed within 24-48 hours of being delivered, making it a time-sensitive project.
Key tips: Lay the sod in a staggered, brick-like pattern to hide the seams. Ensure the edges of each piece are pressed firmly together without overlapping. Water thoroughly as soon as the last roll is down to prevent the roots from drying out. More: How to Install Sod.
Seed – Budget Friendly
Traditional seeding involves broadcasting grass seed over the prepared soil. It’s the most common method for homeowners working with a tight budget.
Pros: Seeding has the lowest material cost and offers the widest variety of grass types and custom blends. Over time, a seeded lawn develops a very deep and strong root system because it has grown in place since germination. Cons: Patience is a virtue with seeding. It can take a full season or more to achieve a dense, mature stand of grass. During this time, the lawn is vulnerable to weed invasion, washout from heavy rain, and being eaten by birds. It also requires consistent, light watering for several weeks.
Spread seed evenly with a broadcast spreader, rake it in lightly to ensure good seed-to-soil contact, and cover with a thin layer of straw or peat moss to retain moisture and deter birds.
Hydroseed – Fast Coverage for Big Yards
Hydroseeding is a hybrid method where a slurry containing seed, water, fertilizer, and a protective fiber mulch is sprayed onto the soil. It’s a favorite for large residential properties and commercial sites.
The mulch (often a green-dyed wood or paper fiber) acts as a mini-greenhouse for each seed, holding moisture, protecting it from the sun, and binding it to the soil. A tackifier in the mix makes it stick to slopes, providing excellent erosion control. Establishment time is a happy medium between seed and sod, with a usable lawn ready in about 4-6 weeks.
Step 4: Understanding Lawn Installation Costs
Project price depends on yard size, prep work, and method chosen. Numbers below are national averages pulled from online sources – not MAS Landscaping quotes.
Ballpark Totals by Method
- Sod: $0.86–$7.50 / sq ft installed (average home spends ≈ $2,000)
- Seed: $0.09–$0.90 / sq ft (typical projects $700–$1,800)
- Hydroseed: $0.50–$4.50 / sq ft (around $1,500 on a mid-size yard)
Extra Line Items to Remember
- Old lawn removal: $0.88–$6.00 / sq ft
- Topsoil: $12–$225 per cubic yd
- Grading: $1–$3 / sq ft
- Sprinkler system: $2,000–$18,000
- Tool rentals (DIY): $330–$1,260
Get figures custom to your property here: New Lawn Installation Cost.
Step 5: Caring for Your Newly Installed Lawn
Your work isn’t over once the grass is down. The first month of care is the most critical period in your lawn’s life and will determine its long-term success.
Water Schedule
Proper watering is non-negotiable for a new lawn. The goal is to keep the root zone consistently moist but not waterlogged. Water in the early morning to minimize evaporation and reduce the risk of fungal diseases.
- Sod: For the first week, water lightly 3-4 times per day for just 5-10 minutes each time. This keeps the sod itself from drying out. For the second week (days 8-14), reduce watering to twice daily but for longer periods (15-20 minutes) to encourage roots to grow down into the soil. For weeks 3-4, water once daily. After week 4, you can transition to a mature lawn schedule of deep, infrequent watering 2-3 times per week.
- Seed: The key is to keep the top 1-2 inches of soil constantly moist until the grass is well-established (typically 6-8 weeks). This usually means light watering 3-4 times daily in the beginning. You must not let the seeds dry out once they have started to germinate. As the grass grows taller, you can gradually taper to deeper, less-frequent watering sessions.
First Mow & Fertilizer
Your new lawn’s first haircut is a major milestone.
Mow when the grass reaches about 3 inches in height (this takes about 3 weeks for sod and 4-6 weeks for seed). Make sure your mower blade is very sharp to ensure a clean cut that doesn’t tear the young grass blades. As a rule, never remove more than one-third of the blade height in a single mowing.
For a seeded lawn, a starter fertilizer should be applied at the time of planting. For sod, the turf already has some nutrients, so wait about 4-6 weeks before the first feeding. After that, feed your new lawn every 6-8 weeks throughout the growing season to provide the nutrients it needs to mature.
Best fertilizer tips: Best Fertilizer for New Sod.
Managing Weeds and Foot Traffic
Keep all foot traffic, including pets, off the new lawn as much as possible for the first month. For seeded lawns, this period may need to be even longer. Any pressure can compact the soil and damage fragile new roots and shoots. Weeds will inevitably appear, especially in a seeded lawn. Hand-pulling is the best option initially, as herbicides can harm new grass. A thick, healthy lawn is the best long-term defense against weeds.
DIY vs. Hiring a Professional
Deciding whether to tackle lawn installation yourself or hire a professional is a key decision that balances cost, time, and the desired quality of the final result.
Going DIY
Pros: The most obvious advantage is the potential for lower upfront costs, as you are only paying for materials and tool rentals, not labor. There is also a sense of personal satisfaction that comes from completing a major home improvement project yourself.
Cons: Do not underestimate the challenge. A proper lawn installation is a physically demanding, multi-day project that involves heavy lifting and long hours. Renting the necessary equipment (like a sod cutter, tiller, and spreader) can cost between $330–$1,260. The biggest risk, however, is that of rookie mistakes. Improper grading can lead to a lumpy, uneven lawn with drainage problems. Uneven seed application results in a patchy look. Mis-timing the project can lead to failure. Fixing these mistakes often costs more in the long run than hiring a pro from the start.
Bringing in MAS Landscaping
When you partner with a professional crew, you’re investing in expertise and peace of mind. Our teams at MAS Landscaping arrive with commercial-grade equipment that makes short work of soil preparation and installation. We have deep, practical knowledge of North-Shore soils and microclimates, ensuring we select the right grass blend and soil amendments for your specific property in Saugus, Melrose, or Lynnfield. What might take you two full, exhausting weekends, our crew can often complete in a single day. Most importantly, we stand behind our work, leaving you with a guaranteed, professional result without the hassle or risk.
Learn more: Landscaping Services Near Me.
Frequently Asked Questions about Lawn Installation
How long before I can use my new lawn?
- Sod: You can allow light foot traffic (like walking to the mailbox) after about 2 weeks. Wait for 4-6 weeks before allowing regular play, pets, or heavy use. This gives the roots time to firmly knit into the soil.
- Seed: You must be more patient. Keep traffic to an absolute minimum for the first 2-3 months. A seeded lawn won’t be ready for heavy play or regular activity until it has gone through a full growing season.
Should I add topsoil before sod?
Absolutely, yes. This is one of the most critical steps for long-term success. A 3-4 inch layer of quality, screened topsoil or a compost blend provides a loose, nutrient-rich medium for the new sod roots to dive deep into. Skipping this step and laying sod on hard, compacted ground is a recipe for a shallow-rooted lawn that will struggle with heat and drought.
Is seed really cheaper than sod?
Upfront, the material cost for seed is significantly lower, starting around $0.09 / sq ft versus $0.86 / sq ft for sod (based on national averages). However, the total project cost difference narrows when you factor in the intensive watering, necessary overseeding to fill in patches, and diligent weed management required for a new seed lawn. For many homeowners, the instant results, higher success rate, and immediate weed suppression of sod make it worth the premium investment.
Can I install a new lawn over my old, patchy one?
While it might seem like an easy shortcut, it’s not recommended. Laying new sod or seed over an existing lawn will lead to poor root-to-soil contact, preventing the new grass from establishing. The old, unhealthy grass and weeds will eventually grow through, competing with your new lawn for water and nutrients and reintroducing the very problems you were trying to solve. Proper site stripping is essential.
How do I know if my new sod is rooting correctly?
You can perform a simple “tug test.” After about 7-10 days, go to a corner of a sod roll and gently tug upward on the grass. If you feel resistance, it means the roots are beginning to anchor into the soil below. If the piece lifts up easily with no resistance, it needs more time and consistent watering.
Conclusion: Your Dream Lawn Awaits

A thriving lawn boosts property value, cools the landscape, and gives your family a fresh outdoor room. By planning carefully, preparing soil properly, selecting the best installation method, and following a short list of early-care rules, you’ll enjoy years of healthy turf.
Need an expert touch in Everett, Lynnfield, Malden, Melrose, Medford, Revere, Chelsea, or right here in Saugus? The MAS Landscaping and Snow Removal team is ready to help. Explore our full range of landscape design services and let’s create the lawn you’ve been imagining.
